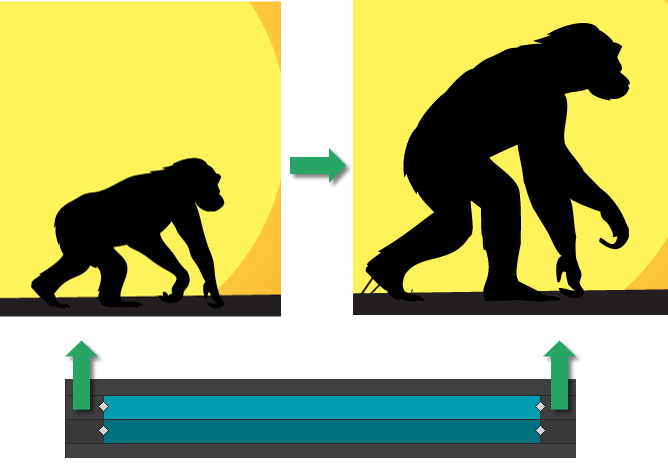
Morph Animations can be considered as a highlight in Saola Animate 3.0. This feature allows animating from one shape or freeform’s form to another through a seamless transition without coding skills required. Besides, it is possible to copy SVG paths from other vector graphic editors and paste them into the app as freeforms for further editing. Let’s take a closer look at today’s article to learn how to create morph animations. And you will be surprised with the result for sure!
This tutorial covers:
Insert Shapes and Freeforms
Basically, morph animations are applicable to shape and freeform elements only. At first, you have to insert a shape or freeform into the Canvas. Now, perform one of the following ways:
- Click the Insert Shape button > select a shape from the built-in list to insert into the scene.
- Click the Insert Freeform button > select a tool to draw, except the Line, Arrow, Double Arrow tools. Line and arrows don’t have morph animations.
- Copy (CTRL+C) SVG paths from other applications (such as Adobe Illustrator, Inkscape) and paste (CTRL+V) them directly into the Canvas.
Note: The Paste vector graphics as freeform shapes check box selected by default helps to insert SVG paths as freeforms. You can see this check box by accessing the Edit menu > Preferences > General tab > Edit section.

If you clear this check box, SVG paths are pasted as normal images, therefore, they cannot be morphed.
Create Morph Animations
After adding a shape or freeform into the Canvas, you now have two ways to create morph animations for it. So, keep reading and do any of the ways below:
- Use Auto-Keyframes
- Add Keyframes Manually
1. Use Auto-Keyframes
Using Auto-Keyframes is a great way to save your time and effort when creating morph animations. Do as follows:
Step 1: Place the Playhead at a desired timestamp.
Step 2: Turn on the Auto-Keyframe Mode or Auto-Keyframe Range button. Alternatively, press K or R on the keyboard.
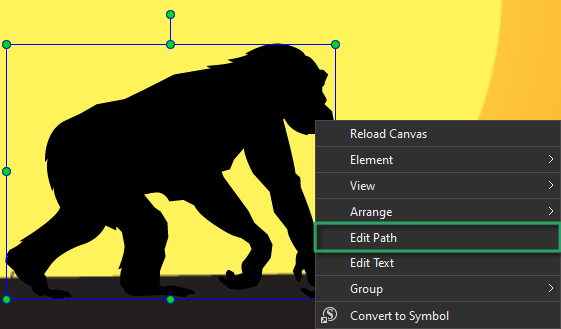
Step 3: Right-click the element on the Canvas > Edit Path.
Then, make an adjustment to any anchor points, control points of that element.
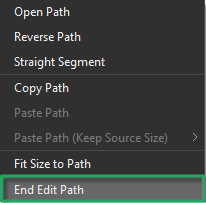
Step 4: Right-click the element on the Canvas > End Edit Path to finish editing.
2. Add Keyframes Manually
Beside using Auto-Keyframes, you can also create morph animation by adding keyframes manually. Take the following steps:
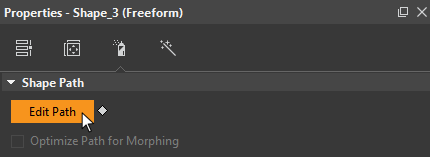
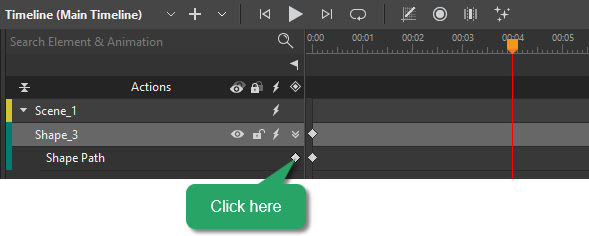
Step 1: Click the Edit Path button on the Properties pane to enable its editing mode. To do that, open the Properties pane > Styles tab > Shape Path section > Edit Path.
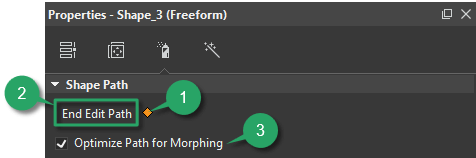
Step 2: Click the Add Shape Path Keyframe diamond (1) to add the starting keyframe.
Step 3: Drag the Playhead to the time you want the animation to end. Next, click the Add Keyframe diamond in the Shape Path property to add the ending keyframe.
Then, you are free to customize the freeform the way you want.
Step 4: Click End Edit Path (2) to finish adjustment.
For further information, see Edit Freeforms in Saola Animate 3.
Note: The Optimize Path for Morphing option (3) is available for Shape Path animation.
- If this check box is selected, it adjusts the paths automatically to animate from one freeform to another.
- If this check box is deselected, the anchor points of the original freeform will be mapped directly to that of the last edited freeform. This is useful when adjusting points manually. Notice that the original/last edited freeform should have the same number of anchor points.
So, you’ve known how to create eye-catching and smooth morph animations with Saola Animate 3. Download the app to try out this feature and don’t hesitate to share with us your amazing result.
See also: