A single scene in Saola Animate can have more than one timeline to easily organize and control complex animations. This tutorial will show you how to use multiple timelines and control timeline playback.
This tutorial covers:
Managing Timelines
In Saola Animate, each scene has the main timeline which automatically starts when the scene loads. Apart from the main timeline, scenes can have multiple additional timelines which are called to play using event actions. In fact, you can play, pause, seek, etc., both the main timeline and other additional ones to create rich and interactive animations.
Creating New Timelines
To create an additional timeline, do the following:
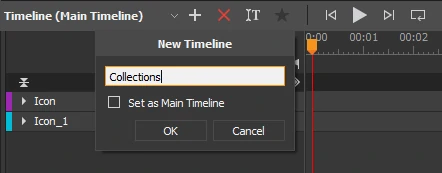
Step 1: Notice the top left of the Timeline pane. Click New Timeline (1).
Step 2: In the dialog, enter a unique name for the new timeline.
Step 3: Select Set as Main Timeline if you want the new timeline to act as the main timeline of a scene. In other words, select this check box if you want animations in this timeline run once the scene loads.
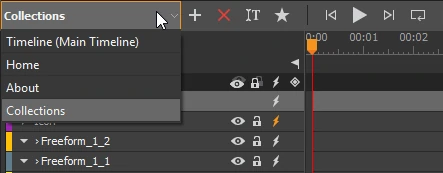
Step 4: Click OK to finish. The new timeline will be directly selected for editing. You can click the Timeline Selector (5) to switch between different timelines of a scene.
Removing Timelines
Click Remove Timeline (2) to remove the active timeline. This button becomes available only when a scene has more than one timeline.
Renaming Timelines
You can rename a timeline as you want. Select a timeline from the Timeline Selector and click Rename Timeline (3) to rename it.
Settings the Main Timeline
The main timeline starts automatically when the scene loads. To set a timeline as the main timeline, select it > Set as Main Timeline (4).
Controlling Timeline Playback
Animations on the main timeline run when a scene loads. Meanwhile, you have to trigger animations on additional timelines. That being said, you’re free to control the playback of both the main timeline and others.
Timeline Events
Saola Animate provides the following timeline events:
- Update: Occur when the timeline updates itself constantly when the Playhead reaches every tick mark on the timeline.
- Play: Occur when the playback of the timeline changes from pause to play.
- Pause: Occur when the playback of the timeline changes from play to pause.
- Complete: Occur when the timeline plays until the end and stops.
- Speed Change: Occur when the playback speed of the timeline changes.
- Reverse: Occur when the playback direction of the timeline changes (forward and backward).
- Seek: Occur when users seek a specific time in the timeline, causing an instant jump to a new time.
Timeline Actions
Seven built-in timeline actions are available to control timeline playback, including:
- Start Timeline: Start the playback of the target timeline (forward or backward).
- Play Timeline: Resume the timeline playback (forward or backward).
- Play Timeline From: Resume the timeline playback from a specific time or label (forward or backward).
- Pause Timeline: Pause the playback of the target timeline.
- Pause Timeline At: Jump to and pause at a specific time or label in the target timeline.
- Toggle Play/Pause Timeline: Toggle the playback of the target timeline.
- Seek Timeline: Jump to a specific time or label in the target timeline without affecting whether or not the timeline is playing or paused.
To know how to work with event actions, see Create Interactive HTML5 Content with Events and Actions. You can also find the way to go with custom JavaScript functions. If you prefer hand-coding, access the Functions pane and create a function.
That’s how you use timelines and control timeline playback. Feel free to ask if you need any support.


