In ActivePresenter, the video editing timeline (also the Timeline pane) comes in handy. That is, it’s a place where you can do many tasks efficiently in editing video/audio. Today, I’ll give you an overview of this timeline, plus video editing commands available.
For those who are new, ActivePresenter is a comprehensive eLearning authoring tool to design eLearning content, record screens, and edit videos. All of the editing procedure is mainly done on the canvas and the editing timeline. Thus, it is easy to control the visual look and the timing of each element on the slide. Download the app now and let’s go through the basics of the editing timeline in ActivePresenter!

Overview of the Timeline Pane in ActivePresenter
If you’ve already used ActivePresenter to create screencasts, edit videos, or design eLearning contents, you may be familiar with the Timeline pane. Located at the bottom of the user interface, this video editing timeline shows how objects in a given slide appear against time.
Using the Timeline pane, you can do the following actions:
- Preview the slide.
- Edit the timing (start point and/or end point) of the objects.
- Experience four range-editing commands, including cut, copy, delete, and crop a range in a video.
- Play the slide and record your commentary in real time.
- Freeze a video for a certain amount of time while other objects keep playing.
- Split any audio/video object in any instant.
- Change the playback speed of audio clips and videos.
- Adjust the volume of audio/video objects.
- Insert closed captions and blur effects.
- Split a slide into two.
Below is the screenshot of the Timeline pane in ActivePresenter:
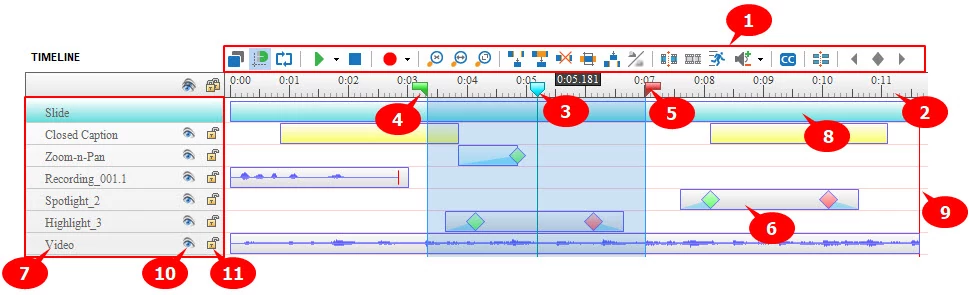
- (1) The Toolbar contains controls to play and edit objects in the slide.
- (2) The Time Ruler shows the time axis in “mm:ss” format. However, if the duration is longer than 1 hour, the time will be shown in the “hh:mm:ss” format. In addition, the time axis starts with 0. This is the instant when the slide starts playing.
- (3) This is Playhead. Drag the playhead to scrub the timeline. Also, click the Time Ruler at the point you want to set the Playhead. Then, the Playhead will jump to that position immediately.
- (4) & (5) The Start Marker and End Marker of the range.
- (6) This is the time bar of an object. Note that the object is active only for the duration of this bar.
- (7) This area shows the names of objects.
- (8) This is the time bar for the entire slide. By default, its ending is automatically synchronized with the last elements in the slide. When you extend this bar, the slide’s bar also extends accordingly.
- (9) This is the end time of the slide.
- (10) The visibility button controls whether to display objects in the Canvas. In general, this is an interface feature helping you work more easily. It doesn’t affect final outputs.
- (11) The lock button controls whether you can edit objects by locking it in place. So, you can avoid accidentally selecting or moving unwanted elements.
Keep in mind the following:
- By default, the app doesn’t show the Start Marker, End Marker, and Playhead. To display them, click anywhere on the Time Ruler. Then, all three appear at the same spot on the Time Ruler.
- The slice of timeline between the Start Marker and the End Marker is the “selected” range (often called “range”). It is shown darkened in this video editing timeline. When you define a range by dragging the markers, range-editing functions are at your disposal. I’ll discuss these functions in the following part of this article.
Video Editing Features in the Timeline Pane
As said earlier, the Timeline pane provides many functional commands for editing videos and audio clips. Below is the short description of each.
1. Edit Video Ranges
In ActivePresenter, the video editing timeline supports four Range-editing commands. They include Cut, Copy, Delete, and Crop to Range. In terms of Crop to Range, this command copies object parts that fall inside the range and then puts them into the clipboard. To work with these features, you should define a range early on.
For more details about how four Range-editing commands work, see Advanced Video Editing: Cut, Copy, Delete and Crop Range.
2. Record Voice Narration
This command is meant for recording your voice even as you play the slide simultaneously. You can thus watch the slide’s playback, and time your voice perfectly with the action on the screen.
Check out the Inserting an Audio article to see how to record your voice with ActivePresenter.
3. Insert Freeze Frames/Silence
In ActivePresenter, the Insert Time command is aimed for adding a freeze frame or silence. In case of video, using freeze frames is a good way to create pauses for giving your audience a clear explanation. Regarding audio, this command helps inserting an interval of silence into the track.
See Insert/Remove Freeze-Frame for more information.
4. Blur Objects in Video
When editing videos, it’s necessary to hide sensitive information like personal identity and email address. In this case, you can use the Insert Blur Area command since it allows inserting blur effects with ease. This feature is capable of hiding both static and moving objects.
The following articles can make it easier for you to use the Insert Blur Area command:
5. Split and Join Audio/Video Objects
In essence, the Split command lets you cut a video/audio into smaller clips. So, you usually don’t need to install any video splitting software. Just download ActivePresenter and feel free to work with this function.
In case you wish to rejoin those clips or join other videos, use the Join command. This function helps merge selected objects, either audio or video. For more details about two commands, check out Splitting/Joining.
Likewise, the Timeline pane has another feature called Split Slide. This command has many practical applications. For instance, when the timing of a slide is too long, and you want to divide them into parts for a better view. Or, you desire to create transition effects between slides. In those cases, Split Slide is helpful. See Splitting & Merging Slides for more details.
6. Speed Up/Slow Down a Track
The next command in the video editing timeline is Change Playback Speed. This feature gives you two possibilities. First, it’s feasible to make a scene run faster. Second, you can use it to create professional videos such as slow motion videos.
To learn how it performs, refer to Adjusting Video Speed.
7. Adjust Volume
Let’s say you are making video tutorials. In case the background music is too loud, it’s difficult for the audience to hear. This is where the Adjust Volume command helps a lot. In ActivePresenter, you can adjust the volume from 0 (means mute) to 500% (means original volume x 5).
See Changing Audio Volume to know more about the procedure.
8. Add Closed Captions
Closed Caption is ultimately a powerful feature in ActivePresenter. When you insert closed captions into your video, they are exactly exactly the same as subtitles you see in a movie.
The procedure and best tips for adding closed captions to videos are available in the following articles:
Here is Big News!
ActivePresenter 7 is coming soon! This new version will come with three audio advanced features in the Timeline pane, including Audio Fade In, Audio Fade Out, and Audio Noise Reduction. In case you missed these new features, check out our series of ActivePresenter 7 New Features and Enhancements.
All in all, I’m sure you can’t wait to experience the video editing timeline in ActivePresenter. So, get started right now. Feel free to contact us via email, Facebook, YouTube, and ActivePresenter community if you need any help.