Starting and stopping the screen recording in ActivePresenter 10 eLearning authoring tool are super easy. You can start your recording by pressing the Rec button. And stop the recording phase using either hotkeys or recording options. Find details below.
Known for its functionality as a screen recorder, video editor, and eLearning authoring tool, ActivePresenter is an all-in-one package. As a screen recorder, the app allows you to record the screen as a video and record interactive simulations. Each provides you with tools and commands to record the screen, then show its typical output on Canvas. Apart from those differences, the way to start and stop recording the screen of the two features is the same. Now without further ado, let this article teach you how to:
Don’t hesitate to install ActivePresenter 10 and start recording for now!

Let’s start!
Start Recording Screen
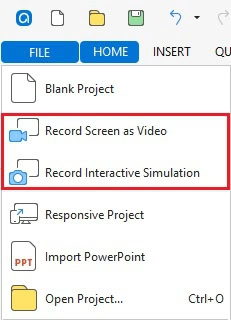
As mentioned above, there are two options to record the screen in ActivePresenter 10. You can find them on the Start Page. Alternatively, click the File button at the top-left corner of the main editing workspace and select a recording mode.
In this example, suppose that you plan to create a video demo. Just follow the steps below:
Step 1: Select Record Screen as Video. Then, you can see a blue rectangle and a dialog pop up.

Step 2: Set up the recording area and other settings. You can learn more about how to do that in Record Screen as Video and Record Interactive Simulation.
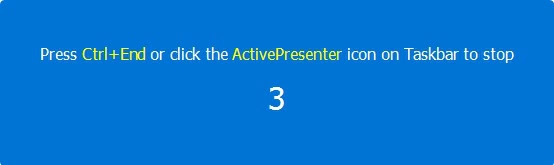
Step 3: After finishing the settings, click the REC button to start recording.

Then, after counting down for 3 seconds, ActivePresenter 10 starts to record all of the actions inside the recording area.
Note: The screen can be captured as single or multiple slides within the current project. For more details, see How to Insert New Slides.
Stop Recording Screen
There are two ways to finish recording in ActivePresenter 10: Use hotkeys and use the Recording Toolbar Dialog.
Use Hotkeys
Simply press CTRL+END (for Windows) or ⌥⌘2 (for macOS) to stop recording the screen. This hotkey, however, can be changed according to your preference. To do that:
- Click the gear button at the top-right corner of the recording dialog > select Recording Settings…
- Open the Hotkeys tab in the dialog that appears > tick the Use Hotkeys checkbox.
- Assign new hotkeys by clicking any command box and pressing a key or a combination of keys.
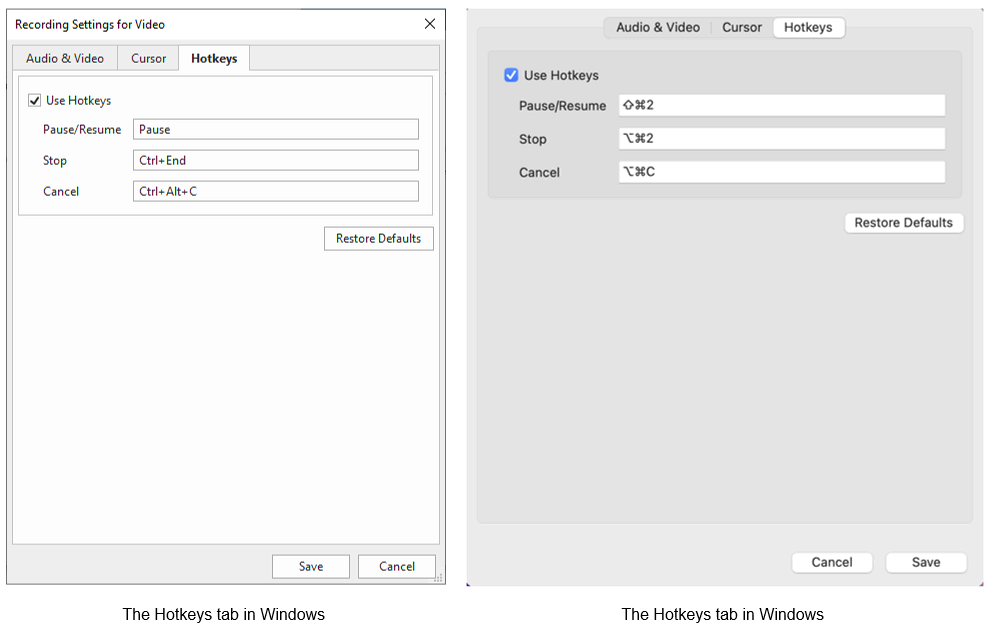
If the new hotkeys don’t satisfy you, click the Restore Defaults button to revert to the default settings.
Use Recording Toolbar Dialog
Another way to finish recording is to use commands in the Recording Toolbar dialog. As soon as you begin recording, the main dialog will be hidden. The ActivePresenter icon will instead appear in the system tray or Taskbar.
Now, click the icon to show the Recording Toolbar dialog.

The dialog lets you know the information about the recording process in 3 sections namely Statistics, Duration, and Audio. It also provides you with 3 buttons to Pause (1), Stop (2), and Discard (3) the process.
- Press the Pause button if you want to pause the recording temporarily. It is useful when you have something else on your mind and need to suspend the recording process. Click the button again to resume.
- Click the Stop button to finish the recording. It immediately directs you to the working space where you can edit it the way you wish.
- Click the Discard button to see a newly pops-up dialog that offers you 3 more options.
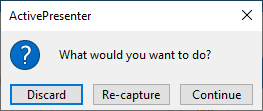
- Discard means stopping the recording project you are working on and deleting everything you have recorded so far.
- Re-capture if you want to stop the current recording without saving it and start over with the previous recording settings.
- Continue resumes the current recording.
With ActivePresenter 10, the start and stop recording screen process is so simple. Download and learn more about the app to deliver your first screen recording!