With basic editing tools for audio/video like cut, copy, delete, and crop, ActivePresenter 10 helps to create great videos in a breeze. Let’s check out today’s article for more details.
As you know, ActivePresenter 10 is an all-in-one screen recorder, video editor, and eLearning authoring tool. Therefore, the app offers many powerful yet easy-to-use features to make demo videos, interactive simulations, eLearning games, training courses, etc.
Especially, ActivePresenter allows you to edit both imported and recorded audio/videos. Right after the capture phase, the software takes you to the editor where you can edit what you’ve recorded. On the other hand, you can also import audio and video into Active Presenter and edit them as normal.
Before we go ahead, download and install the latest version of ActivePresenter:

Today’s article covers:
The following parts will offer you more information about what a range is and how to apply these basic editing tools to your audio/video. Let’s begin!
Define a Range
To enable the basic editing tools for audio/video, make sure that you created a range in ActivePresenter 10. In case you haven’t selected a range, these buttons are disabled and you cannot click them.
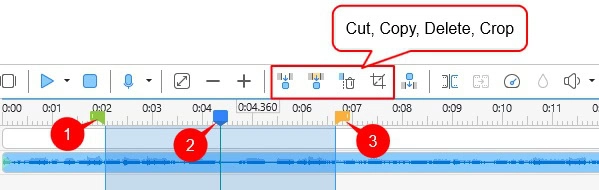
- Start Marker (1): The green marker represents the starting point of the selected range.
- Playhead (2): The blue line indicates the timestamp that you are currently selecting.
- End Marker (3): The orange marker indicates the ending point of the selected range.
The Start Marker and the End Marker help to define a range. Just click to place the Playhead at any position in the Timeline pane. Then, you can select a range by either dragging the Start Marker or the End Marker. When you drag a marker, the Playhead will stick with it. The selected range is highlighted in light blue color to help easily recognize it. To clear the selection, double-click the Playhead anywhere on the time axis.
Note:
- These basic editing tools for audio/video act differently depending on whether or not you select an object. If you select an object, the tools affect that object only. If not, they affect the slide and all objects falling into the range ( the entire slice of the range).
- To get a better view of the timeline, zoom in or out by holding down CTRL while scrolling the mouse wheel up or down, respectively.
Basic Editing Tools for Audio/Video
In this part, we will walk you through four basic editing tools for audio/video:
Now, let’s take a look at each of them.
Cut Range
In general, even when you work carefully, mistakes happen now and then when you record the screen. A big mistake may require you to start over and re-record everything. Meanwhile, a tiny mistake only needs an “undo” then you can continue recording as if it never ever happened. In that case, just cut the mistake out from the video/audio and you’re done. So, the Cut Range is one of the basic but powerful tools for editing audio/video.
Perform some very simple steps below to cut and remove unwanted fragments from the video/audio:
Step 1: Select a video/audio that contains unwanted fragments. After that, define a range.
Step 2: Click Cut Range (4). Alternatively, press CTRL+SHIFT+X to remove the range.
Then, a red stripe appears to show where the two remaining parts of the video/audio are joined together.

Step 3: Paste the cut content into the same or another slide. To do that, move the Playhead to the desired position and press CTRL+V.
Copy Range
After learning about cutting a range in a video/audio. Let’s get to know how to use the Copy Range button to copy parts of objects that fall inside the range. Then, you can put them on the clipboard. So, follow the steps below:
Step 1: Select a video/audio. Then, make a range.
Step 2: Click Copy Range (5) or press CTRL+SHIFT+C to copy the range.

Step 3: Paste the copied content into the same or another slide. To get it done, place the Playhead at the desired position and press CTRL+V.
Delete Range
Let’s say removing mistakes is a basic task when you edit videos. So, use the Delete Range button to remove any unwanted audio/video parts. This is another one of the basic editing tools for audio/video that ActivePresenter offers you. Just do as follows:
Step 1: Select a video/audio. After that, define a range.
Step 2: Click Delete Range (6) or press CTRL+DELETE to get it done.
As can be seen, a red stripe appears to show the position where you cut the range.

Note: The Delete Range button works just like the Cut Range button, except for one difference. While the former is used to delete the content inside the range, the latter “cuts” the content from the range and places it on the clipboard, then you can paste it where you want. In short, Delete Range stands for removing while Cut Range stands for reallocating.
Crop to Range
Often you record extra footage at the beginning and end of a recording. When editing video/audio, you want to trim out these fragments, that is to take off either end of the video/audio. As a result, ActivePresenter offers you a basic tool to solve this issue.
Now, let’s use the Crop to Range button to remove everything outside the range. Here’s how:
Step 1: Select a video/audio that you want to trim out extra content. Then, define a range. Bear in mind to keep the main content in the range.
Step 2: Click Crop to Range (7) or press SHIFT+DELETE. That way, only the part falling inside the range is retained.

As mentioned above, these basic tools also work when you select no objects at all. In that case, they affect all the objects falling into the range. For example, if you click Crop to Range while selecting no objects, you retain only the slide content inside the range and delete all the rest.
In short, that’s all about four basic editing tools for audio/video ActivePresenter 10 offers you. Make use of them together with other advanced tools to create stunning projects. In addition, visit our YouTube channel for more useful tutorial videos and handy information.
See also:
Record Screen as Video
Record Interactive Simulation
Split and Join Videos/Audio Tracks
Add Background Music