In ActivePresenter 7, interactive objects are designed to respond to user input in a predefined manner. Interactive objects are useful in creating eLearning contents since they let you test the learner’s performance. They also help you keep track of the learner’s activity.
Users can interact with them using the mouse or keyboard in the HTML5 output. In case that interactive objects have events – actions, the presentation will display differently based on those events and actions.
Insert Interactive Objects
There are two ways to insert an interactive object into projects:
- Open the Interactions tab and select an object from the gallery.

- Open the Home tab, click Interactions and select an object from the list.

After that, ActivePresenter will insert the object in the slide that you are working with. You can insert more than one interactive object into a slide. However, each time you insert a question, ActivePresenter will add a new slide containing it. To know more about questions, see Creating Quizzes.
On the contrary, to delete any interactive object, select it and press the DELETE key on your keyboard.
There are many types of ready-made interactive objects to help you create interactions in the course. They are listed below:
- Mouse Click: Mouse clicks are placed in a slide where users must click to trigger the next action.
- Key Stroke: Key strokes respond when users press a key or combination of keys.
- Text Box: Text boxes allow users to enter text directly onto a slide. Text boxes provide a great way to test user knowledge and collect information from users.
- Drop Area: Drop areas are interactive objects that accept drag sources. Different from Drag-n-Drop questions, a drop area can accept only one drag source.
- Button: Buttons allow you to redirect the viewer to specific contents when they click it (a slide, for example).
- Check Box and Radio Button: Viewers have to check Check Box and Radio Button to complete the task or to trigger other actions. These interactive objects are useful in creating eLearning contents to test learners’ knowledge. They are also useful in collecting viewers’ feedback.
- Question (9 types): Questions are interactive objects which contain question title, answers, feedback messages, and button. You can use questions to assess learner performance or collect viewer opinions.
Insert Feedback Messages to Interactive Objects
Normally, when you add an interactive object into a slide, it includes feedback messages. Of course, you can still add more or remove them easily.
Take the following steps to do that:
Step 1: Select the object either in the Selection pane or Canvas.
Step 2: In the Interactions tab, click the Message button. Then, select one from the message list.
Alternatively, you can right-click the object, click Insert and select the message.

By contrast, to delete a feedback message, just select it and press the DELETE key on your keyboard.
See Working with feedback messages to know in details how to insert feedback messages and show them in the output.
Add Events – Actions to Interactive Objects
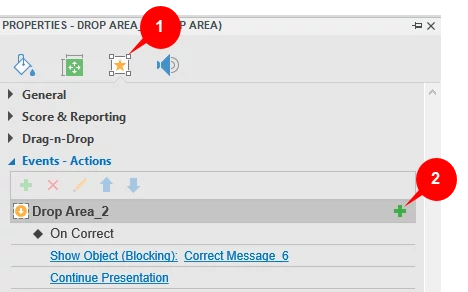
Each interactive object usually has default and ready-to-use settings for events and actions. You can use these settings without changing any of them. For example, whenever you insert a Drop Area object, it has On Correct, On Incorrect, and On Timeout event with actions and conditions. Correct/Incorrect event are automatically displayed when users take a correct/incorrect action respectively.
However, you can still adjust those events and actions for more advanced requirements. To add events – actions to an object, do the following:
Step 1: Select the object.
Step 2: Open the Interactivity tab (1) of the Properties pane.
Step 3: In the Events – Actions section, hover the mouse over the object title entry and click Add Event (2).
Step 4: Add actions to events. Hover over the event entry and click Add Actions (3).
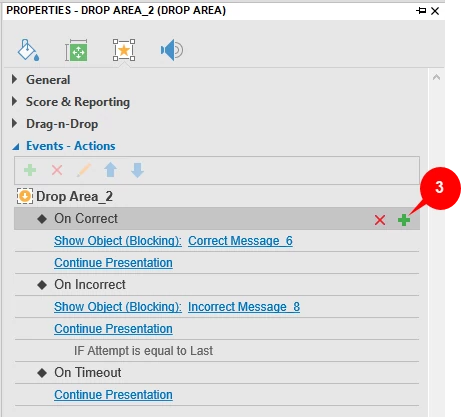
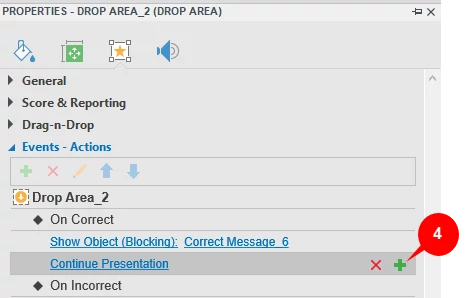
Step 5: Add conditions to actions. Hover over the action entry and click Add Condition (4).
For more details, see Working with events – actions.
That’s a short introduction to interactive objects in ActivePresenter 7. There are also many articles about how to use each of them on the tutorial page. Take a look for more details regarding the object type you want to use.