Last Updated On: March 2, 2020

 Step 2: Select an action from the action list that pops up. Repeat the procedure to add more actions if you want.
 Note: ActivePresenter 7 allows you to add more than one action to an event. In that case, actions will take place in the order that you insert.
To change the order of an action, select it and click the Move Action Up button
Note: ActivePresenter 7 allows you to add more than one action to an event. In that case, actions will take place in the order that you insert.
To change the order of an action, select it and click the Move Action Up button  or the Move Action Down button to bring an action up or down one level respectively. Or, simply drag and drop them to desired position.
Step 3: After selecting an action, the action entry will appear below the event entry. You can define further properties of the action. Just click the action entry and take further steps depending on type of actions you are adding.
For example, if you add Go to Slide action, you have to specify the slide that the presentation will go to. On the other hand, if you add Show Object action, specifying the object along with its entrance/exit effect is the next step.
This opens the Add Condition dialog. The content of this dialog may vary differently. It depends on which type of objects you are working with.
or the Move Action Down button to bring an action up or down one level respectively. Or, simply drag and drop them to desired position.
Step 3: After selecting an action, the action entry will appear below the event entry. You can define further properties of the action. Just click the action entry and take further steps depending on type of actions you are adding.
For example, if you add Go to Slide action, you have to specify the slide that the presentation will go to. On the other hand, if you add Show Object action, specifying the object along with its entrance/exit effect is the next step.
This opens the Add Condition dialog. The content of this dialog may vary differently. It depends on which type of objects you are working with.

Introducing Events – Actions
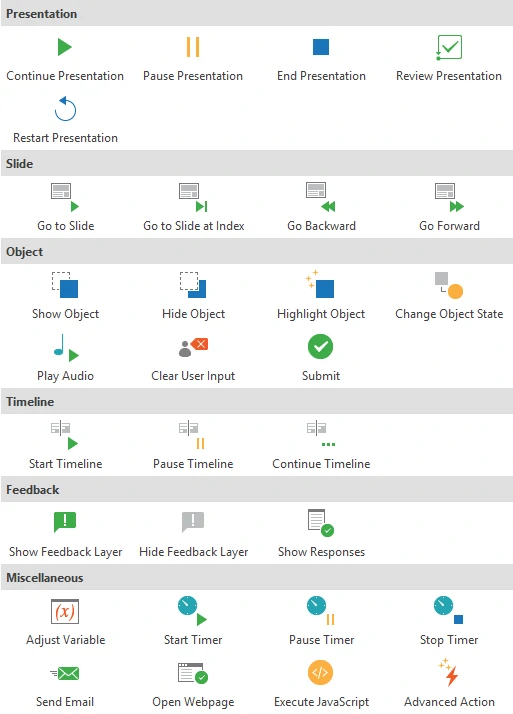
In ActivePresenter 7, events and actions come with objects and slides. For any kind of objects in ActivePresenter, you can add an event (for example, “when the mouse rolls over this shape”), then add an action in response to that event (for example, “display the hint message”). After completing adding events and actions, you can create desired interactive actions for an object. Specifically in this example, the interactive action is created: “when the mouse rolls over this shape, the hint message will appear”. In today’s tutorial, let’s explore this amazing feature, which is extremely useful in creating quizzes, games or courses requiring a high level of interactions. In older versions of ActivePresenter, you can manage interactions in the Event Editor dialog. From version 7, the Event Editor no longer exists. Instead, you can set up and manage interactions in the Interactivity tab of the Properties pane. There are up to 21 types of events in ActivePresenter 7, some of them are:- On Click: Occur when users click an object
- On Accept: Occur when any accepted Drag Source is dropped onto Drop Area/Drop Target
- On Reject: Occur when any rejected Drag Source is dropped onto Drop Area/Drop Target
- On Correct: Occur when users give a correct response
- On Incorrect: Occur when users give an incorrect response
- On Complete: Occur when a question is answered or a text box is filled. It is only available when the mode of questions or text boxes is survey.
- On Incomplete: Occur when the answer is incomplete
- On Timeout: Occur when viewers don’t respond within the specified time
- Go to Slide: Go to a specific slide
- Go Forward: Go forward by a specified number of slides
- Show Object: Show different types of objects such as shapes, images, audio, etc.
- Change Object State: Change the display state of an object
- Start Timeline: Start the playback of the target timeline. This is important when your project has added timelines and you want to use actions to call them.
Working with Events – Actions
In general, the procedure of working with events – actions is to add events to objects/slides, then add actions to events, and finally and optionally, add conditions to actions. Besides, you can copy, paste, or remove events and actions at ease. Let’s get to know in detail.Adding Events to Objects/Slides
To add an event to an object or slide, take the following steps: Step 1: Select an object or a slide that you want to add events. Note that you cannot add events to multiple objects at once. Step 2: Open the Interactivity tab (1) in the Properties pane Step 3: Expand the Events – Actions section (2) Step 4: Hover the mouse over the object title and click the Add Event button (3). Then, select one event from the pop-up menu.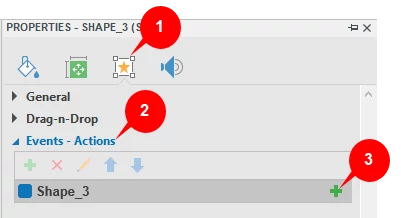
Adding Actions to Events
After adding an event to the object, the event entry will appear below the object title. You can add actions to that event easily: Step 1: Hover the mouse over the event entry and click the Add Action button (4).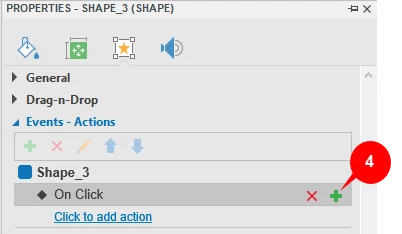 Step 2: Select an action from the action list that pops up. Repeat the procedure to add more actions if you want.
 Note: ActivePresenter 7 allows you to add more than one action to an event. In that case, actions will take place in the order that you insert.
To change the order of an action, select it and click the Move Action Up button
Note: ActivePresenter 7 allows you to add more than one action to an event. In that case, actions will take place in the order that you insert.
To change the order of an action, select it and click the Move Action Up button Adding Conditions to Actions
ActivePresenter allows you to set specified conditions for a given action. When you set conditions for an action, then the action can only be played if those predefined conditions are matched. To add conditions to actions, hover the mouse over the action entry and click the Add Condition button (5).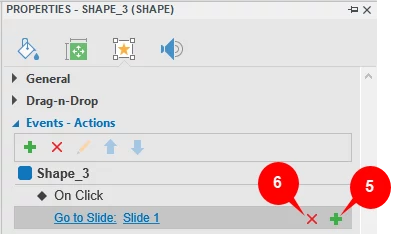 This opens the Add Condition dialog. The content of this dialog may vary differently. It depends on which type of objects you are working with.
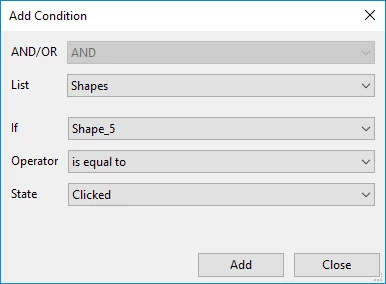
- And/Or: Use this to combine multiple conditions in an action
- List: The type of object to be compared in a condition
- Operator: The logical operator which is used to compare
- State: The state of the shape which the current state of the shape is compared with
- Type: Select to compare a variable with a variable or a value
- Value: Set the value to compare the variable with
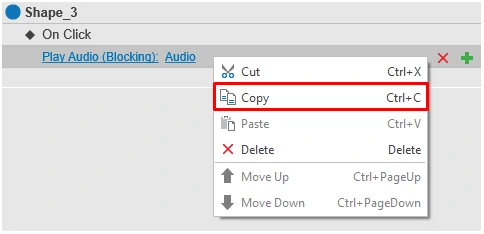
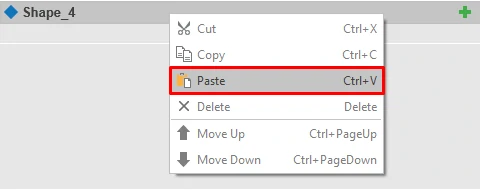
Copying and Pasting Events/Actions
Copying events actions can be useful if you need to duplicate the events or actions that you have already created as it saves time and effort. To copy and paste events/actions, do the following: Step 1: Firstly, right-click the event/action that you want to copy. Step 2: Copy the event/action by clicking Copy in the pop-up dialog.