Insert objects are a common task in every project whether it is a responsive or non-responsive one. However, managing them in a responsive project is quite a challenging task and different from a non-responsive project. This tutorial will explain in detail how to insert and manage objects in responsive projects.
Inserting Objects
In this paragraph, you will learn how to insert objects, then manage them in the next part. You can easily insert both non-interactive and interactive objects into a responsive project by choosing one from the Insert tab or Questions tab.
Objects properties of the two types of projects are almost the same. However, objects in responsive projects have an exact position (position mode), responsive unit (px and %), and object alignment (align horizontal and vertical center). Besides, you cannot lock the aspect ratio of objects in the responsive project.
Managing Objects
Responsive Layout
After inserting objects, you will need to manage them. In a responsive design, Flex Box is preferred to be used as a responsive layout because of its huge advantages. Therefore, ActivePresenter 8 makes it by default when you start creating a responsive project. ActivePresenter allows you to have control over it by accessing the ActivePresenter button > Preferences > General tab > check/ uncheck the box of the Responsive Layout option. When it is on, the below snapping behavior will follow.
Container Snapping Mode
If a responsive layout is Flex Box, an inserted object will automatically be snapped to the layout when you move it on the canvas (the container turns orange).
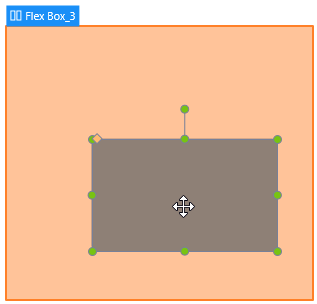
When you insert an object into a flexbox, the object is called a flex item or a flex child. You can now freely customize the flex child and its container layout as you wish.
For more information, please see this tutorial.
Any object can be included in or excluded from the container layout. If an object is excluded from the layout, which means it will not be dragged into that layout, you are free to place them anywhere on the slide. To make one or more objects excluded from a container layout, you can select them first, and then do either of the following:
- Right-click the objects > Exclude from Container Layout.
- Go to the Properties pane > Interactivity > General > select the Exclude from the Container Layout check box.
- You can temporarily disable the snap behavior by holding down ALT while moving objects. Or turn off this mode by clicking the View tab > Container Snapping.
Change Object Position
An inserted object has a default position on the slide. You can manage object position as well as the position unit if you want. To change the position, do either of the following:
- Drag the object on the Canvas.
- Change the position values of the object in the Properties pane. This way provides a more exact position on the Canvas.
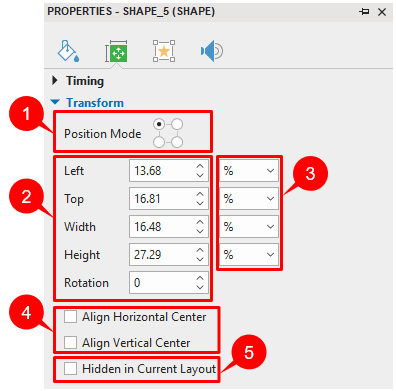
To change the position unit, you need to select the object, then navigate to the Properties pane < Size & Properties > Transform. After that, you can change object position, position mode, object position value, and align the object as you wish. Keep reading to know each of them for details.
Change Object Position Mode
Position Mode is the exact specification of the object position in a slide of a project.
To change this value of an object, go to the Size & Properties tab > Transform > Position Mode (1) > select one from four modes (Top-Left, Top-Right, Bottom-Right, or Bottom-Left).

Change Object Position and Size
These values (Left, Top, Right, and Bottom) define the object position in a slide.
They display in this section depending on the Position Mode type you select. For example, if you select the Bottom-Right mode, this section will show the Bottom and Right value instead of showing Top and Left value when you select the Top-Left mode.
To change those values, select the object and go to the Size & Properties tab > Transform > adjust values of Left, Top, Right, Bottom, Width, and Height (2) (in percentages or pixels).
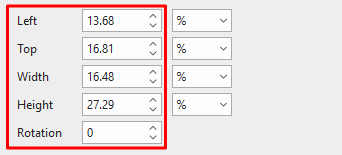
Note: If you want to keep the height-to-width/ width-to-height ratio when changing the object width/height, select Auto in the Unit box next to the Height/Width spin box. This option automatically changes the height according to the width and vice versa.
To rotate the object, along with dragging the rotation handle of the object, you can enter a value in the Rotation spin box.
Change Object Position Value Unit
You can change the unit of object position value between percentages (%) and pixels (px).
Select the object and go to the Size & Properties tab > Transform > access the Unit drop-down lists (3) next to the Size spin boxes. Then, select %, px, or Auto (for Width and Height unit).
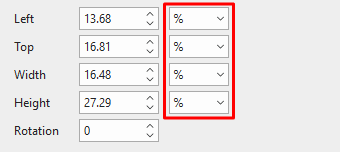
- Choose the % unit if you want the object position to be a percentage of left/top/width/height.
- Select the px unit if you want the object position to be a number of pixels of left/top/width/height.
- Choose Auto in the Width/Height unit box to retain the aspect ratio.
Note: Either the unit you choose, the size and position of the object should remain unchanged.
Aligning Objects
You can align objects at the center of the slide in all layouts of responsive projects. To do that, in the Properties pane > Size & Properties > Transform > Align Horizontal Center or Align Vertical Center (4).

- Align Horizontal Center: The object will be aligned horizontal center and you can move the object only in the vertical direction of the slide. You cannot move it horizontally.
- Align Vertical Center: The object will be aligned vertically center and you can move the object only in the horizontal direction of the slide. You cannot move it vertically.
If you select both check boxes, objects will be aligned both horizontally and vertically in the center of the slide. This means that you cannot move the object either in the horizontal or vertical direction.
Showing/Hiding Objects in Individual Responsive Layout
ActivePresenter allows showing or hiding the object in each layout individually. To do that, in the layout that you want to hide the object, select that object > Properties pane > Size & Properties > Transform > Hidden in Current Layout (5).

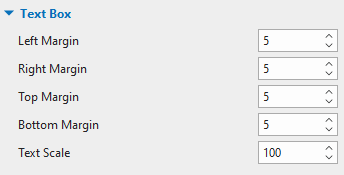
Text Box
This section allows you to customize the position of the text inside its container in four directions (Left, Right, Top and Bottom) and scale text in other layouts.
Note: The boundary of objects in a responsive project in the smaller layout will be inherited from the larger layout.
For example, the Tablet Landscape is smaller than the Desktop layout. So, if you change an object boundary in the Desktop layout, its boundary will be inherited by the Tablet Landscape layout. However, the Desktop is larger than the Tablet Landscape layout. Hence, if you change the boundary of an object in the Tablet Landscape layout, its boundary will not be inherited by the Desktop layout.
Inserting Objects into Multiple Slides
What if you need to insert one type of object into multiple slides? You can definitely do that with the Batch Operations feature in ActivePresenter 8. This feature is useful especially when some slides of your project need the same type of objects. To do that, click the ActivePresenter button > Project > Batch Operations > Insert Objects…. Then, specify the options in the dialog that appears. For more information, take a look at this tutorial.
That’s how to insert and manage objects in responsive projects with ActivePresenter 8. Hope that the tutorial is helpful. Feel free to contact us if you need help.
See Also: