Interactive timelines can help you create stunning interactive eLearning courses, quizzes, and games. Let’s dive deeper into this article to learn how to work with this type of timeline in ActivePresenter 9.
As indicated in the previous article, the interactive timeline is one of three timeline types ActivePresenter 9 offers you. Each slide can include a Main Timeline and many interactive timelines depending on users’ purposes. You are free to add, rename or remove this type of timeline. Have in mind that they can only be run by using events-actions.
Suppose you want to create a traffic light to control the movement of traffic vehicles. The red, yellow, and green lights appear and disappear repeatedly. So, you have to apply the entrance and exit effects to each traffic light color many times. In today’s tutorial, you’ll learn how to do that using interactive timelines in ActivePresenter 9.
The article covers:
Create an Interactive Timeline
The very first step to have the traffic light movement is creating an interactive timeline. Now, follow the detailed steps to create a specific one.
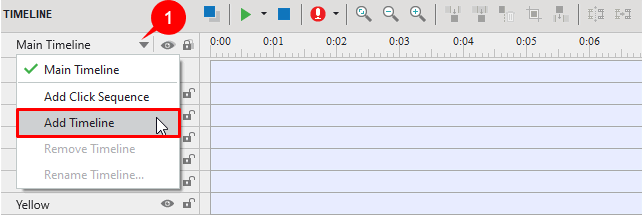
Step 1: Add a new timeline by clicking the Main Timeline drop-down arrow (1) > Select Add Timeline.

Immediately, you entered the newly added timeline with an auto-generated name (Timeline N).
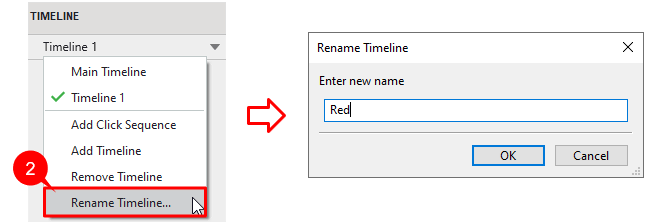
Step 2: Rename the timeline by clicking the timeline drop-down arrow (2) > Rename Timeline… > enter a name in the pop-up dialog > OK.
Note that you should set the newly created timelines with meaningful names for quickly recalling. For example, Red, Yellow, and Green correspond to three traffic light colors.

Besides, if you no longer need the timeline, just select Remove Timeline.
Step 3: Add animations to objects in the added timeline. In general, this performance is similar to doing that in the main timeline:
- Select the object that you want to apply animations from the Canvas or Selection pane. For instance, you’re in the Red timeline, so, select the red color object.
- Access the Animations tab > Select an entrance effect from the list. Then, place the Playhead at another position > Select one exit effect. (E.g., Appear and Disappear effects).

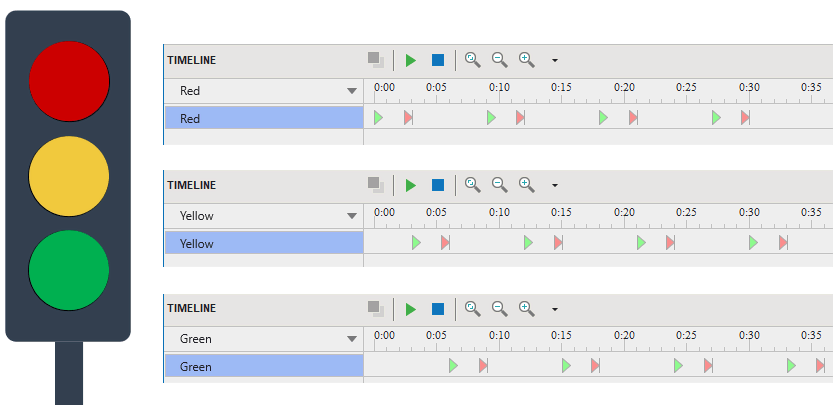
Tip: The interactive timelines allow adding multiple animation effects of all types to an object many times. So, you can do these two steps again to make a traffic light color appear and disappear sequentially. Then, repeat the step for the other traffic light colors.
After adding animations effect to objects in three interactive timelines, this is how they look:

For more details about how to animate objects, refer to Animate Objects in ActivePresenter 9.
Trigger an Interactive Timeline
An interactive timeline doesn’t automatically play when slides are started. Therefore, if you want to trigger it, you need to use actions to call it. Now, do as follows:
Step 1: Navigate to the Properties pane > Interactivity tab > Events – Actions section.
Step 2: Click the Add Action button in the slide On Load event. Then, pick up the Start Timeline action and a suitable interactive timeline. Repeat the step to start three interactive timelines when the presentation loads.

Note: Besides the Start Timeline action, ActivePresenter also provides you with two other actions for the timeline. These are the Pause Timeline and Continue Timeline actions.
Finally, let’s see the traffic light moving through the video below:
That’s it! Now you know how to work with interactive timelines in ActivePresenter 9. Much helpful information is available on our YouTube, Twitter, and Tutorials pages. So, don’t miss them out!
Download the app and use this feature to create engaging interactive games or impressive eLearning courses!
See more:

