Wanted to create a video demo? Chances are you need to record your actions on screen and edit videos when finished. All these desires will be addressed with the Record Screen as Video feature in ActivePresenter 9. Let’s learn now!
The Record Screen as Video feature in ActivePresenter 9 is actually the Record Video feature in ActivePresenter 8 and older versions. The new name is to give users a clearer overview of its functionality. As you might expect, this new version offers improved performance. Examining its capabilities in-depth, you can record all actions on your screen truthfully as a full-motion video. Also, the feature gives you a chance to have other things in the video like your face and voice. In this tutorial, we will show you 6 steps to do that:
- Select the Record Screen as Video Mode
- Specify the Recording Area
- Set up Webcam and Audio
- Adjust Recording Settings
- Start Recording
- Finish Recording
Now, let’s explore them in turn.
Select the Record Screen as Video Mode
In ActivePresenter 9, you can create a new video demo as a completely new video project. Do one of the following:
- On the Start Page, click Record Screen as Video.
- On the workspace of the current project, click the ActivePresenter button > Record Screen as Video.
You can also record your screen as a video slide right within the current project. This option is ideal when you’ve already had a project, for example, a training course, and you want to add a video demo to explain the steps.
- In the Home tab or the Insert tab > New Slide > Record Screen as Video.
- In the Home tab > Record Screen > Record Screen as Video.
After that, you will see:
- The Record Screen as a Video Project dialog.

There are many things which can be done from here. For example, specify the recording area, choose to record webcam and audio, or open the Recording Settings menu. The details will be discussed in the next part.
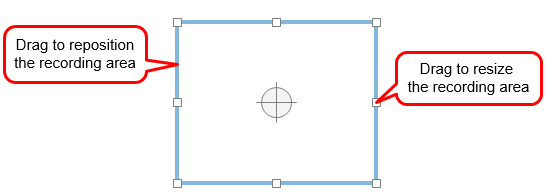
- A blue rectangle and a cross-hair (in the middle of it) indicate the recording area. ActivePresenter 9 will record all actions that happen only inside this area. The rest of the screen doesn’t appear in your recorded video. You can specify the recording area by either choosing values in the dialog above or adjusting this blue rectangle.
Now you’ve got the basic information about the Record Screen as Video function, let’s move to step 2.
Specify the Recording Area
As being said, ActivePresenter 9 gives you two ways to specify the recording area. One is using the blue rectangle to do that manually. But if you want to have more options, just work with the Recording Area section in the Record Screen as a Video Project dialog.
This section offers two capture modes: Full Screen and Custom. Choose one of them to specify the capture area.

- The Full Screen mode is good to go with if you want to capture the entire screen. By doing so, the entire screen will be treated as the capture area.
- The Custom mode gives you the ability to record a partial screen.
- Enter the width and height value in the Size spin boxes. Or, click the Preset Sizes drop-down list (1) to select a preset from the list.
- Select Lock to application checkbox and choose one target application from the dropdown list. By doing so, the selected application will be resized to fit into the blue rectangle. Then, no matter how you move or resize the recording area, the target application will follow.
Otherwise, if you want to record an application with predefined sizes, you can let the blue rectangle automatically resize to fit into that app. Before choosing the target app from the list, just click the Change Lock Mode button (2) to show two options. The Fit to Boundary option is set up by default as explained earlier. Now, you select the Fit to Application option which helps resize the blue rectangle to fit into the application window. Thanks to that, you don’t need to manually resize it.
Set up Webcam and Audio
Using webcam and audio is perfect for personalizing your video demo.
To set up the webcam and audio, take a look at the Audio & Webcam section in the Record Screen as a Video Project dialog. You can choose to record webcam or audio or both.
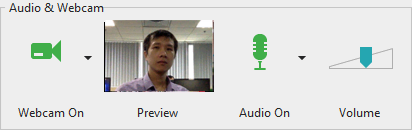
- Webcam: Click the Webcam button to enable/disable the webcam recording. When the webcam is on, the camera icon turns green. Then, a live preview of the camera appears next to the button. You can click the drop-down arrow next to the button to choose a detected webcam device from the list.
- Audio: Click the Audio button to turn on/off this recording option. When the icon is green, that means the audio recording function has been enabled. When you click on the drop-down arrow next to the button, this feature comes with two commands. They are audio from the microphone and system audio. In the case of the former, select one from the microphones detected to record. In addition, there is a volume scale next to the Audio command. Drag it to change the recording volume if you want.
Adjust Recording Settings
The Record Screen as a Video Project dialog contains a Settings menu as well. To access this menu, click the Settings button in the top-right corner of this dialog.
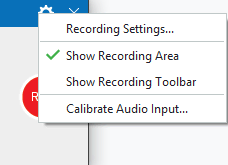
The Settings menu has four following options:
- Recording Settings…: Open the Recording Settings dialog for more recording options such as audio and video settings, cursor effects, hotkeys, and more.
- Show Recording Area: Show or hide the blue rectangle.
- Show Recording Toolbar: Show or hide the Recording Toolbar. This toolbar allows you to pause/stop recording and view the recording status.
- Calibrate Audio Input…: Click to open the Calibrate Audio Input dialog. It’s a functional feature to detect recording sensitivity levels and improve the sound quality when creating video demonstrations. From this dialog, you can change the audio input volume automatically or manually.
Start Recording Screen as Video
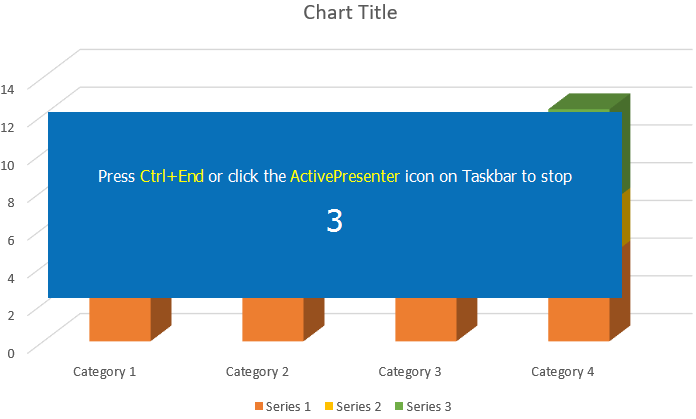
If you are satisfied with all settings, let’s start recording by hitting the Rec button. After that, the Record Screen as a Video Project dialog will hide itself and countdown from 3 to 1. The app will start recording after the countdown.
At the same time, an ActivePresenter icon is also shown in the system tray (for Windows) or the Menu bar (for macOS). In case you record a partial screen, you can click this icon to show the Recording Toolbar dialog. It helps you easily pause or stop recording as well as get a live preview of yourself. However, make sure you place this toolbar outside the blue rectangle. Otherwise, it will appear in the recorded video.
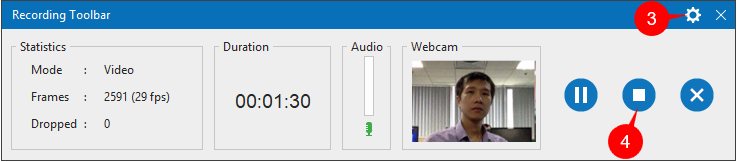
- Statistics section: Give you information about the recording. That is, Mode is the current recording project mode (Video for the Record Screen as Video function). Frames are the current frame number of the recording. Meanwhile, Dropped indicates the number of missed frames of the recorded video.
- Duration section: Show the current duration of the recording.
- Audio section: Show the audio sound level.
- Webcam section: Show the live preview of the webcam.
To hide any section shown above, click the Settings button (3) to show the options. Then, deselect the section you don’t want to show.
Finish Recording
To stop recording the screen as video, press CTRL+END (for Windows) or ⌥⌘2 (for macOS). Alternatively, you can click the Stop button (4) in the Recording Toolbar dialog.
Once finishing the capturing phase, ActivePresenter 9 automatically transfers your recording to the edit screen. You are free to fine-tune and enrich your recorded video right within ActivePresenter 9 with a lot of powerful features.
Finally, if you wish to export the video demo, go to the Export tab and click Video.
All things considered. So, let’s download ActivePresenter 9 right now and start recording your first video. Also, feel free to contact us if you need any support.
Download ActivePresenter 9 and try all the features for free!

See also: