ActivePresenter 9 allows you to record system audio and your narration from the speaker simultaneously or separately. That all depends on your need.
While recording the screen, you are able to include audio from the computer system and your voice at the same time in the recorded video. Otherwise, recording your narration separately after recording is also available.
Record System Audio and Narration Simultaneously
The function of recording system audio and narration at the same time can be accessed when you record the screen. To start capturing, do either of the following ways:
- On the Start Page, click Record Screen as Video or Record Interactive Simulation.
- In the current opening project, click the ActivePresenter button or in the Home tab > Record Screen > Record Screen as Video or Record Interactive Simulation.
After selecting the recording function (here is Record Screen as Video), you will see a blue rectangle, and the Record Screen as a Video Project dialog appears. Take a closer look at the Audio & Webcam section and do the following steps:
- Click the Audio button to turn it green.
- Click the drop-down arrow (1) next to the Audio button to see all available audio input devices.
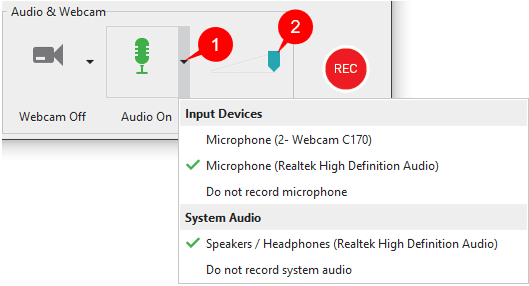
- Select one device detected from the Input Devices section to record your narration from the microphone. And select one from the System Audio section to have audio from the computer system in your recorded video.
The volume of the audio can be changed easily by dragging the Volume scale (2) or using the Adjust Volume tool on your computer.
Note: When you select to record system audio, all of the sounds on your computer including app notifications will be recorded. So, you should turn off notification sounds of unused apps to avoid any unwanted sounds.
- If you don’t want to record any of the microphone audio or system audio, just select Do not record microphone or Do not record system audio, respectively, or both.
When all the settings are done, you just click the Rec button to record audio and screen at the same time.
Record Narration Separately
If you want to record your voice after the recording screen then the Record Narration feature comes to your aid. This feature is available in the Timeline pane in the editor.
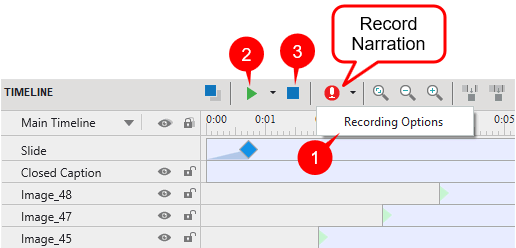
- Click the drop-down arrow and click on Recording Options (1).
- Select a device from the Input Device list and adjust the volume if needed. And press OK.
- Click the Record Narration button in the Timeline pane to start recording your voice. To pause the recording, click on the Pause/Resume button (2). When you want to finish recording narration, click on the Stop button (3). Or the recording will automatically stop when it reaches the end of the slide.
Edit Audio After Recording
When finishing the recording, you will get separated audible audio objects in the Timeline pane like this.
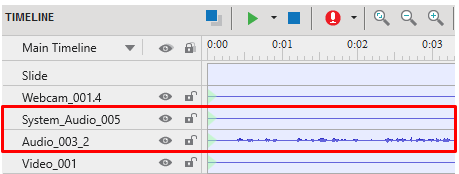
If you no longer need any audio object, simply select it and press DELETE on your keyboard. Otherwise, you are free to edit them such as cut, delete range, adjust volume, or even reduce background noise as the same as normal audio objects.
So, that’s the way you record system audio and your narration in ActivePresenter 9. Download the app today and start to create impressive screencasting projects with this feature.

See also: