
When using an eLearning authoring tool, branching scenarios can turn a linear course into an interactive learning experience where learners make decisions and follow different paths based on their choices.
Scenario Editor in ActivePresenter 10.6 provides a visual workspace for planning, creating, and checking these navigation paths. Slides appear as nodes in a graph, while connections show how learners can move between them.
In this tutorial, you’ll learn how to create branching scenarios in ActivePresenter 10.6 step by step, from opening Scenario Editor and creating your first branch to tracing learner paths and testing the finished scenario.
Ready to transform your training modules into engaging, decision-based learning experiences? ActivePresenter is an all-in-one eLearning authoring tool that makes creating advanced interactive content effortless. Download ActivePresenter today and start building dynamic branching scenarios in just a few clicks!

What Is a Branching Scenario?
A branching scenario is an interactive learning structure in which the path through a course changes according to learner actions, responses, or other conditions.
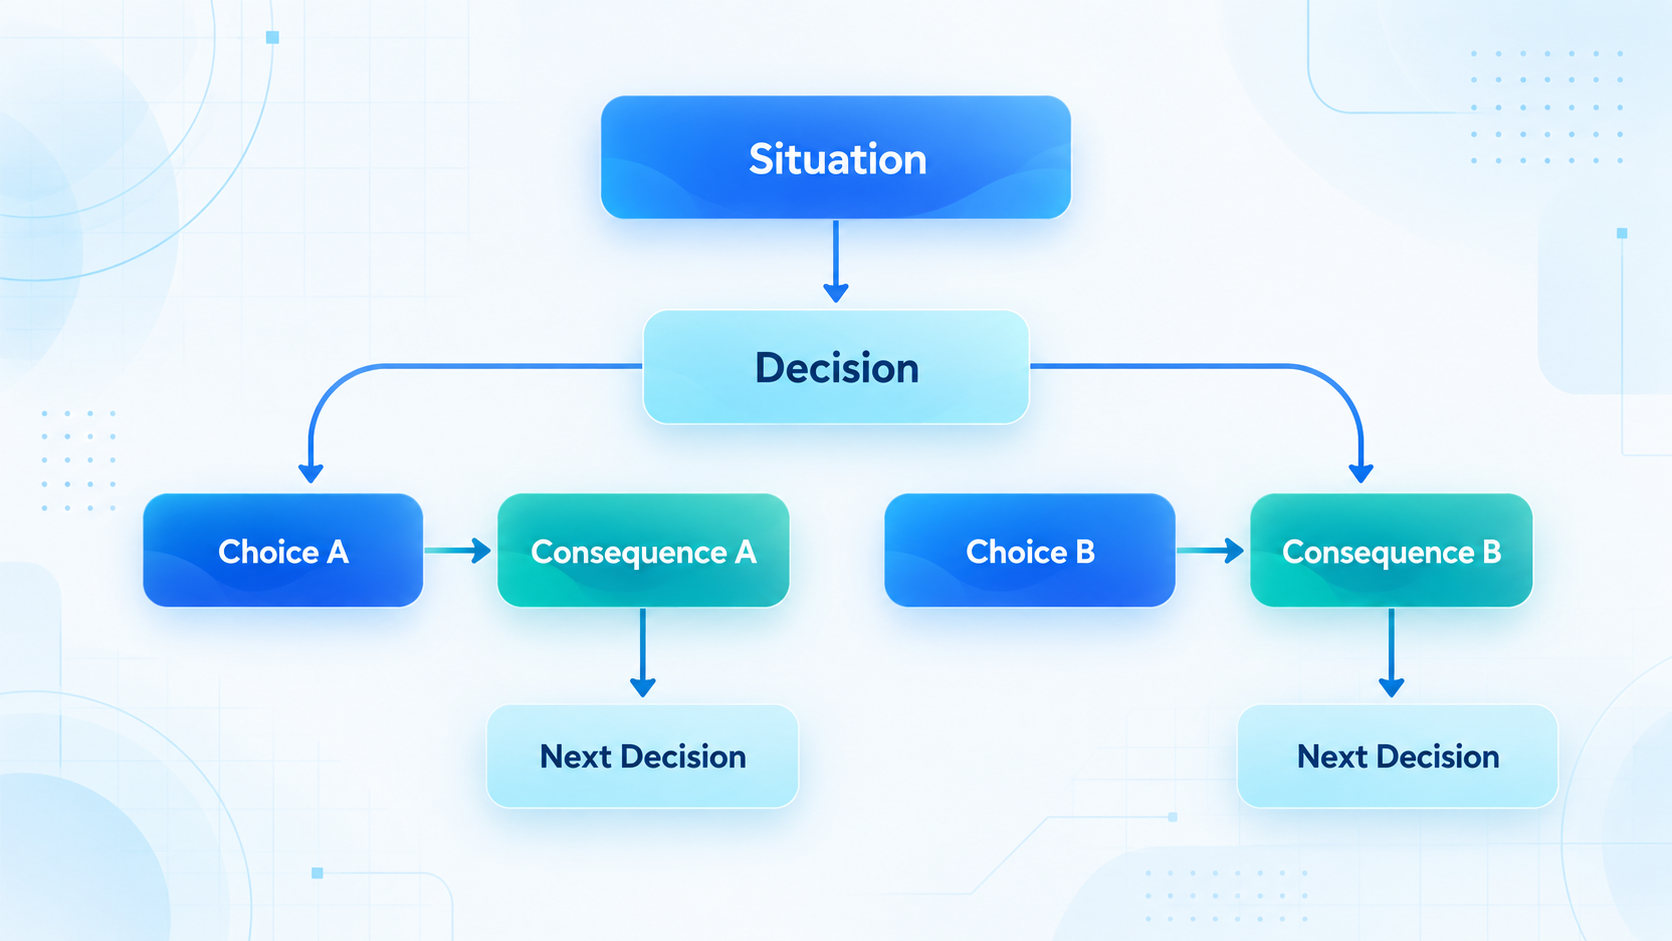
For example, imagine a customer service training course where a learner needs to respond to an unhappy customer.
They might have three choices:
- Response A: Apologize and offer a solution.
- Response B: Explain company policy.
- Response C: Escalate the issue immediately.
Each choice can lead to a different slide, consequence, or follow-up decision.
This approach is particularly useful for scenario-based learning, decision-making exercises, compliance training, customer service simulations, and other courses where learners need to practice applying knowledge rather than simply consuming information.
How to Create Branching Scenarios in ActivePresenter 10.6
Let’s walk through the complete workflow.
Step 1: Prepare Your Scenario Slides
Before creating branches, prepare the slides that will make up your scenario.
For a simple decision-based scenario, you might have:
Slide 1: Scenario Introduction
Introduce the situation and give learners the information they need.
Slide 2: Decision Point
Ask learners what they would do and provide several choices.
Slide 3: Positive Outcome
Show what happens when the learner makes an appropriate decision.
Slide 4: Negative Outcome
Explain the consequence of a less effective choice.
Slide 5: Follow-up Decision
Give learners another opportunity to respond to the situation.
You don’t necessarily need to arrange these slides in the exact order learners will see them. Scenario Editor can connect slides according to your navigation logic rather than simply following their document order.
Step 2: Open Scenario Editor

Once your slides are ready, open your ActivePresenter project.
Go to:
View > Scenario Editor
ActivePresenter opens the Scenario workspace and displays your project as a graph.
You’ll still have access to the normal Slides pane, while tools such as the Inspector, Issues, Summary, Outline, Learning Paths, Test Cases, Find, and filters are available in the Scenario workspace.
Step 3: Choose a Learner View
At the top of Graph View, choose the learner view you want to examine:
- Demo
- Tutorial
- Practice
- Test
You can also use All modes when you want to inspect or modify the union of authored behavior.
However, simulation and preview require a specific learner view.
Choosing the correct view is important because the navigation available to a learner can differ depending on the playback profile.
Step 4: Select the Slide Where the Decision Happens
Now let’s create the first branch.
Select the slide that contains your decision or interaction.
For example, suppose Slide 2 asks:
“How would you respond to the customer?”
The learner can select one of several answers, and each answer should lead somewhere different.
With the source slide selected, go to the contextual Scenario tab and choose:
Add > Branch
This opens the branch composer.
Step 5: Define the Branch Trigger
The branch composer lets you specify what causes the learner to follow this path.
Start with On.
This identifies the slide or project-level event that owns the branch.
Next, configure When.
Choose the event that should trigger the branch.
For example, the branch might occur when the learner clicks an answer or another interactive object.
Conceptually, you’re telling ActivePresenter:
When this event happens on this slide > send the learner to this destination.
Step 6: Choose Where the Learner Should Go
Next, use Go To to select the destination.
Suppose the learner chooses the recommended response in your customer service scenario.
You might configure the branch to go to:
Slide 3 : Customer Feels Heard
For another response, you could create another branch leading to:
Slide 4 : Customer Becomes More Frustrated
Repeat the process for the other decisions in your scenario.
Your graph will gradually change from a simple linear sequence into a branching structure.
Step 7: Add a Condition When Necessary
Not every branch needs to run every time an event occurs.
If the destination should depend on a learner response, object state, variable, or another condition, expand Only If in the branch composer.
Then define the condition that must be satisfied.
This allows you to create more sophisticated branching logic.
For example:
If Score >= 80 > Advanced Challenge
If Score < 80 > Review Section
Or:
If Attempts = 1 > Try Again
If Attempts > 1 > Show Explanation
If the branch doesn’t require conditional logic, you can leave Only If unused.
When you’re finished, confirm the branch.
If you cancel the composer instead, ActivePresenter makes no changes to the project.
Step 8: Inspect the New Connection
After creating the branch, select its connection in the graph.
The Inspector displays the complete logic behind it, including its event, condition, branch, action, and destination.
This is especially helpful in larger scenarios because you don’t have to open individual slides and interactions just to understand why a learner is being sent somewhere.
If navigation exists inside a Conditional Action, it remains inside its original THEN or ELSE branch.
Suggested image: New branch selected in the graph with its properties displayed in the Inspector.
Creating Branches from Project-Level Events
Not every navigation action needs to belong to a single slide.
Scenario Editor also lets you create branches from project-level events or events belonging to objects shown over multiple slides.
For example, imagine your course contains a persistent Home button that learners can use to return to the main menu.
Go to:
Scenario > Add > Branch from Project-level Event
Then configure:
- On : Select the project event or object that owns the branch.
- When : Select the event that triggers it, such as On Click.
- Go To : Select the destination slide.
- Only If : Optionally add a condition.
- Confirm the branch.
The new connection appears from the Project-level Events node to its destination.
Because an object displayed over multiple slides can trigger its event wherever that object is available during playback, this course creation tool feature makes managing persistent navigation controls (like Home or Menu buttons) quick and efficient.
Step 9: Check Your Scenario for Problems
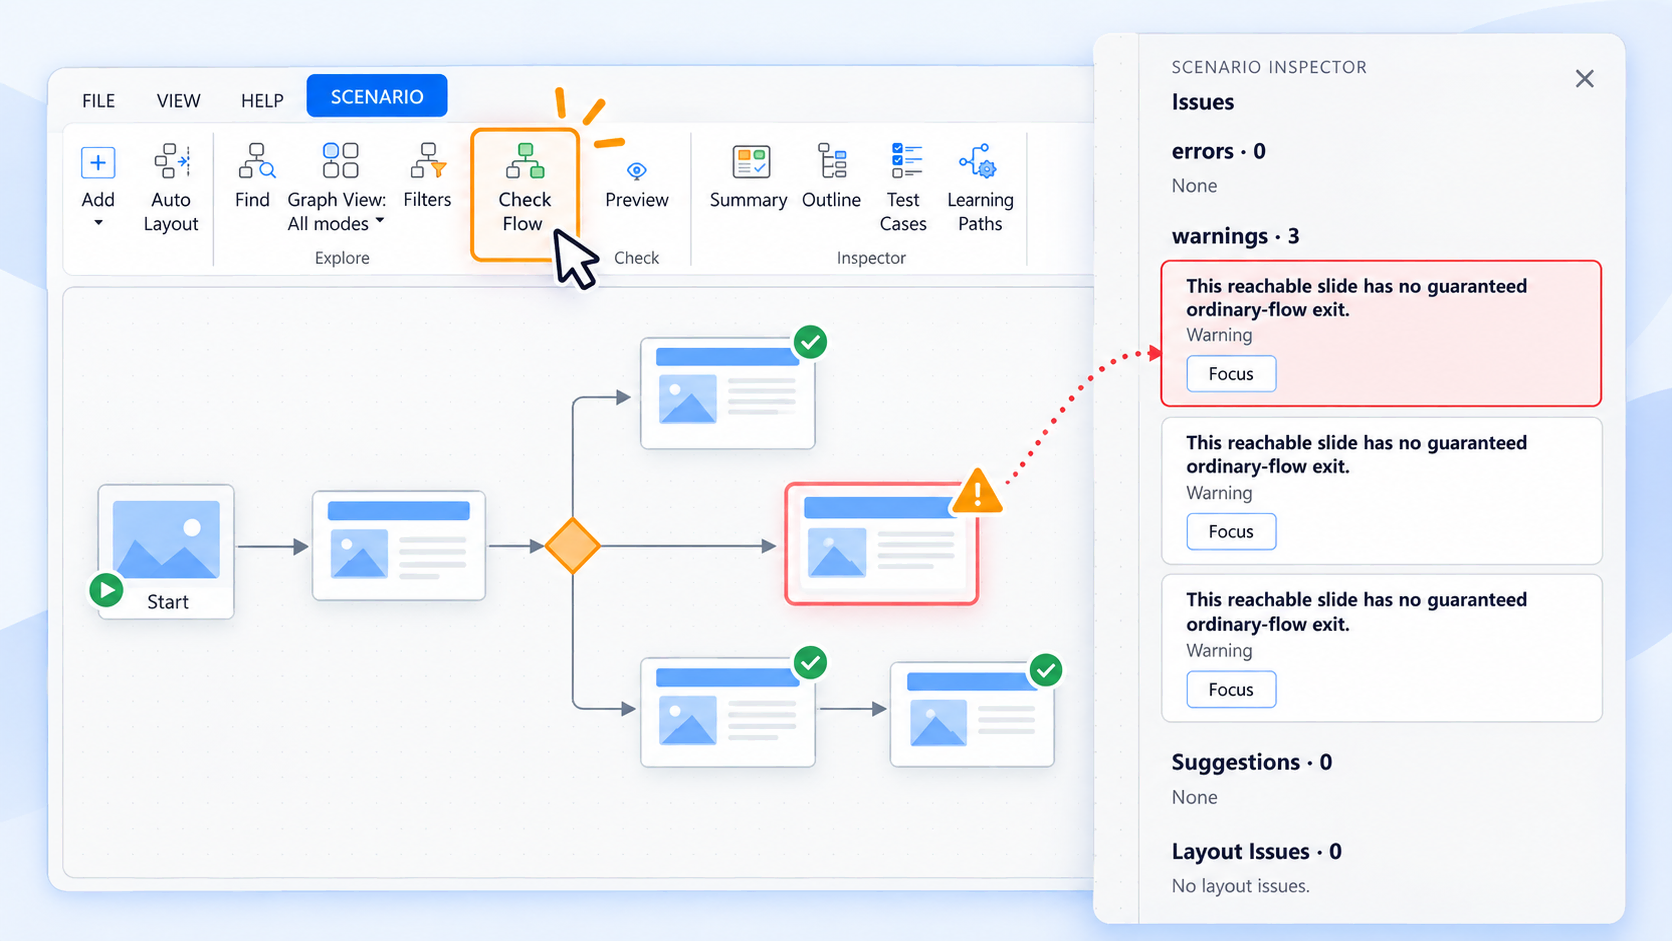
Once you’ve created several branches, the graph may look correct visually, but that doesn’t necessarily mean every path works.
Use Check Flow to analyze the scenario.
Scenario Editor can help locate problems such as:
- Unreachable slides
- Dead ends
- Invalid navigation targets
When an issue appears, select it to locate the related node or connection.
Correct the problem and run Check Flow again.
This is particularly valuable for complex courses because a single incorrect connection can make an entire section of your scenario inaccessible.
Suggested image: Issues panel showing an unreachable slide or dead-end warning.
Step 10: Trace a Learner’s Path
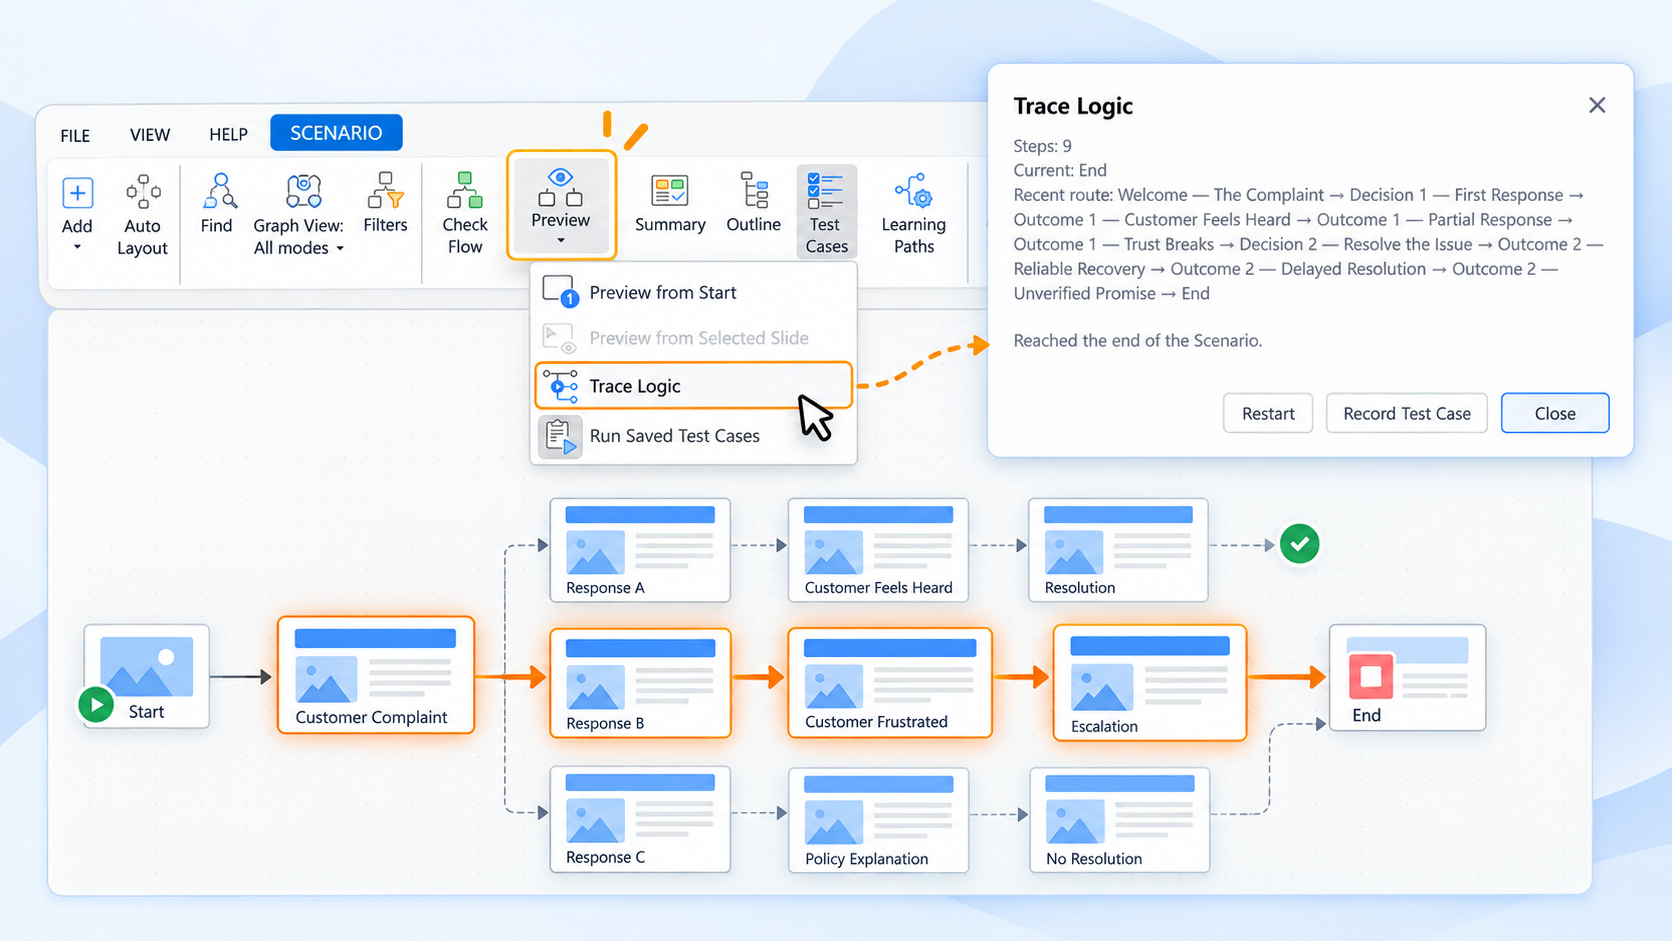
You don’t always need to preview every slide to understand whether your branching logic works.
Use Trace Logic to explore a possible learner path without playing the actual slide content.
Choose a learner mode and starting slide, then enter any known initial variable values.
As ActivePresenter moves through the scenario, it may ask you to resolve unknown or ambiguous choices.
The graph then highlights the resulting route and terminal state.
For example:
Start > Customer Complaint > Response B > Customer Frustrated > Escalation > End
You can immediately see the route the learner would take.
This makes Trace Logic particularly useful when troubleshooting complicated conditional navigation.
Step 11: Save Important Routes as Test Cases
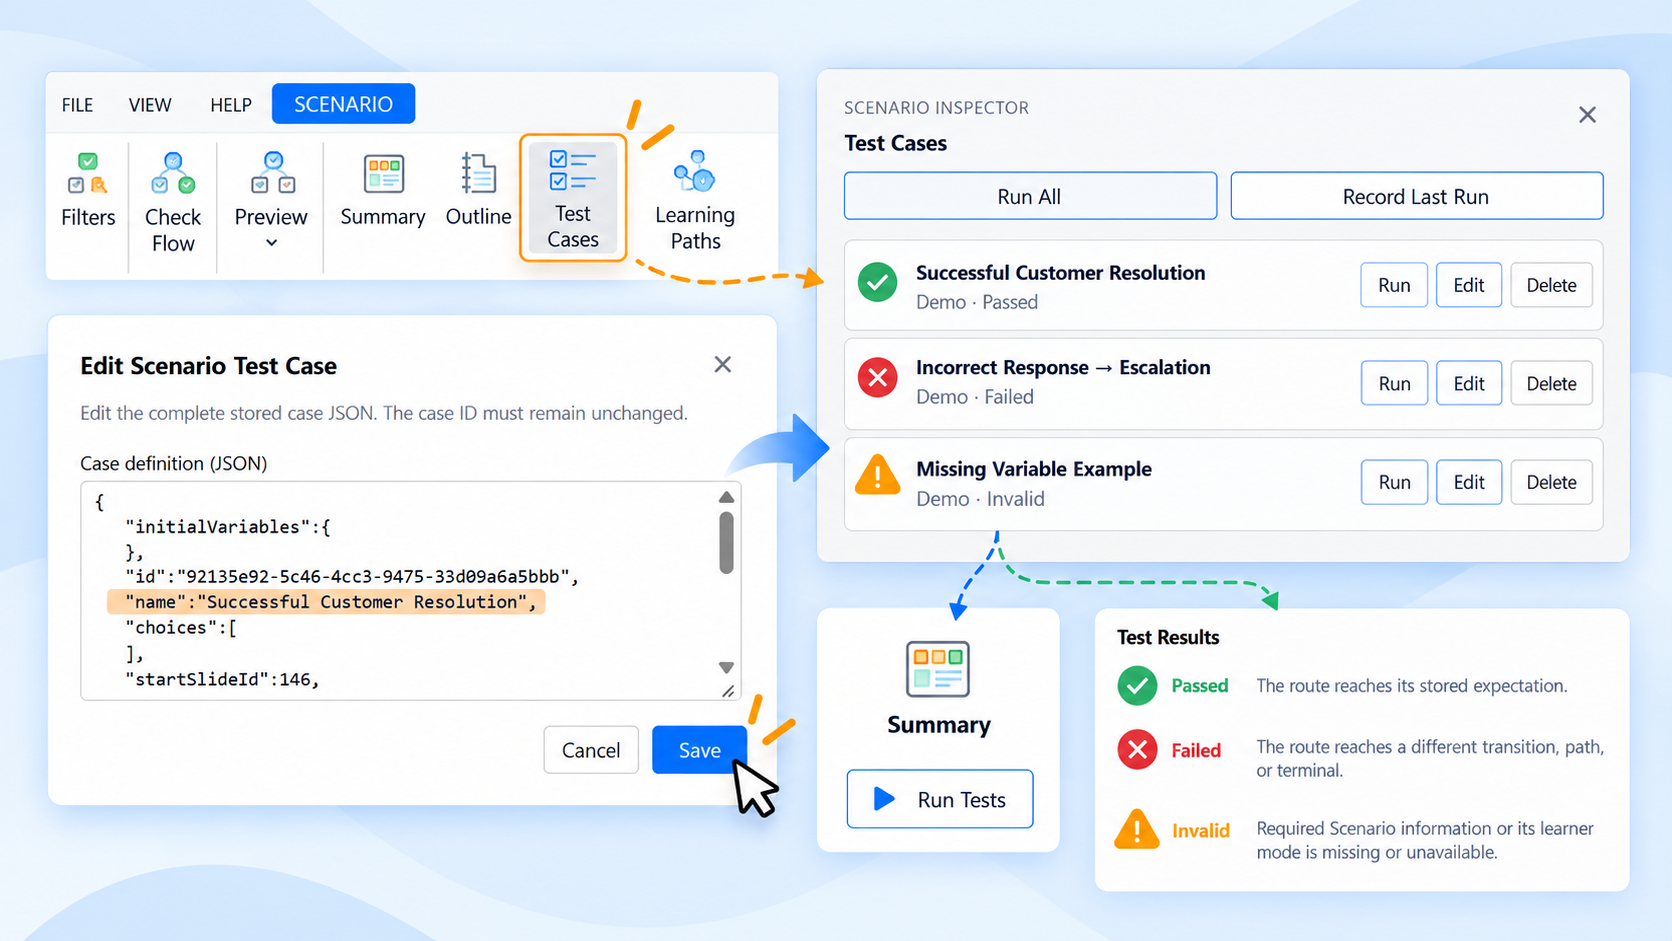
If a Trace Logic route represents an important learner journey, you don’t have to manually recreate it every time you modify your course.
Click Record Test Case and give the route a meaningful name.
For example:
Successful Customer Resolution
or:
Incorrect Response > Escalation
A test case can store information including its starting slide, learner mode, initial variables, recorded choices, and expected terminal and named path.
Open Test Cases to run an individual case or choose Run All.
You can also open Summary and select Run Tests to run the complete suite.
A test can return three main results:
- Passed: The route reaches its stored expectation.
- Failed: The route reaches a different transition, path, or terminal.
- Invalid: Required Scenario information or its learner mode is missing or unavailable.
Test cases become particularly useful as a branching course evolves. Instead of manually checking every route after making a change, you can rerun important scenarios and identify unexpected changes.
Step 12: Organize Routes with Learning Paths
For larger courses, you may want to organize existing slides into named learning paths.
Go to All modes, then choose Learning Paths on the Scenario tab.
Select Add Path, enter a name and description, and choose its member and entry slides.
You can then configure whether the path is required and define its pass condition using:
- Percent
- Points
- Number correct
- Slides viewed
It’s important to understand that a learning path does not create a branch or change navigation.
Instead, it assigns existing slides to a named scoring and reporting track.
This makes learning paths useful when different routes through a scenario need their own completion, scoring, resume state, or reporting behavior.
For HTML5 output, per-path reporting is supported with SCORM 2004 and xAPI. SCORM 1.2 retains the aggregate project result instead of separate path objectives.
Export Your Scenario Graph
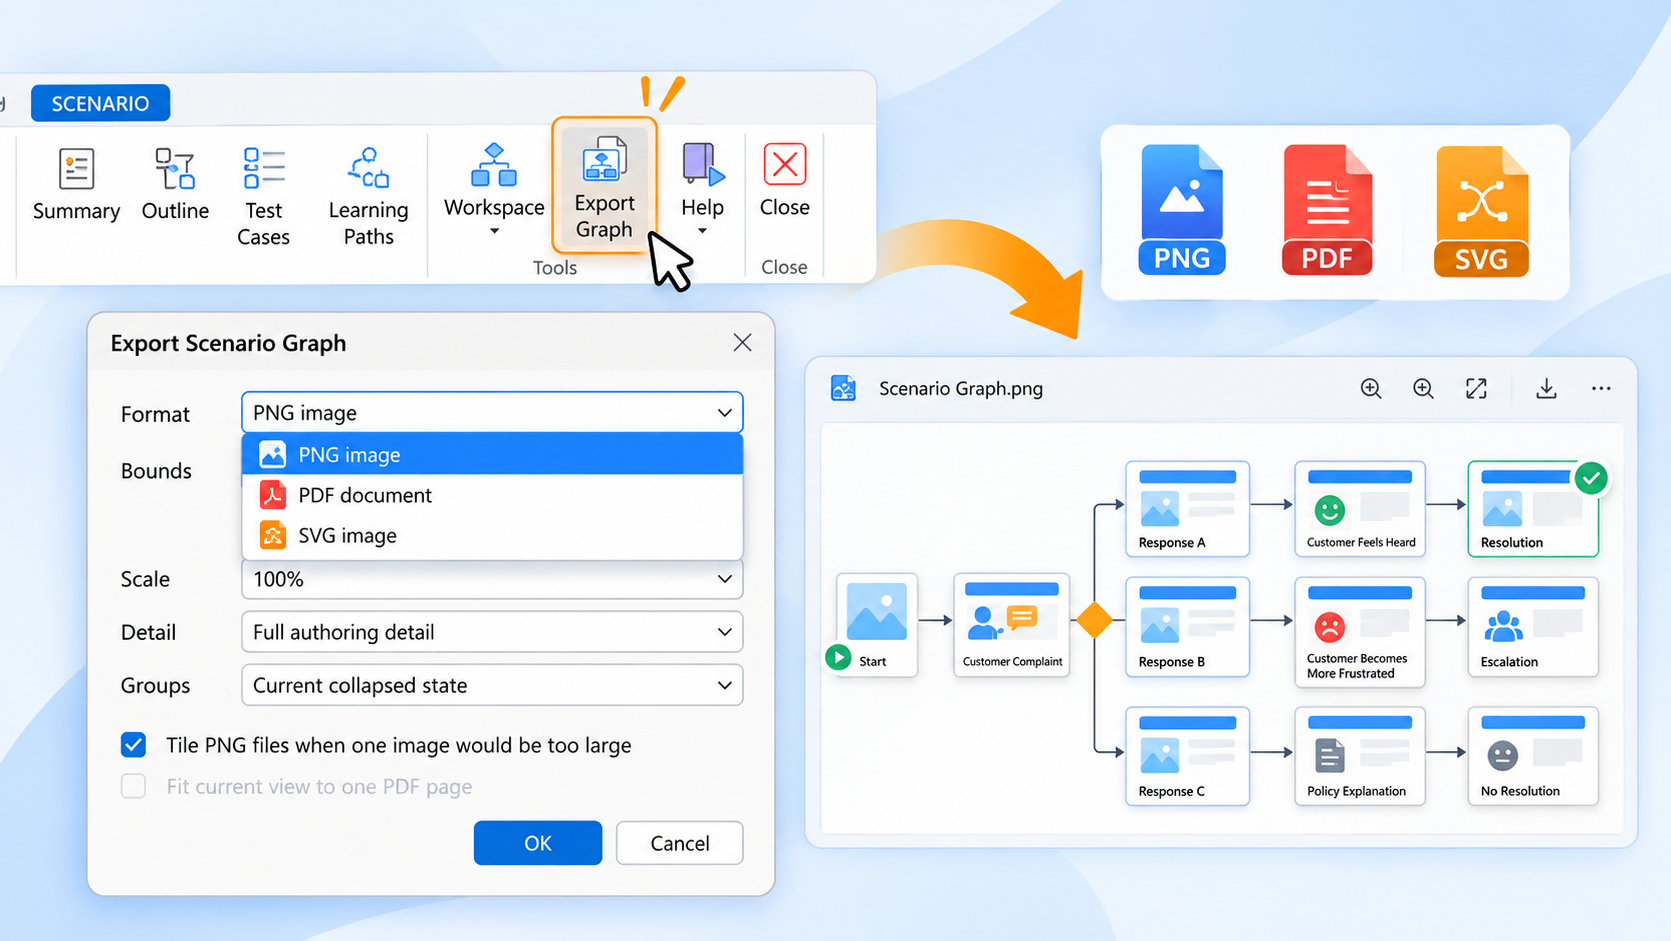
Scenario diagrams can also be useful outside ActivePresenter, for example, during instructional design reviews or when sharing course logic with stakeholders.
Choose:
Scenario > Export Graph…
You can export the graph as:
- PNG
- SVG
You can choose between exporting the Entire graph or Current view, along with scale and detail options.
This gives instructional designers a convenient way to document branching structures or review them with subject matter experts before finalizing a course.
Final Thoughts
Branching scenarios are powerful because they let learners experience the consequences of their decisions instead of simply moving through the same sequence of slides.
However, the more choices you introduce, the harder those routes can become to manage.
Scenario Editor in ActivePresenter 10.6 brings that logic into a visual workspace. You can see how slides connect, create branches directly from the graph, add conditions, identify unreachable slides and dead ends, trace possible learner journeys, preview the experience, and save important routes as reusable test cases.
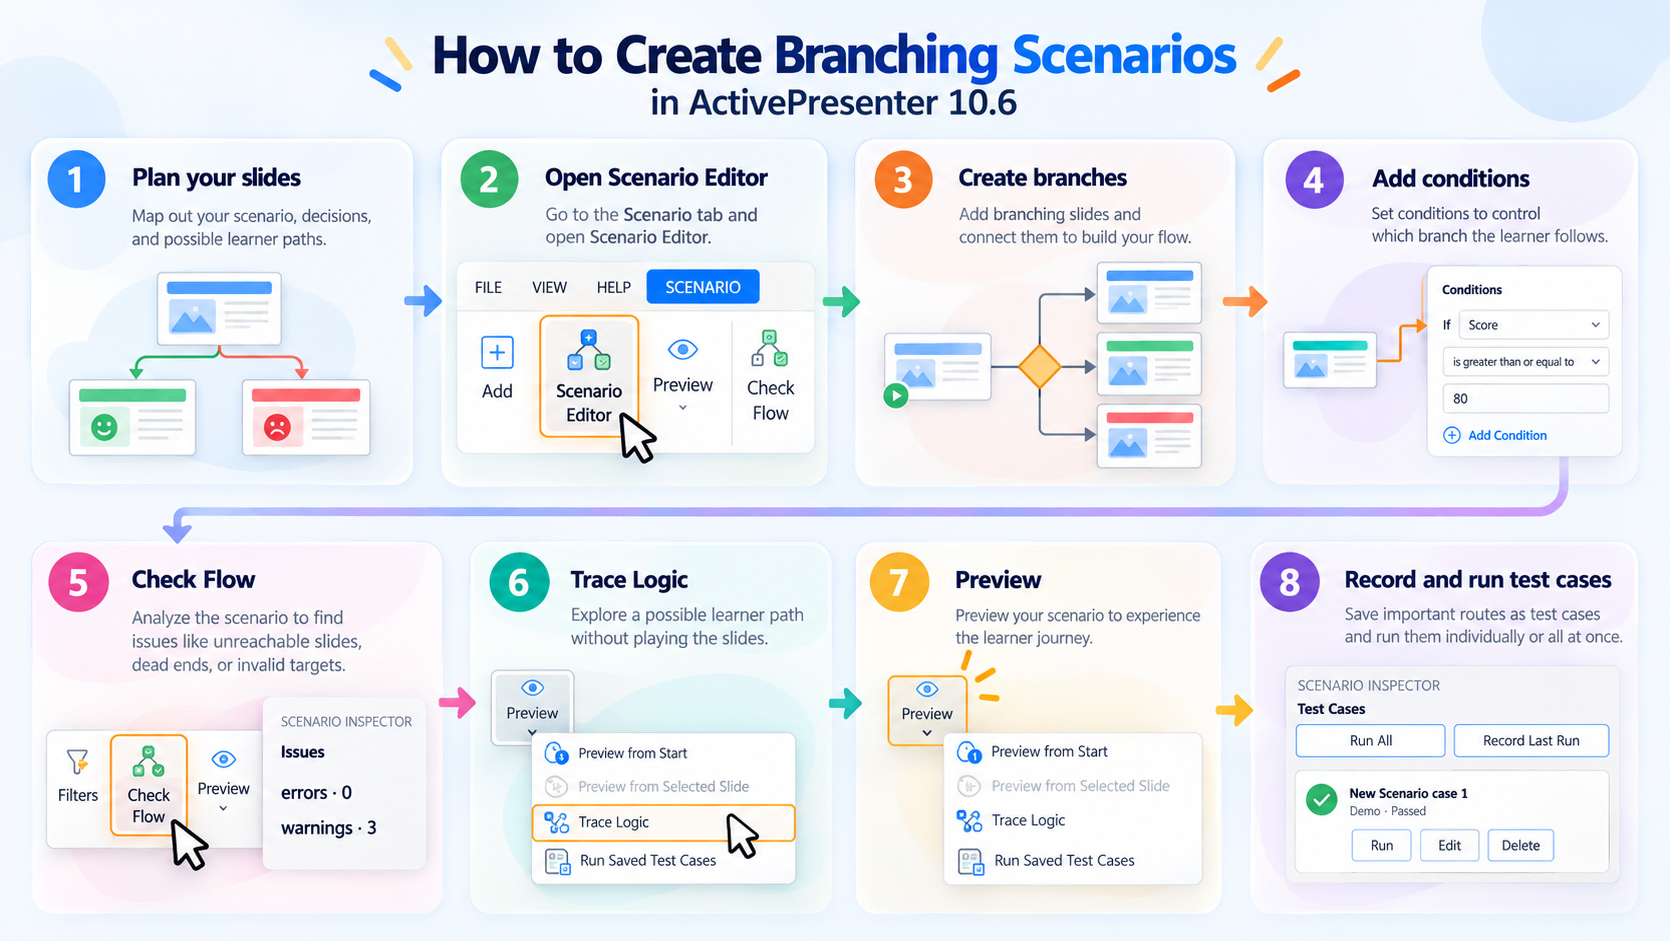
With this workflow, instructional designers and course creators can build more complex decision-based learning experiences while keeping the underlying navigation easier to understand, troubleshoot, and maintain.
Ready to Build Your First Branching Scenario?
Take control of your course design and elevate your learner experience with ActivePresenter. Download the latest version today to get started!