Inserting and removing slides are two of the most basic steps when creating presentations. Therefore, with the purpose of helping users save time and focus on more important procedures, ActivePresenter provides a considerable number of simple methods to add or remove slides. This article will help you to get a better idea of how to use them. If you have not installed ActivePresenter yet, download it here for free.
Inserting New slides
In ActivePresenter, there are six ways to perform this task:
Inserting a Blank Slide In an Existing Project
When you need to add some objects such as text, images, shapes or video clips, you have to create a blank slide first.
To insert a blank slide, take one of the following ways:
- In the Home (1) tab, click Blank Slide (2).
- Or click Blank Slide (4) from the Slide tab (3).
- Or right-click in the Slide Pane and select New Blank Slide (5).
If there are any existing slides, the new one is inserted right after them. You can switch to them manually.
Inserting Images as Slides
ActivePresenter allows you to import images from Library or a hard drive folder to a current project as new slide backgrounds. Just take one of the next steps below:
- In the Home tab, point to Slides From (6), and click From Images (7).
- Or click Images Slides (8) in the Slide tab.
The following steps are similar to open a new Image project.
Inserting Slides from a PowerPoint Presentation
If you already have a PowerPoint presentation, you can use ActivePresenter to convert it into an interactive eLearning course.
Two ways to add slides from a PowerPoint presentation are as follows:
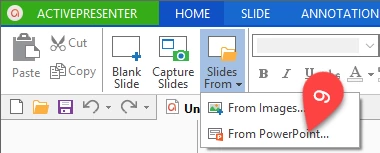
- Click From PowerPoint (9) in the Slides From drop-down list.
Or click PowerPoint Slides (10) from the Slide tab.
The next steps are the same as when opening a new PowerPoint project.
Inserting a Random Slide
In general, a random slide in ActivePresenter is a random question in other tools.
To insert a random slide, you just click Random Slide (11) in the Slide tab.
After that, the inserted slide pool is automatically linked to the first slide pool in the project.
Inserting New Slides by Fresh Capturing
This option is suitable for the case that you have a created project and need to record a few more slides.
Then, you can choose one of two options below to do this task:
- In the Home tab, click Capture Slides (12).
- Or click Capture Slides (13) in the Slide tab.
Copying Slides from Another Project
If you are creating a new blank project, and want to copy some slides from an existing one, this method is right for you.
Step 1: Open the project created before while launching a new one.
Step 2: Select desired slides from the previously created project, and press CTRL+C.
You can also copy multiple slides by pressing Ctrl/Shift while clicking slides.
Step 3: Switch to the new project, click the slide you want your copied slides to follow and then press CTRL+V.
Deleting Slides
If there is any unwanted slide, just delete it:
- Right-click it, and choose Delete from the pop-up menu.
- Or select it, and press the Delete key on the keyboard.
Now, you know how to insert and delete slides with ActivePresenter. Feel free to contact us if you need more help.
Don’t forget to follow us to get more useful information about how to make use of ActivePresenter in screencasting and designing eLearning courses.


