To work with your projects faster and save time in ActivePresenter, check out full features and description of our screen recording and video editing tool here first. You can use the Batch Operation tool. In the previous tutorials, I introduced you to two useful features of this technique, including editing and changing style for multiple objects at once. Check out the how-to guide below to find out more on how to use its another option which is called Inserting and Deleting Multiple Objects at the same time.
Inserting an Object into Multiple Slides
As you know, inserting an object into multiple slides at once, great features in elearning software, will help you to save a great deal of time, and avoid performing the same task over and over again. In ActivePresenter, you can do that with following steps:
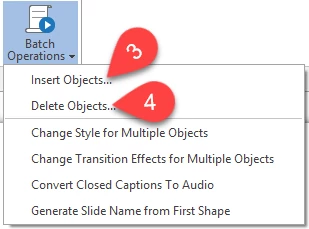
Step 1: In the Slide tab (1), click Batch Operations (2).

Step 2: Click Insert Objects (3).

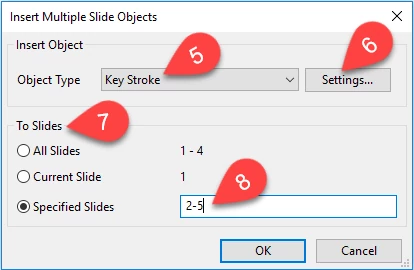
Step 3: Customize default settings in the following dialog box.
- Select the type of object that you want to add in the Insert Object section (5).
You can adjust the properties of the selected object (such as size, style, transition effects, time duration, etc.) by clicking the Settings button (6).
Step 4: Define which slide(s) to apply the changes (7).
- All Slides: Insert that object into all the slides of the current project.
- Current Slide: Insert that object into the working slide only.
- Specified Slides: Select it if there are just some certain slides that you want to insert the object in.
You can type the ordering number of those slides into the box, and separate them with a comma, or use a hyphen to indicate the range. For example, the range 2-5 in the picture above refers to the slides from 2 to 5 (8).
Once the batch processing finishes, a new object will appear on all selected slides with the same properties. Obviously, you can edit its properties in each slide separately.
Deleting Multiple Objects at Once
If there are many unwanted objects in your working project, and you want to remove them at once, this technique is an ideal choice.
Some basic steps for deleting multiple objects are as follows:
Step 1: In the Slide tab (1), click Batch Operations (2), and click Delete Objects (4).
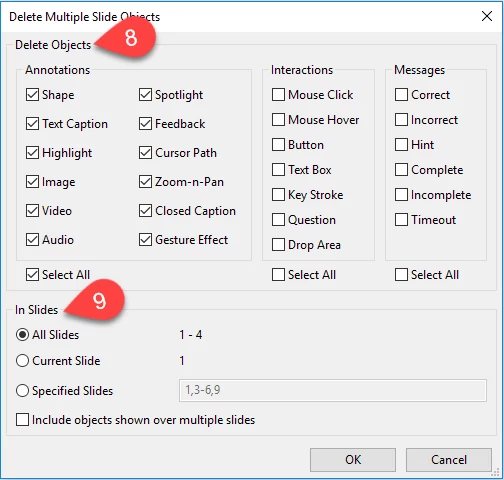
Take further actions in the window appearing on the screen.
Step 2: Select the types of objects that you want to remove in the Delete Objects section (8). Click Select All if you want to delete all objects of the same type.
Step 3: In the In Slides section (9), specify the desired slide (s).
- All Slides: Delete the selected objects in all of the slides of your project.
- Current Slide: Delete the selected objects in just the slide you are working with.
- Specified Slides: Type the ordering number of slides that contain the selected objects.
Now, you get a full idea of how to use the Batch Operation tool in ActivePresenter. Try it today, and feel free to contact us if you have any problem.

