Math Crossword Puzzle is a game that helps players enhance their mathematical thinking and calculation skills in a fun way. Let’s learn how to create this game by using ActivePresenter, a download eLearning creation tool to create eLearning gamification for school learning in today’s article.
From Playing to Creating: Math Crossword Puzzle
How to Play?
This game consists of multiple crosswords. Each crossword contains a mathematical equation. Players need to fill in the blanks to make these mathematical equations true.
When players complete the puzzle, they can click the Submit button to see the result. If there is any incorrect answer, the game will show checkmarks to let players know which answers are correct or incorrect. From here, they can make the corrections. If players give all the correct answers, the game will be over.
How to Create?
To start creating the Math crossword puzzle, you can prepare a background image to make the game visual more engaging. Next, simply create crosswords by using the Grid Box feature. To set up blank cells to fill in, an easy and fast way is to use the Text Entry objects. Last but not least, adding events – actions will be the final step to make the game work as desired.
To be more clear, following this procedure:
- Insert Objects to Create Game Layout
- Create Crosswords
- Set Up Blank Cells
- Submit and Get Results
- Preview and Export the Math Crossword Puzzle
Now let’s start creating this game right away.
Insert Objects to Create Game Layout
This is a preparation step. You can insert some objects (background images, instruction) to create the game layout. To be more precise, in this game, you need to:
- Add a background image (Properties pane of the slide > Slide Properties tab > Background Image > choose an image from your computer).
- Create the instruction (Insert tab > Text Caption). Then, feel free to change its font, size the way you want.
Create Crosswords
The Math crossword puzzle is a combination of multiple horizontal and vertical crosswords. To create them, you can use the Grid Box feature. Before starting, you can refer to the Work with Grid Box tutorial to better understand this feature.
Create Horizontal Crosswords
To create a horizontal crossword, take the following steps:
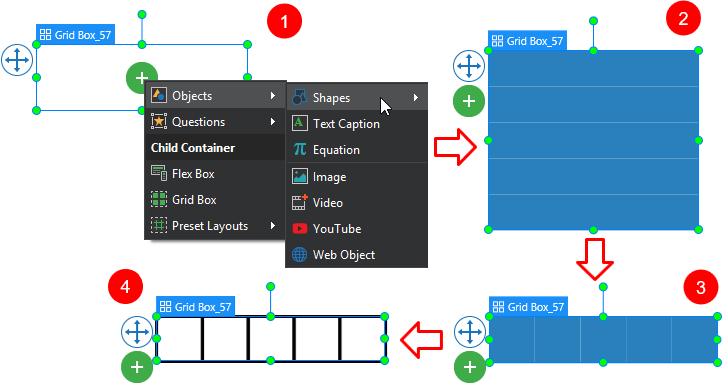
Step 1: Access the Insert tab > Container > Grid Box > click the green plus button at the center of the container > Objects > Shapes (1) > Rectangle.
Step 2: Because of the 5 cells for an equation, you need to insert 5 rectangles (2). Note that the more cells your crossword contains, the more rectangles you need to insert.
Step 3: After that, navigate to the Properties pane of the grid box container > Size & Properties > Container Layout > set the Number of Column to 5.
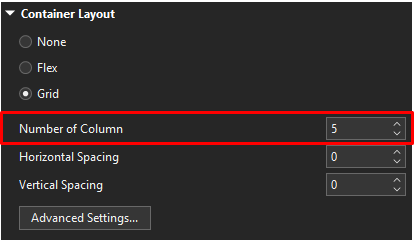
Step 4: Adjust the size of the grid box in the Transform section (for example, 500px wide and 100px high). As a result, you will get 5 squares (100px x 100px for each) inside the grid box (3). By defining the exact size of the grid box, you will save time when creating vertical crosswords later.
Step 5: In the Style & Effects tab of the grid box > set No Fill and Solid Line > customize the width and color of the line if you want (4).
Create Vertical Crosswords
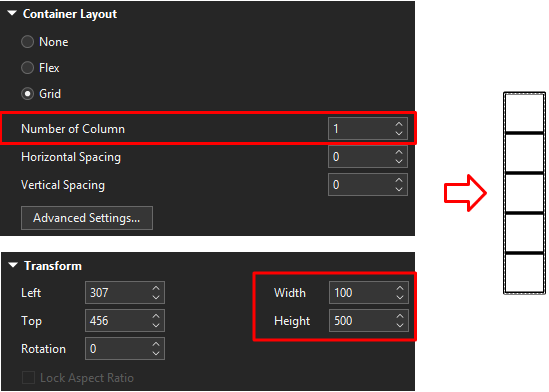
For vertical crosswords containing 5 cells, you can copy a horizontal crossword created earlier. Then, re-set the Number of Column to 1 and re-adjust the size to 100px wide and 500px high, for example.
Combine Horizontal and Vertical Crosswords Together
After creating horizontal and vertical crosswords, now it’s time to combine them together to get a complete Math crossword puzzle.
Note: Once you move a crossword (grid box) over the other, its container will turn orange due to the Container Snapping mode being turned on by default. When you release the mouse button, their layouts will be snapped together like this:
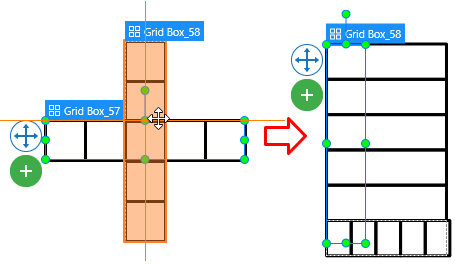
To avoid it, you can access the View tab > click Container Snapping to turn it off. Otherwise, you can temporarily disable the snap behavior by holding down ALT while moving crosswords.

By doing so, now you can freely place crosswords anywhere on the slide.
After that, just use the copy (CTRL+C) and paste (CTRL+V) commands to create as many crosswords as you need.
Insert Numbers and Math Symbols into Crosswords
It’s easy to insert numbers, even math symbols, such as plus, minus, multiply, divide, into a crossword. To get it done, select a cell > navigate to the Insert tab > click the Equation icon > select any symbols you want from the list.

If you want to reuse a symbol, just copy the existing one and paste it to another cell.
For more information, let’s check out the Insert Equations tutorial.
Note: Before adding numbers and math symbols into crosswords, you need to change the text color from default white to black for easy seeing. Just select all crosswords and adjust at once in the Home tab.
Set Up Blank Cells
In this game, you can insert a Text Entry object to each blank cell. After that, you are able to set its correct answer, points, attempts, and other necessary properties.
Insert Text Entries
Just follow these instructions:
Step 1: Access the Insert tab > select Text Entry > draw or click anywhere on the Canvas > delete the default correct and incorrect feedback messages if you don’t need them.
Step 2: Change the size of the Text Entry object to be equal to the size of the blank cell (eg. 100px wide and 100px high).
Step 3: Navigate to the Style & Effects tab > set No Fill and No Line.
Step 4: Place the customized Text Entry object on top of a blank cell like this:
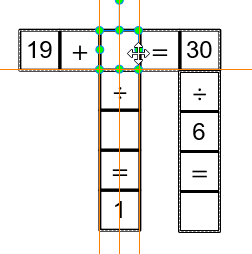
Set Correct Answers for Text Entries
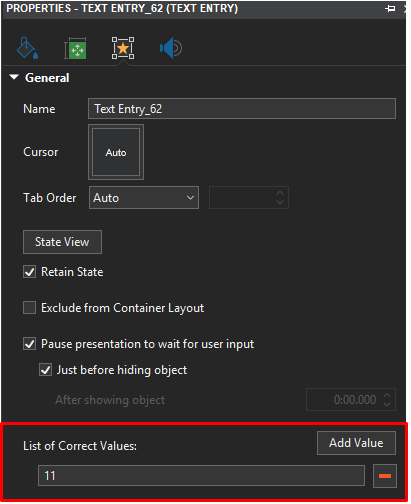
To add the correct answer for Text Entry object, you navigate to its Properties pane > Interactivity tab > General section > click the Add Value button in the List of Correct Values section.
Set Score and Other Properties for Text Entries
You need to notice some properties in the Score & Reporting section below:
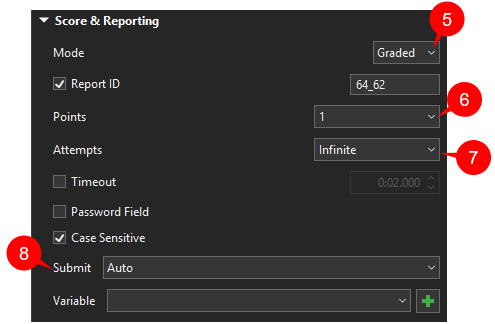
(5) Graded mode: Set the Graded mode to earn a point for the correct answer.
(6) Points: When players give a correct answer, they will get that predefined point. That point will be used as the condition for the Submit button later.
(7) Attempts: Set the number of attempts to Infinite, so that there is no limit on the number of answers that players can make.
(8) Auto Submit: Set the submitting method to Auto. Thus, players can submit their answers automatically. That means the system will validate the entered text whenever players press any key.
Submit and Get Results
To submit players’ answers, you need to create a Submit button first. Just access the Insert tab > Button. When players submit the correct answer of each Text Entry object, the system will automatically add 1 point (6) to the apQuizScore variable. Otherwise, it doesn’t. This game has 8 correct answers, so the max apQuizScore should be 8.
Having these in mind, you need to add event and actions to the Submit button. To be more precise, add the On Click event and 2 actions corresponding to 2 scenarios like this:
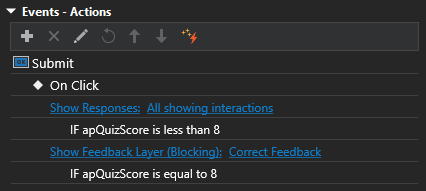
- If there is any incorrect answer, players can review and check their results. To get it done, add the Show Responses action and set it up like the image below:
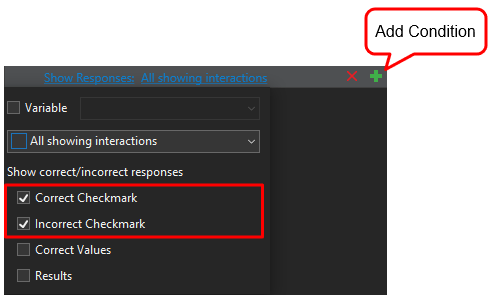
Then, click the plus button to add a condition for that action.
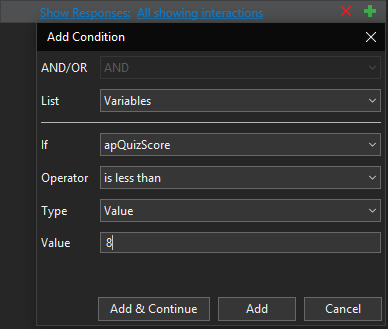
By doing so, players can see which blank cells are incorrect. Then, answer again until they have all the correct ones.
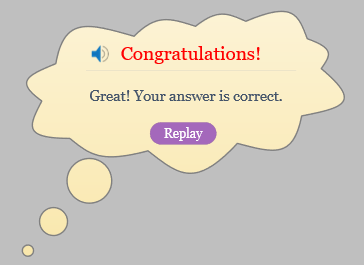
- If players have all the correct answers meaning the apQuizScore equal to 8, a correct feedback message will be shown.
You can customize that feedback message the way you want in the View tab > Feedback Master > Correct Feedback Layer. Also, you can add the Replay button to let players replay the game (On Click event > Restart Presentation action).
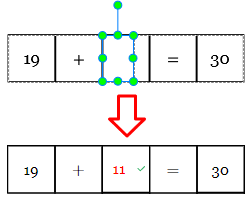
Tip: A checkmark will be shown next to each blank cell. It may partly cover the next cell. In this case, you can reduce the size of each Text Entry a little bit, so that the answer filled in and the checkmark will be in the same cell.
Preview and Export the Math Crossword Puzzle
Previewing the game is necessary since it lets you see any mistakes caused and make changes before actually exporting. If the result pleases you, just export it to HTML5, SCORM, or xAPI packages depending on your needs.

For your reference, you can download the Crossword sample project from this link.
Download ActivePresenter and try all the features without time restrictions
Read more: