Suppose you have a group of audio objects at different volumes and you want to make them all play at the same volume level. You can easily deal with this issue by using Audio Normalization feature in ActivePresenter 7. Basically, Audio Normalization applies constant amount of gain to an audio recording to bring the amplitude to a target level (the norm). For example, you can normalize audio during the recording phase when you cannot speak at the same volume level. Now, let’s see how Audio Normalization works.
Using Audio Normalization
First of all, if you have an audio file and want to normalize it, ensure to insert it into ActivePresenter. After that, do the following:
Step 1: Specify the audio range that you want to normalize.
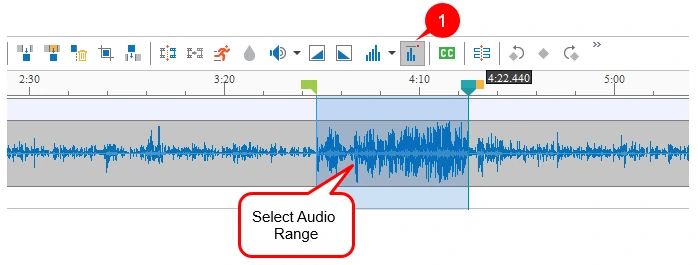
Step 2: In the Timeline pane, click the Audio Normalization button (1). Then, the Audio Normalization dialog will appear:
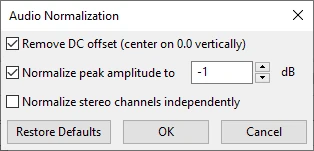
- Remove DC offset: DC offset is an offsetting of a signal from zero. The waveform can represent the trouble as it appears above or below the 0.0 horizontal line. In general, DC offset is mostly a hardware problem that can cause clicks, distortion, or loss of audio volume. It can limit the possible loudness. Hence, it is necessary to remove DC offset when normalizing audio as it centers the waveform on the 0.0 amplitude level. You should clear this option to speed up the normalization, if you are sure your audio has no offset.
- Normalize maximum amplitude to (peak normalization): Peak normalization brings the highest peak to the norm. A level of -1 dB (the initial default setting) is just below the maximum amplitude (0 dB) possible without clipping. However, giving a little headroom for effects and distortion-free playback on all equipment. For this option, enter zero or a negative value for the maximum amplitude you would like the selected track to have. A more negative value means you normalize the selected track to lower amplitudes.
- Normalize stereo channels independently: Normalization can work on the left and right channels of a stereo track as independently or a pair. So, when you select this option, normalization adjusts the amplitude of the channels separately to the same peak level. If not, normalization adjusts the level of both channels by the same amount, which is practical if your audio is already balanced.
After adjusting, Click OK to apply the effect and close the dialog.
If you do not satisfy with the adjusting result, click Restore Defaults to go back to the original settings or press CTRL+Z. Next, try Audio Normalization again with different settings.
Final Word
So, you have known how to use Audio Normalization in ActivePresenter 7. Don’t forget to use it when designing eLearning courses or editing the recording to enhance the audio quality.