Let’s bring your words to life with a very new feature offered in ActivePresenter 8: Text Animations. To get it done, you simply need to insert text, customize style, and add animation effects to them.
You can create animations for text in various ways, one of which is adding a typing effect or so-called typewriter effect to your text. The eye-popping text typing animation is quick to be done by animating text by its letters or words. For more details, keep reading today’s tutorial.
This tutorial covers:
Add Text
The very first step to animate text is to add text to your project. Text can come along with multiple objects such as shapes, text captions, equations, buttons, check boxes, and more. You can animate not only the whole object but also the text inside it with ease. The most commonly used object to create animated texts is the Text Caption. That’s because a Text Caption is with a transparent background, and where only text is given prominence.
You can insert a Text Caption into a project by going to the Insert tab.

Then, simply click anywhere on the Canvas or draw on the Canvas to see a text caption that appears allowing you to type multi-line formatted texts.

Format Text
If the text’s default styles do not satisfy you, it’s easy to change the text’s styles the way you want. To format text, do the following:
Step 1: Select the text in the text caption.
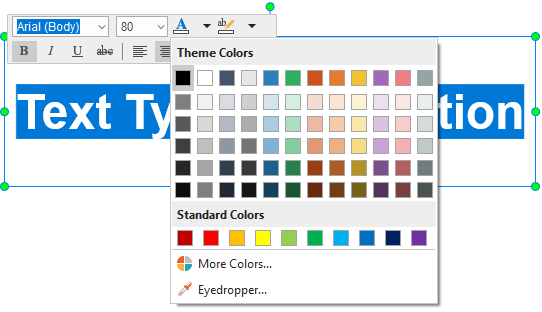
Step 2: Change the font, size, and color of the text in the Home tab or in the inline text editor that appears.

Add Animation Effects for Text
To add animation effects for text, you first need to animate the object containing that text. For that to happen, do as follows:
Step 1: Select the Text Caption object.
Step 2: Open the Animations tab. You can choose the types of animation effects among four built-in effects (Entrance, Exit, Emphasis, and Motion Path) and effect options (if any).
Now I want to add a typewriter effect to text, so I will use the entrance Appear effect. By default, this entrance effect is automatically added to the time bars of the inserted objects in a project. It is presented by a green triangle.

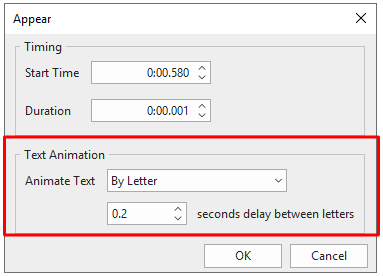
Step 3: Double-click the green triangle to open the settings dialog. Here is a Text Animation section, allowing you to apply the animation effect to the text.

To animate text, do the following:
- In the Animate Text spin box, select either By Letter or By Word options. That means each letter/ word of the whole text will appear in turn.
- Set the delay value for the time between letters or words appearing by doing one of the following:
- Click the up or down arrow in the delay box to increase/decrease the delay time.
- Enter a new value in the delay box.
3. Click OK to apply.
Note: Except for the Appear and Disappear effects which have no duration, when you add other animation effects to an object, take note of the following:
- The delay time between letters or words appearing is set by the percent of animation duration of the object, other than seconds.
- Other animation effects will be presented in the Timeline as effect time bars (colored rectangles). After closing the animation settings dialog, you can change the delay time by dragging the text effect time bar (the transparent bar) in the Timeline.

Remove Animation Effects of Text
If you no longer need animation effects of text, you can easily remove them by opening the settings dialog mentioned earlier. In the Animate Text spin box, select None.
So, all things considered. Let’s explore your creativity with animated texts with ActivePresenter 8. Animating text has never been so easy than ever. Don’t hesitate to download ActivePresenter 8 right now and try it and share with us your result. Also, feel free to contact us at any time you need help.
See also: