Supposing you are listening to an audio, you may feel uncomfortable if the track suddenly starts or ends with the same volume as the whole one. Don’t worry because you can fix this issue easily with the Audio Fade feature. So, in this tutorial, we will learn how to use Audio Fade In/ Fade Out in ActivePresenter 8.
Basically, Audio Fade is an effect used in audio editing to make the audio gradually increase or decrease the signal level. It’s useful especially in smoothing the beginning and end of an audio track. Audio Fade contains Audio Fade In and Audio Fade Out. When you want the beginning of the audio to gradually increase from silence, you can use the Fade In effect. In contrast, the Fade Out effect is helpful to decrease the sound to silence.
In addition, this feature is also useful in fading the background music in your projects.
Use Audio Fade in ActivePresenter 8
Now, take the following steps to use this feature:
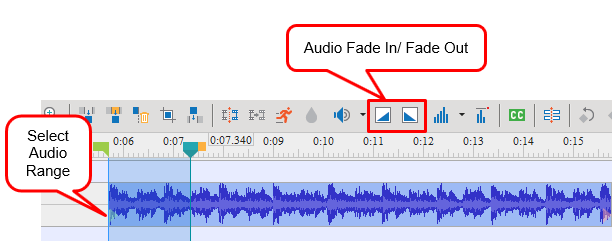
Step 1: Select the audio object (on the Canvas, Timeline or Selection pane).
This selected audio track can be a normal audio file or the recorded file.
Step 2: In the Timeline pane, specify the audio range that you want to apply the effect by dragging the Start and End marker of the Playhead along the timeline.
In the audio time bar, it’s the start range if you need to apply the Fade In effect. On the other hand, it’s the end range if you need to apply the Fade Out effect.
Note: If you don’t select any range, ActivePresenter will apply the effect to the whole audio file.
Step 3: Click the Audio Fade In ![]() or Audio Fade Out
or Audio Fade Out ![]() button depending on your need.
button depending on your need.
As a result, this is what you get if you use both types of Audio Fade. The audio time bar will look like the below screenshot:
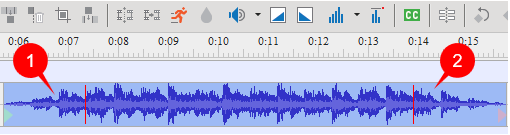
- Fade In (1) begins with silence and gradually becomes louder until full volume.
- Fade Out (2) makes audio progressively softer until it can no longer be heard.
- The red marks are where the Fade In effect ends and the Fade Out effect starts.
As you can see, the shape of the fade is linear as the volume rises or falls at a constant rate. You can apply these effects several times to strengthen the fade.
Restore Original Volume
After using the feature, in case the changes aren’t pleased you, you can restore the audio track to its origin.
Now, do as follows to remove the audio effect that you’ve applied:
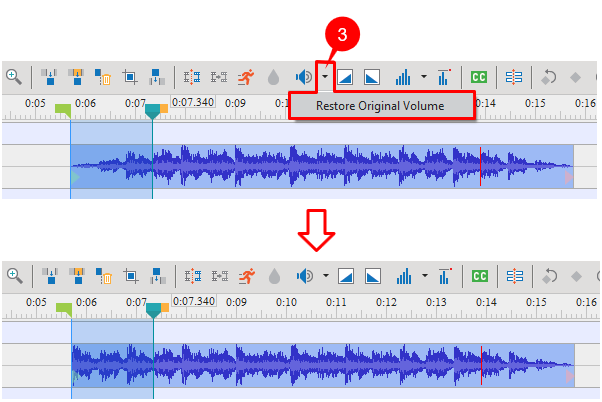
Step 1: Select the faded range.
Tip: Before selecting the range, turn the Timeline Snapping mode on so that you can select it more exactly. To do that, access the View tab and click Timeline Snapping ![]() .
.
Step 2: Click the arrow button on the Adjust Volume button (3) and select Restore Original Volume.
After that, the faded range will go back to its original signal level. And this is the result:
So, now you know how to use the Audio Fade effect in ActivePresenter 8. Feel free to take a look at our YouTube channel and Tutorial page for more useful information.
Related articles: