As said earlier, ActivePresenter 8 has many functionalities for video editing, ranging from basic to advanced. And in the previous post, you’ve learned about four basic audio and video editing tools. So, in this tutorial, we will quickly walk you through how to split and join audio/video in ActivePresenter 8.
Now, let’s get started!
Split Audio/Video
Regarding making videos, sometimes it’s necessary to split one video into several parts. For example, you want to save each of them as a single file and then use them for different purposes. So, here are the simple steps to split an audio/video into multiple parts:
Step 1: Select an audio/video and specify the timestamp where you want to split it.
Step 2: In the Timeline pane, click the Split Audio/Video Objects button. The video will be split into two separate objects. However, the timeline still places the two objects in the same object line.
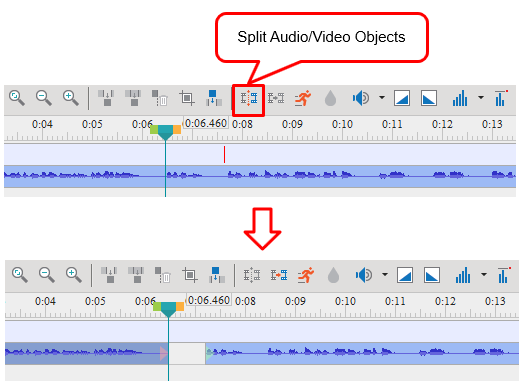
Step 3: If you want to move the latter part to a new object line, right-click it > Move Up/Down into a New Line.
Join Multiple Audio/Videos
Indeed, joining multiple audio/videos into one is just a breeze with ActivePresenter 8. To do that, check out the below steps:
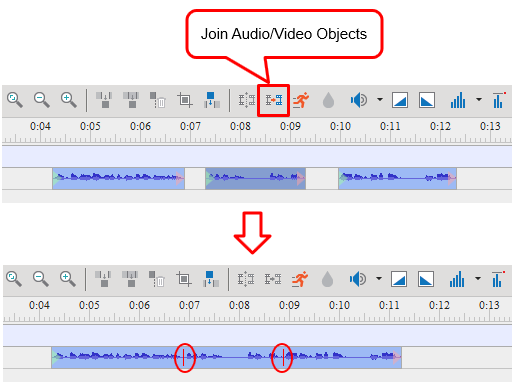
Step 1: Select all the audio/videos that you want to merge. Remember to hold down CTRL or SHIFT while clicking to select multiple audio/videos.
Step 2: Click the Join Audio/Video Objects button. As a result, all the selected audio/videos will merge based on ascending order of their start time. In other words, the audio/video with a smaller start time will play first in the combined audio/video. As can be seen, these red marks show where audio/videos join.
Here are some cases you may encounter when you join audio/videos:
- If audio/videos have the same start time, ActivePresenter will sort audio/videos by their z-order in ascending order. Hence, the audio/video with a lower stack order will appear in front of the one with a greater stack order.
- If audio/videos don’t have identical properties such as width, height, or resolution, the combined video will use all the first video properties that play. In other words, the output video will apply all the properties of the video having the smallest start time.
That’s it. So, you’ve known all the simple steps to split and join audio/video in ActivePresenter 8. Feel free to contact us if you have any obstacles. In addition, visit our YouTube channel to get more useful tutorial videos.
See Also: