Apart from SAPI5-compatible voices installed on your computer, ActivePresenter 9 allows you to get more third-party text-to-speech voices, including Amazon Polly, Google Cloud, and Microsoft Azure. Keep reading today’s tutorial to learn how.
Text to Speech is a handy built-in feature in ActivePresenter that helps you create audio tracks right within the app. In ActivePresenter 9, you will be able to access external cloud voices from different voice providers to create your own audio track. Sound interesting? Download the latest version of ActivePresenter to discover more:

The article covers:
Get more third-party Text-to-Speech voices
Let’s begin!
Enable Text to Speech Feature
As mentioned in the previous article, the Text to Speech feature is a convenient way to generate audio from text or convert closed captions to speech. You can find this feature in the Properties pane:
- Media tab of an audio object.
- Audio tab of an object with attached audio.
- Size & Properties tab of a CC node.

Here, you can choose one voice from the Voice drop-down list, then adjust the speed and volume if you want to. Getting done by the way, it creates a TTS audio.
For more detail, see Use Text to Speech Feature.
If the available voices in the Voice drop-down list do not satisfy you, you can click More Voices… to access other cloud voices. However, you need to do some further settings. That will be discussed in the next part.
Get More Text-to-Speech Voices
Access Voices
Once you click the More Voices… button, a Cloud Voices dialog appears allowing you to access more voices. However, to make voices accessible, you first have to get authentication from the voice providers. Do the following:
Step 1: Either click Authentication Settings (1) or Get Available Voices (2).

After that, the Cloud Text-to-Speech Authentication dialog popping up allows you to enter authentication keys for any provider whom you want to use their provided voices. Note that to get these access keys, you need to create an account in each corresponding provider.
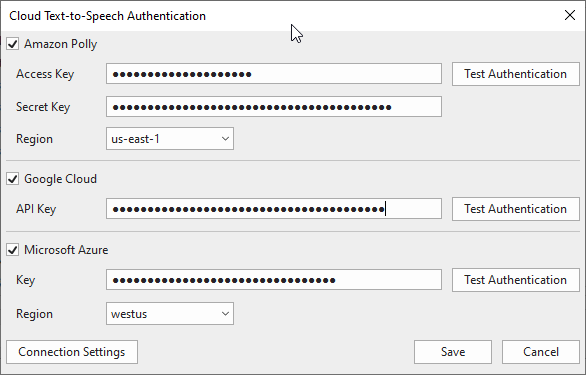
Below are some helpful references that you may want to take a look at:
- Amazon Polly: https://docs.aws.amazon.com/IAM/latest/UserGuide/id_credentials_access-keys.html#Using_CreateAccessKey
- Google Cloud: https://cloud.google.com/docs/authentication/api-keys
- Microsoft Azure: https://docs.microsoft.com/en-us/azure/cognitive-services/cognitive-services-apis-create-account?tabs=multiservice%2Cwindows
Step 2: After entering the keys, click the Test Authentication button to check if your keys are valid.
Step 3: Click Save to apply and go back to the Cloud Voices dialog.
Choose Language
After you successfully got authentication, available voices will appear in the Voice Option section.
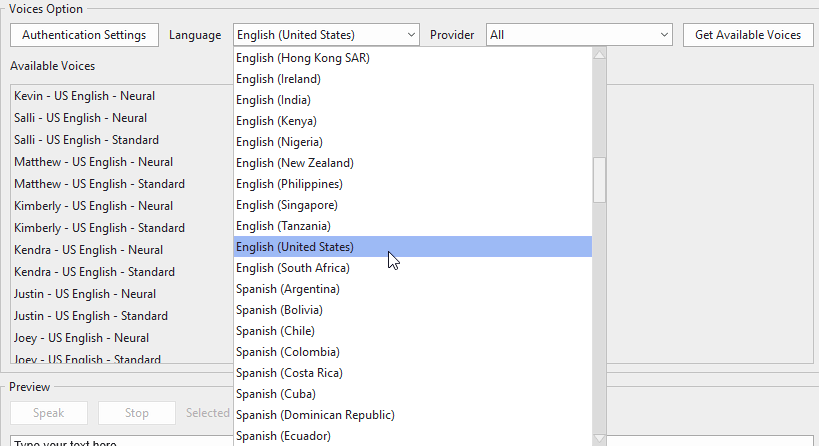
Here, you can:
- Click the drop-down arrow in the Language combo box to choose your desired language.
- Click the Provider combo box to choose among three providers, which are Amazon Polly, Google Cloud, Microsoft Azure, or all of them. The available voices of the selected language of the corresponding provider will be shown in the Available Voices list.
Preview Voices
To preview a voice, follow these steps:
- Select a voice in the Available Voices list.
- Enter a text in the Preview text box.

3. Click Speak to listen to the voice and click Stop to stop listening.
Manage Voices
If you are satisfied with a voice, you can click the Add button (3) to add that voice to the Added Voices list.
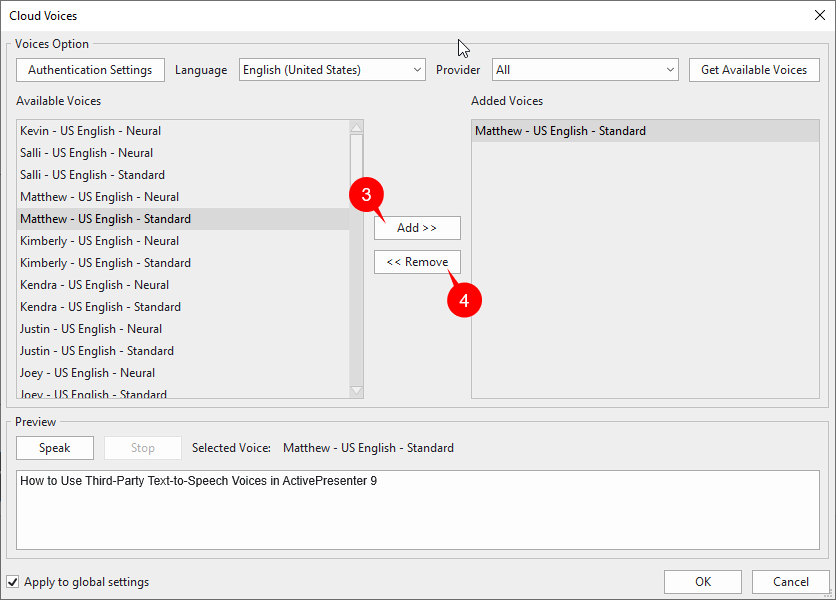
Then, the added voice will be shown in the Voice drop-down list of the Text to Speech section in the Properties pane, accordingly.

When you no longer need to use any voice, just click Remove (4). As a result, that voice will no longer be displayed in the Voice list.
Use SSML Tags for SSML-Supported Voices
Most of the cloud voices are SSML (Speech Synthesis Markup Language) – supported voices. That means you can enhance that voice with SSML tags. For example, you can use SSML tags to add pauses and other speech effects such as emphasis, volume, speaking rate, pitch, and more to that voice.
In the Text to Speech dialog, you can:
- Choose any cloud voices already added here.
- Select the SSML checkbox to enable this function.
- Enter plain text with SSLM tags (eg. </speak>, <break>, <prosody>, <phoneme>, <p>, <s>, etc.)
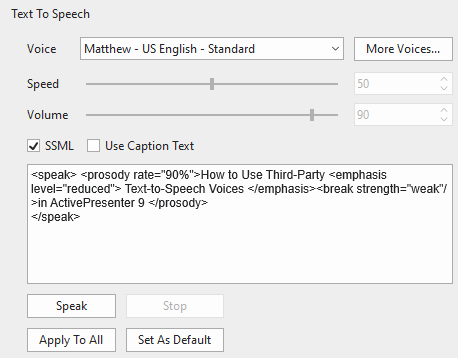
Meanwhile, if you select the Use Caption/Object Text checkbox, you just simply adjust the plain text without any SSML tags.
For more information about supported SSML tags, you can take a look at corresponding references: Amazon Polly, Google Cloud, and Microsoft Aruze.
That’s it. Now, you can access and adjust more third-party text-to-speech voices right within ActivePresenter 9. Feel free to contact us if you need any help.
See more: