Using screen recording function in ActivePresenter is really simple and interesting. Whenever you start creating a new capture, ActivePresenter will launch you the Capture Profile Editor for more specific settings. This window contains five different tabs dealing with different specific areas. In this article, I will introduce you how to work with it.
The General tab
The General tab allows you to have very basic and generic settings for your capture in terms of Capture Profile, Capture Type and Panning.
- Capture Profile (1): show you the profile name and its description.
- Capture Type: allow you to choose between the Smart Capture or Full Motion Recording mode.
Smart Capture
Using the Smart Capture mode (2), ActivePresenter records your screen and takes a screenshot whenever you do a mouse click or text type.
If you select Automatically use Full Motion Recording for either Drag and Drop Actions (i) or Mouse Wheel Actions (ii), ActivePresenter will switch automatically between Smart Capture type and FMR capture type.
This means that you can capture in the Smart Capture mode and ActivePresenter will switch to FMR mode whenever you drag any item and when you scroll or wheel the mouse.
Full Motion Recording
The Full Motion Recording mode (3) allows you to record your screen like a camera with a fixed frame rate per second.
It does not respond to any mouse/keyboard input; therefore, you will have no further choice like the Smart Capture.
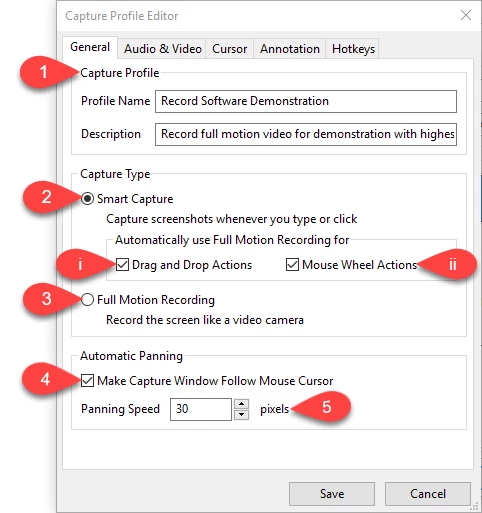
- Automatic Panning
Automatic Panning is used if your capture frame is smaller than the recorded application screen and you want to freely move the frame to any part of the screen.
Make Capture Window Follow Mouse Cursor (4): whenever you move the mouse on the screen, the capture frame will follow it. It’s very useful if your target application has many controls.
Panning Speed (5): the speed that the frame will follow your mouse movement.
The Audio & Video tab
The Audio and Video tab contains two sections providing you more choices for video and audio.
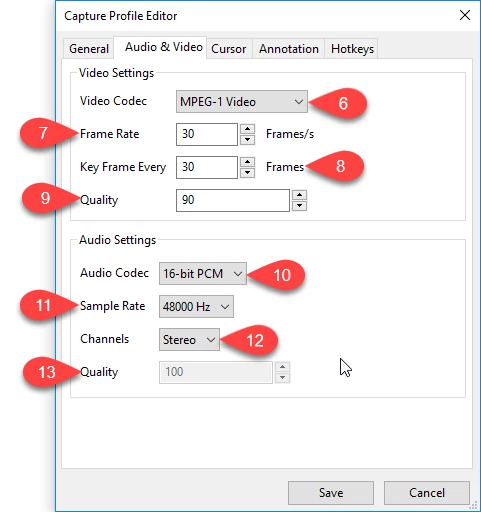
1. Video Settings
- Video Codec (6)
ActivePresenter provides you some kinds of video codecs to choose depending on your specified purposes:
Lossless codec creates videos with quality reserved (Flash Screen Video).
Lossy codecs create videos with less file size but not fully reserved quality (MPEG-1, MPEG-2 Video, H.264/MPEG-4 AVC).
- Frame Rate (7)
You should let it in the range of 20-30 frames/s. Because too high value may increase your video size and overload some simpler computer while too low values make your video appear jerky.
- Key Frame Every (8)
This is the number of continuous non-key frames between key frames. It’s recommended that you should let it be in the range of 4-400.
- Quality (9)
The higher quality you select the larger video file size and vice versa. This option is activated only when you select one of the three lossy video codecs.
2. Audio Settings
- Audio Codec (10)
Similar to Video Settings, ActivePresenter offers you some kinds of audio codecs for different desired outputs:
Lossless codec which is 16-bit PCM
Lossy codecs which are Vorbis and MP3.
- Sample Rate (11)
The Sample Rate decides the fidelity of the audio. The higher sample rate increases the fidelity and audio size and vice versa.
- Channels (12)
Select Mono or Stereo from Channels. In comparison with Mono Channel, Stereo Channel needs double storage size.
- Quality (13)
The higher quality you select the larger output video file size and vice versa. This option is activated only when you select one of the three lossy audio codecs.
The Cursor tab
The Cursor tab allows you to have settings for cursors in the recorded video.
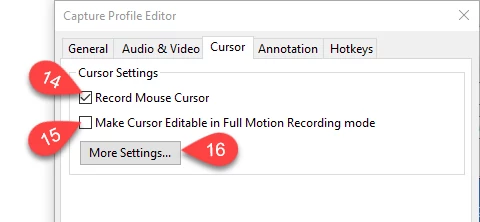
Record Mouse Cursor (14): ActivePresenter will record mouse cursor for your record videos that makes it easier for your audiences to follow your steps. Otherwise, your video will have no mouse cursor.
Make Cursor Editable in Full Motion Recording mode (15): If this checkbox is selected, you will be able to edit the cursor properties such as cursor highlight mouse click sounds and effects in your recorded video.
Click More Settings… (16) to have further adjustments for the cursor properties.
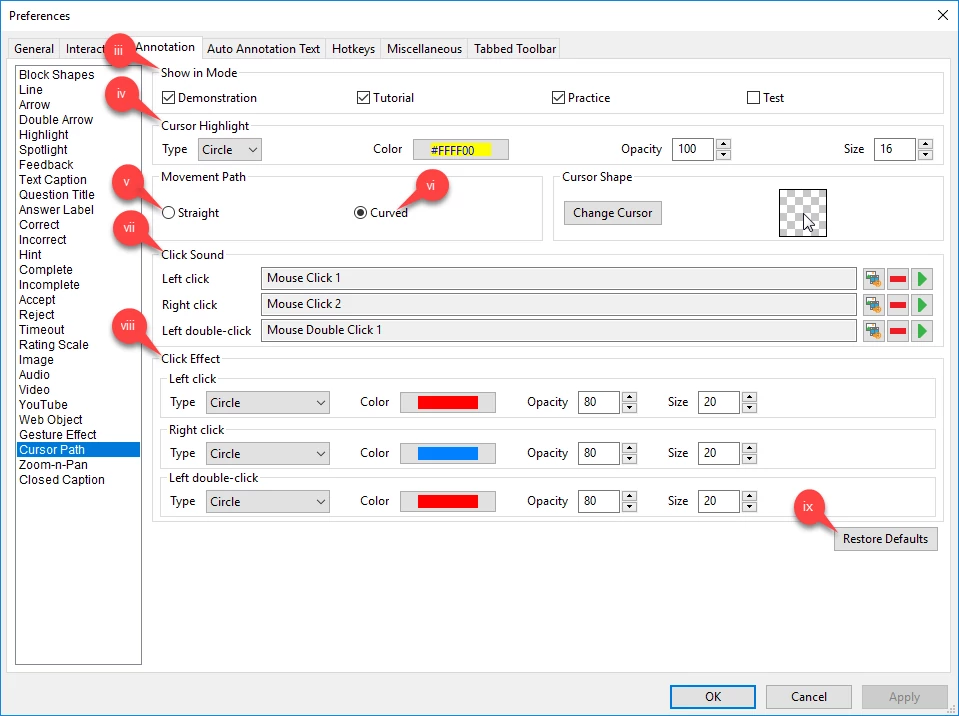
Show in Mode (iii): select mode(s) that you want the cursor to be shown.
Cursor Highlight (iv): change the Cursor Highlight in terms of Type, Color, Opacity and Size.
Movement Path: define how the cursor path will be.
If you select Straight (v): the actual path of the mouse will be replaced by a straight line.
On the other hand, if you select Curved (vi), ActivePresenter will maintain the actual mouse movement.
Click Sound (vii): define the sound of mouse clicks. You can choose the audio file you like from your computer as click sounds.
Click Effect (viii): define the effect of the mouse clicks.
Restore Defaults (ix): reset all the changes to the default values.
The Annotation tab
The Annotation is only activated when you choose Smart Capture Mode. This tab gives you controls over annotations and interactions that are automatically added during the capture.

It has two main sections containing settings for mouse and keyboard:
Annotation (16): add annotations to guide viewers how to operate. Those hints can be shapes with text inside telling learners how to behave.
Key Stroke/Text Box Interaction (17): provide feedback messages corresponding to user actions such as Correct, Incorrect, and Hint.
The Hotkeys tab
The Hotkeys tab allows you to set the keyboard shortcuts for various functions.
Remember to select the Use Hotkeys box (18) to activate all of the properties below. Then just change them into keys that you like.

Now, click Save (19) to save all the settings that you have made with the Capture Profile Editor and start recording your screen with ActivePresenter and feel free to contact us if you need support.