Saola Animate offers background fill styles to modify the background of a scene or an element. In a word, you can fill in a scene or an element with colors or images, or even make it transparent. Keep reading to learn more details about these background fill styles and get some tips to use them when creating HTML5 animation.
This tutorial covers:
- Filling Background with Solid Color
- Filling Background with Gradient
- Using Image as Background Fill
- Making Transparent Background
Filling Background with Solid Color
By default, Saola Animate makes scenes completely white and DIVs or shapes blue. Meanwhile, text elements are made transparent, but it’s up to you to customize their background.
To fill the background with a solid color, do the following:
Step 1: Select a scene or an element.
Step 2: Click the Properties pane > Fill section. Solid fill is the second style which defines a solid color for the background.
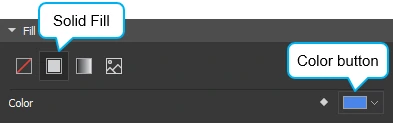
Step 3: To change the color, click the Color button. Solid fill uses the RGBA Color Picker. The default alpha (A) is 255.
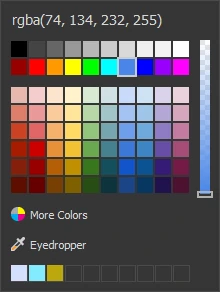
You can:
- Pick a color from the default color palette.
- Click More Colors to define custom colors.
- Click Eyedropper to sample a color from anywhere within Saola Animate.
- Drag the alpha slider or click directly on the alpha bar to change alpha value. If alpha is 0, the background fill becomes transparent.
In addition, it’s possible to animate the background color. By default, a color is made to gradually change into another. If you want an instant change, right-click a segment and select Remove Transition.
Filling Background with Gradient
Besides setting the background to a solid color, you can set it to a gradient. Gradient is a band of two or more colors in which one color gradually fades into another.
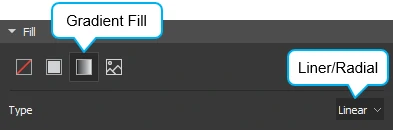
Saola Animate offers two types of gradient fill:
- Linear gradient creates a straight progression between two or more colors. It can go horizontally (left, right), vertically (up, down), or diagonally.
- Radial gradient creates a circular progression between two or more colors. It radiates from its center, either in an ellipse or in a circle.
Linear Gradient
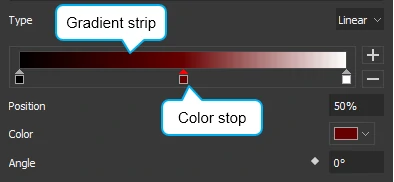
Linear gradient creates a gradual straight-line blending between two or more colors. By default, it has two color stops, namely black and white. You can add as many color stops as you want to create different linear gradient effects.
Take note of the following:
- Gradient strip: Show a “live” sample of the gradient. Use it to make changes to the gradient in a visual manner.
- Color stop: Each color stop on the strip is a distinct color. The selected color stop has a red triangle at the top. To add a color stop, click on the strip or click the Add button (plus icon). In contrast, click the Remove button (minus icon) to delete the selected color stop.
- Position: Specify the position of the selected color stop where you want a color to “start”. For example, the starting color stop has the position of 0%, whereas the ending color stop has the position of 100%. To change the position of a color stop, drag it along the strip or enter a new number in the Position text box.
- Color: Use the Color Picker to define a color for the selected color stop. Gradients support transparency, allowing you to create stunning effects. For example, you can stack a gradient with a background or stack multiple gradients.
- Angle: Set the angle of direction for the gradient line. By default, a linear gradient runs vertically from bottom to top with an angle of 0 degree. For example, 90 degree creates a left-to-right horizontal gradient. As the degree increases, the gradient direction rotates clockwise. If you set a negative value to the angle, the gradient runs in the counter-clockwise direction.
Radial Gradient
Similar to linear gradients, radial gradients create a gradual blending between two or more colors. However, radial gradients radiate from their center which is called a center point.
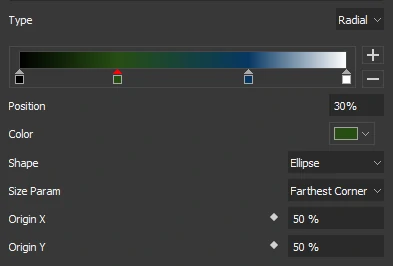
Take note of the following:
- The Gradient strip, Color stop, Position, and Color of radial gradients are much the same as those of linear gradients.
- Shape: Define the shape of the gradient. The value can be either ellipse or circle, of which ellipse is the default.
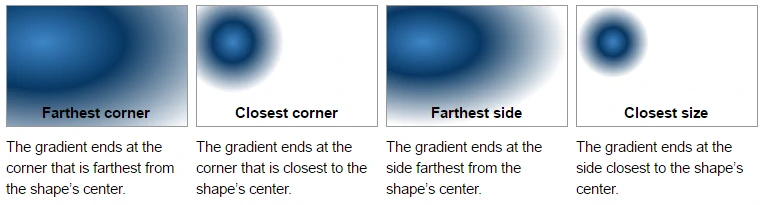
- Size Param: Define the size of the ending shape, in other words, the shape where the last color ends. There are four possible values:
- Origin X, Y: Adjust the location of the center point. For example, Origin X, Y [value: 50%, 50%] sets the gradient in the center (default). Meanwhile, Origin X, Y [value: 0%, 0%] sets the gradient to start in the top left. You can animate these properties to create animation where the center point moves from this position to that position.
Note: Saola Animate is compatible with Chrome 4+, Firefox 3.5+, IE 9+, Edge, Safari 3.1+, and Opera 11.5+. For CSS gradient fill, newer versions are required: Chrome 10+, Firefox 3.6+, IE 10+, Safari 5.1+, and Opera 12.1+.
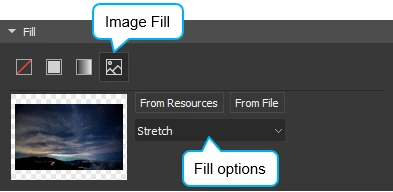
Using Image as Background Fill
Apart from colors, it’s possible to specify an image as the background of a scene or an element. You can select images from the Resources pane or from your computer. After selecting an image, remember to set the fill option to resize and reposition the image within the element. The best fill option depends on your personal preferences and the proportions of the image you are using.
- Stretch: Extend the image to all edges of the container by distorting or shrinking it. Thus, Stretch may only work for some abstract images, not the “figurative” ones. This is the default.
- Center: Center the image inside the element. If the image is smaller than the container, you’ll see a transparent area around the edges. Otherwise, you’ll see the very center of the image, with the rest outside of view. Choose this for images with the center focus.
- Tile: Repeat the same image throughout the background, making multiple tiles of the image. It is meant for small images or patterns.
- Fit: Scale the image as large as possible without cropping or stretching it. By doing so, the whole image is shown. The empty portion of the container is made transparent.
- Fill: Scale the image as large as possible without stretching it. If the proportions of the image differ from the container, the image is cropped so that it covers the entire container.
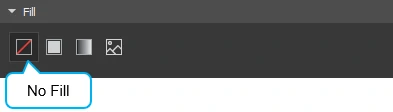
Making Transparent Background
To make transparent background, select No Fill as the background fill style. You can also use solid fill with 0 alpha or set the Opacity property value to 0%.
That’s all about background fill in Saola Animate. Hope that this helps.