It’s a simple to create HTML5 animation and interactive web content with Saola Animate. The software provides a powerful set of animation features that ease the animation task. At the same time, it lets you do the most common interactivity without coding.
This tutorial covers the basics of using Saola Animate, including:
- Creating Projects
- Importing Resources
- Creating Animation
- Adding Interactivity
- Previewing and Exporting
Creating Projects
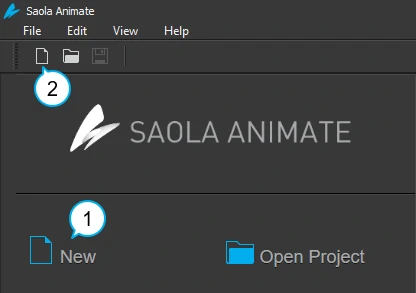
Creating a project is the first step when you create HTML5 animation. You can press CTRL+N or click New on the Welcome Screen (1) and the main toolbar (2). Depending on your content, you may want to start a non-responsive project whose scene size is in pixels, or use responsive layout to start a responsive project that functions well at different screen sizes.
Responsive layout uses the so-called breakpoints to divide screen sizes in ranges/layouts. Each layout can have a different set of element properties and animations. In the browser, the HTML5 player loads the suitable layout based on the current viewport size. Using responsive layout, you can make use of flexible layout. Flexible layout uses relative units instead of fixed units. This keeps elements relatively aligned with each other and with their container when the container size changes.
Importing Resources
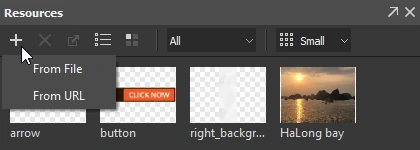
Although Saola Animate has DIVs, text, and basic shapes, it’s most likely you want to import some resources such as images, audio, and videos. You can either drag these resources onto the Canvas or use the toolbar buttons to add them. Saola Animate keep a copy of the resources in the Resources pane.

Besides multimedia, you can use external JavaScript, CSS, and HTML files to better control you document’s look and feel. You can also import JavaScript and CSS directly from a webpage. All the script resources are editable within the program.
Creating HTML5 Animation
Animations are composed of two keyframes which define the starting and ending values of a property animation. Suppose you want to rotate a Ferris wheel, select it and do the following:
Step 1: In the Timeline pane, position the Playhead to where you want the animation to begin.
Step 2: In the Properties pane > Transforms section, click the Rotate keyframe diamond to add the starting keyframe (3). Adjust the property value of this keyframe as you want.
Step 3: Move the Playhead to where you want the animation to end.
Step 4: Click the Add Keyframe button to add the ending keyframe (4). Then, adjust the property value of this keyframe (5). This creates an animation segment for the Rotate property.
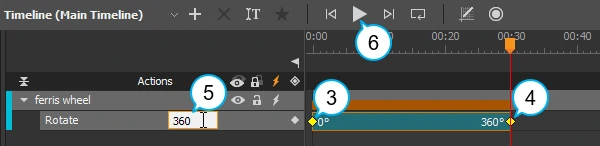
Step 5: Press SPACE BAR or click Play/Stop (6) to preview animation.
Note:
- You can generate keyframes automatically to speed up your work.
- When it comes to position animations, motion paths let you animate elements along complex curves to mimic real-life motion.
- You can easily create sprite sheet animation to represent one or several animation sequences while only loading a single image.
- Symbols are reusable elements, scenes, timelines, and animations having independent timelines and interactive capabilities. Use symbols to build complex animations by nesting one animation within another.
Editing Animations
You can edit an animation segment by doing one of the following:
- Change timing and duration: Drag an animation segment left or right to change its timing. To change the duration, click a keyframe and drag it.
- Invert segments: Right-click a segment > Invert Animation Segment to swap its starting and ending keyframes.
- Copy segments: You can copy a segment (CTRL+C) and paste it onto the timeline of the same or other elements (CTRL+V).
- Remove segments: Select a segment and press DELETE.
By default, transition allows an element to gradually change from one state to another over time. Without transition, the property will jump to the ending value at the ending keyframe. In other words, the property stays unchanged until the ending keyframe is encountered. This makes an instant change in the property value.
- Create transitions: Right-click a segment > Create Transition.
- Remove transitions: Right-click a segment > Remove Transition.
- Customize easing: Use different easing functions to control the speed of a transition.
Adding Interactivity
Interactivity gives audience interactive control over their experience. A mouse click or a swipe can kick off an animation, play a video, change a scene, etc. While built-in actions are enough in most cases, custom JavaScript functions may be needed to create complex interactivity.
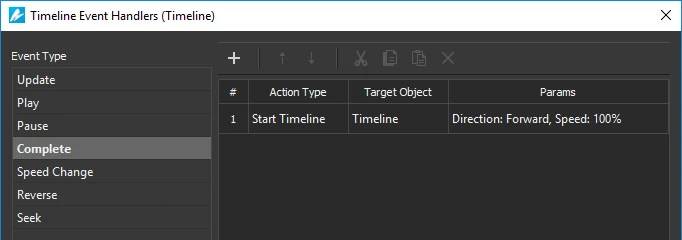
Saola Animate provides great support for building interactive HTML5 content using event actions and timeline triggers. It also aids you with timeline labels and multiple timelines. Timeline labels serve as bookmarks on the timeline. Using labels saves you time and effort when you want to send the Playhead to a specific point. Meanwhile, a single scene can have multiple timelines which are independent and can be run in parallel.
Previewing and Exporting
When you create HTML5 animation, frequently previewing lets you see how your animation will look and behave to the end user. You can preview the current scene (7) or the whole project (8) in browser.

Once your animation is complete, you’ll want to export it. In the main toolbar, click Export to HTML5 (9) to produce the HTML5 output. The output folder contains the *.html page and some corresponding resource folders. Those are the basics of using Saola Animate to create HTML5 animation. Hope this helps.