A video with sound can make it easier for viewers to follow on-screen actions. If you are looking for a rich-featured free screen recorder with audio that runs well on Windows 11, ActivePresenter certainly does not disappoint you.
Struggling to demonstrate something on your computer screen? Recording your screen is the go-to solution, but a recording without sound can leave your audience lost. Capturing both your screen activity and accompanying audio – whether it’s your voice explaining steps or the system sounds of an application – is essential for creating helpful tutorials, presentations, or demonstrations.
If you’re on Windows 11, you have tools at your disposal, but knowing how to use them effectively to get reliable, clear audio can be tricky. This guide will walk you through the simple steps to ensure your screen recordings on Windows 11 are heard as well as seen, making your content instantly more valuable and professional.
ActivePresenter is multi-featured yet extremely easy-to-use software. One of its standout features is screen recording. It allows you to create a full-motion video or a slide-based interactive simulation depending on your needs. “So, can we record the screen with audio?” Of course, with just a few clicks, this is easily accomplished. Additionally, this screen recorder works well on both Windows 10 and Windows 11. Best of all, the above features are FREE to use without watermarks in outputs. Let’s dive into today’s blog to learn more about:
- Start Recording
- Record Screen with Audio from the System
- Record Screen with Audio from a Microphone
- Stop Recording
- Recording Tips
Download the ActivePresenter Free edition and try out all the features without any limitations!

Now, let’s start the screen recording.
Start Recording
As you launch the software, you will see the screen recording function on the left pane of the Start Page.
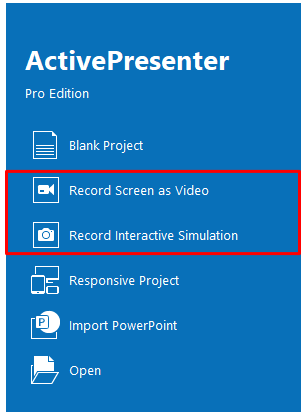
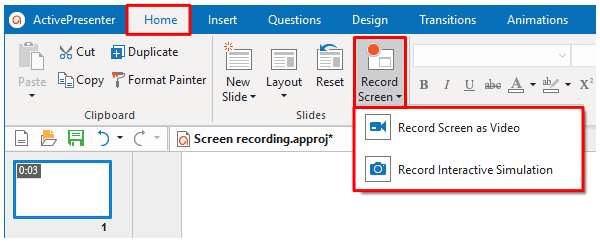
Or in the Workspace, click the ActivePresenter button in the top-left corner, and choose one of the recording modes.

In addition, if you want to add a recording to a certain project, in the Home tab > Record Screen > Choose Record Screen as Video or Record Interactive Simulation.
For further information about the differences between the two options, refer to this video.
Now, assuming that you select Record Screen as Video, the Record Screen as a Video Project dialog and a blue border rectangle appear.
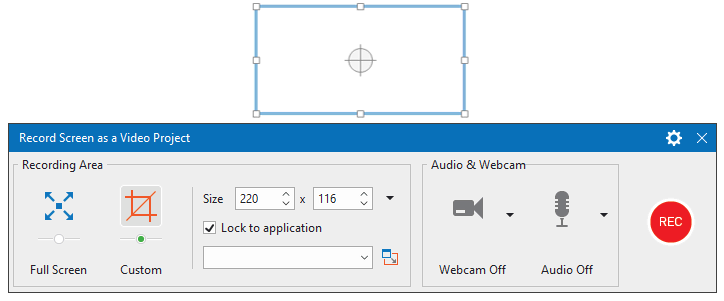
The blue rectangle displays the recording area. For more details on how to specify it, refer to the article Record Video Demonstrations.
In the next parts, let’s explore how this screen recorder helps you record your screen with audio simultaneously, from the system audio and from the microphone.
Record Screen with Audio from the System Sounds
Making screen recordings with the system sound or the sound coming from the device rather than the microphone is a very common method. This will generate better sound quality in the video without affecting the external environment.
ActivePresenter screen recorder allows you to record the screen with the audio from your computer system. Do the following steps:
Step 1: Enable the Audio button in the Record Screen as a Video Project dialog.
Step 2: Click the down arrow next to that button. Then, select an option in the System Audio section.
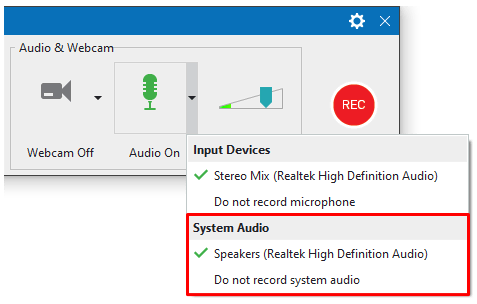
Step 3: Drag the Volume slider next to the Audio button to the left or right. This helps to get a suitable volume level.
Step 4: Click REC to start recording. All the actions in the recording area and system sounds will be recorded.
Step 5: Stop recording.
Then, any sounds in your computer system will be recorded. They can be mouse clicks, sound effects, music from the operating app, and even notification sounds from chatting apps. Therefore, turn off the unnecessary ones before recording.
Screen recording with audio from the system sound is perfect for recording an online lesson, lecture, conference, or meeting. You can replay it whenever you want.
Record Screen with Audio from a Microphone
Not only capturing screen with audio from the computer, but this screen recorder is also perfect for recording voiceover from the microphone. This is the best option when you want to create tutorial videos. Forget about the video with only manipulations. Your voice makes the tutorial clear and easy to follow up.
You need to connect the microphone to your computer. Then, follow the steps below:
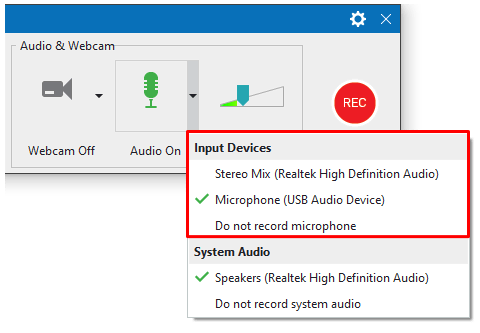
Step 1: Turn the Audio button on. Now the button turns green.
Step 2: Select a microphone in the Input Devices section. Make sure that you don’t plug/unplug the mic during recording.
Step 3: Calibrate the audio input if needed.
Step 4: Click REC to start recording. Then, speak to the microphone to record.
Step 5: Stop recording.
Screen recording with audio from the system sounds and a microphone can be done separately or simultaneously. Both features are FREE to use.
Stop Recording
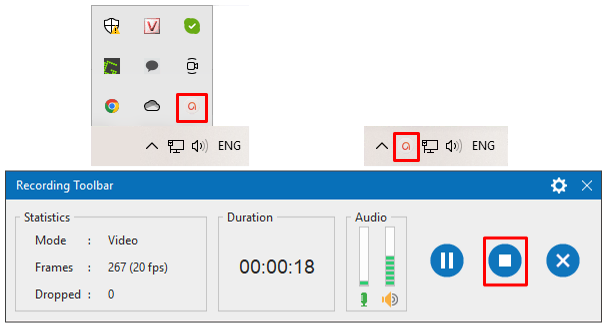
When you finish recording, you can stop it by pressing the CTRL+End keys. Alternatively, find and click the ActivePresenter icon on the taskbar or the system tray. Then, click the Stop button on the Recording Toolbar dialog that appears.
For more information on how to stop recording, refer to the article Start and Stop Recording.
After that, ActivePresenter screen recorder enables you to edit the recorded video and audio using basic editing tools. As a result, you can cut, crop, split, join, change volume, speed up, slow down the audio and video. They are non-fee features. Finally, export your project to various outputs such as MP4, AVI, WMV, WebM, and MKV. The outputs without a watermark can be used for educational or non-profit purposes.
If you want to create more enhanced projects, try using advanced features. They help you to fade In, fade out the audio, reduce noise, and blur objects in the video. In fact, you can experience them in the Free edition. However, a watermark will be added in the outputs. Therefore, consider the Feature Comparison and get the Standard edition.
Recording Tips
- ActivePresenter can run well on both Windows 10 & Windows 11.
- Select the correct audio input before recording.
- Don’t plug/unplug the audio device while running ActivePresenter.
- Try recording at least once to check if all the devices work well.
- Turn off all unnecessary notifications from other apps and devices. It can be recorded in your project.
Hopefully, this blog post on ActivePresenter screen recorder will help you record the screen and audio more efficiently. Get the latest news and features by following our Blog and YouTube channel!
More articles:
How to Record Screen on Window 11? Here’re the Two Best Options
How to Take a Screenshot on Windows 11?