In today’s digital landscape, creating video content that captures what’s happening on your screen is incredibly common, whether for tutorials, software demonstrations, or online presentations. While a simple screen recording provides valuable information, it often lacks a crucial element: you! Without a presenter visible, viewers can sometimes feel disconnected, watching a process unfold without a guide. This is where the powerful technique of recording your screen and webcam at the same time becomes essential, transforming passive viewing into a more personal and engaging experience.
So, why is this dual-recording approach becoming a necessity rather than just a feature? The primary reason is engagement and connection. Including your webcam feed alongside your screen capture allows you to build rapport with your audience, convey enthusiasm, use non-verbal cues, and make complex topics more relatable. It adds personality and authenticity, making your content feel more like a face-to-face interaction. This human element is vital for holding attention, fostering trust, and making your message truly resonate with viewers in an increasingly crowded digital space.
The versatility of simultaneous screen and webcam recording makes it invaluable across a wide spectrum of applications. Educators can deliver more engaging online lectures and software guides, corporate trainers can create personalized onboarding materials, marketers can produce compelling product demos with a human touch, and content creators like gamers or vloggers can share their reactions alongside their on-screen activity. From detailed step-by-step tutorials and dynamic presentations to reaction videos and interactive course modules, recording your screen and yourself opens up a world of creative possibilities to make your content more impactful and memorable.
This blog covers 5 main steps:
- Install and start the app
- Select screen recording mode
- Turn on the camera and microphone
- Start recording
- Finish recording
Firstly, let’s download the latest version for free to get started.

#1. Install and Start the App
Double-click the downloaded file and follow the instruction to install the app. After that, it launches the app and shows a pop-up window requiring you to select a theme to start.
ActivePresenter has a friendly user interface, but the first use may take time. If you are a new user, see Introduce ActivePresenter 9 User Interface in advance to speed up your work.
#2. Select Screen Recording Mode
ActivePresenter provides 2 modes of screen recording: record your screen as video and record interactive simulation. However, recording the webcam simultaneously is only available if you select the former mode.
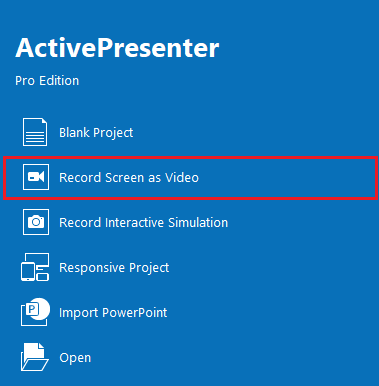
On the Start Page, select Record Screen as Video. If you are in the workspace, click the ActivePresenter button > Record Screen as Video.
Then, the Recording Screen as a Video Project dialog and a blue rectangle which defines captured area appear:
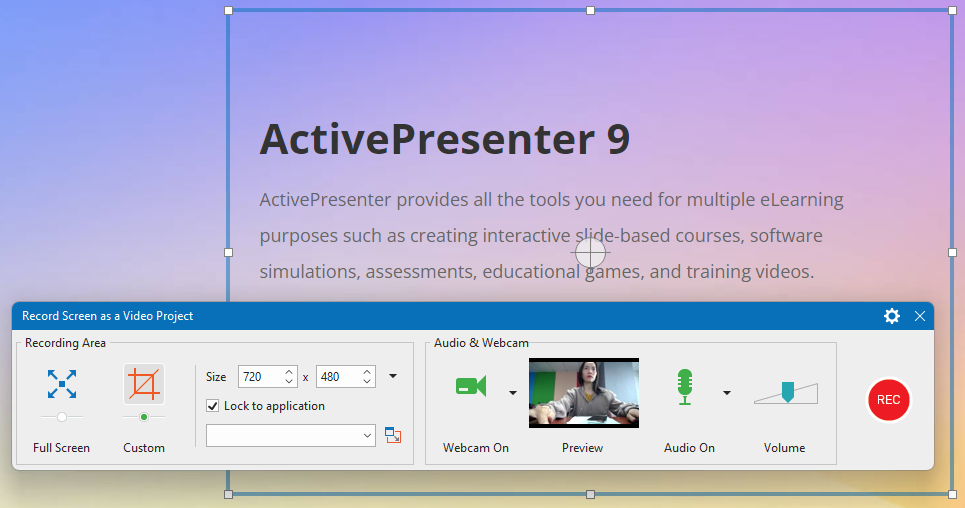
In the dialog, you can select to capture the full screen or only a part of the screen. If you prefer the latter, feel free to resize and reposition the captured area as you want. Just drag the resizing handles of the blue rectangle, or enter the width and height values into the Size spin boxes.
#3. Turn On the Camera and Microphone
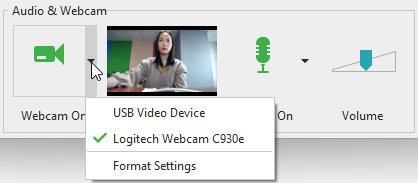
To record the screen along with the webcam, you have to turn on the camera and microphone. In the Audio & Webcam section of the Record Screen as a Video Project dialog, click the camera and microphone icons until they turn green. Once you do that, a live preview of the camera appears next to the camera icon. Also, the Volume option appears next to the microphone icon to let you adjust the volume of will-be-recorded audio. In case you have several devices which are being plugged in, click the dropdown arrow next to the icons to select the right one.
Note: You should test before doing it for real to make sure you select the right webcam/microphone and they work well.
About recording audio, you may want to learn about:
#4. Start Recording Screen and Webcam
To start recording, hit the REC button. Right after that, ActivePresenter will hide the Record Screen as a Video Project dialog and countdown to start. The app will record all actions on the screen which is inside the blue rectangle, as well as your face and audio.
Note: During the recording, don’t plug or unplug the camera/microphone to avoid unwanted problems.
Refer to the Start and Stop Recording tutorial for details.
#5. Finish Recording
To stop recording, do either of the following:
- Press CTRL + END (for Windows) or ⌥⌘2 (for macOS).
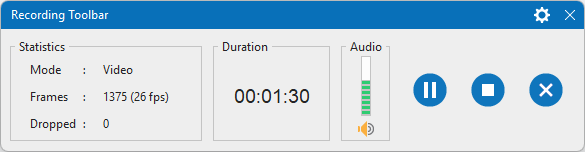
- Click the ActivePresenter icon on the Taskbar or system tray > click Stop Recording in the Recording Toolbar dialog.
Once finishing the capturing phase, the app transfers your recording to the editor. You will see 2 recorded videos: a screencast and a webcam video which overlay each other. Here, you can edit both of them using a wide range of powerful editing features. Check out the Edit Screen Recordings tutorial to learn more. Finally, if you wish to export your recording, go to the Export tab > Video.
Now that you know how to record screen and webcam simultaneously in ActivePresenter. Download the app and try recording your first screencast along with your webcam. In case you have any questions, let us know. We’re ready to support you.
See more: