In this article, I’m going to introduce to you the Recording Settings dialogs. These dialogs provide both basic and advanced settings for recording video demonstrations and software simulations.
Recall that when recording a video demonstration, you will have the Record Video Project dialog. On the other hand, ActivePresenter provides the Record Software Simulation Project dialog when you create simulations. In this article, suppose that you want to record a software simulation and need more settings and customizations for the recording.
As a reminder, you can take a look at the tutorial How to Record Software Simulations to know how to have a professional software simulation.
Open Recording Settings Dialog
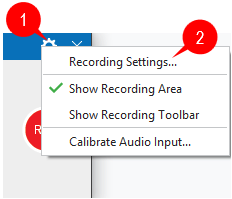
In the Record Software Simulation Project dialog, click the Settings icon (1) at the top-right corner, then select Recording Settings… (2) from the pop-up menu.
After that, the Recording Settings for Software Simulation dialog will pop up having four tabs: Audio & Video, Cursor, Annotation, and Hotkeys.
We will go through all of them.
Audio & Video Tab

Video Settings
- Video Codec: ActivePresenter 8 provides you some kinds of video codecs to choose depending on your specified purposes:
- Lossless codec creates videos having quality reserved (Flash Screen Video).
- Lossy codec creates videos with less file size but not fully reserved quality (H.264/MPEG-4 AVC).
Note: If you select the lossy video codec, the compressed videos will have lower quality than the original videos. They may also lack some information included in the original ones.
Besides, when recording video demos, especially streaming videos, you should select H.264 video codec. This video codec lets you stream videos with high frame rate but lower quality.
- Frame Rate: When it comes to frame rate, it should be in the range of 20-30 frames/s.
A too high value may increase your video size and overload some low configuration computers. This causes the loss of video frames when being viewed on some computers. On the other hand, too low values make your video appear jerky.
- Quality: Select the video quality in the range from 1 to 100. The higher the value, the higher the video quality, and the larger video file size.
Note: This option is activated only when you select a lossy video codec.
- Use Direct3D for recording screen: ActivePresenter may record screen with a very high frame rate without overloading.
Audio Settings
- Audio Codec: Similar to Video Settings, ActivePresenter offers you some kinds of audio codecs for different desired outputs:
- Lossless codec having quality reserved (16-bit PCM).
- Lossy codecs with less file size but not fully reserved quality (Vorbis and MP3).
Note: Using a lossy codec, the compressed audio will have lower quality than the original audio.
- Sample Rate: Sample rate decides the fidelity or the quality standard of the audio. The higher the fidelity, the better the audio quality.
A higher sample rate increases the fidelity and audio size and vice versa. In ActivePresenter, it’s recommended that you should let this value be 4800 Hz.
- Channels: Select Mono or Stereo from the Channels list.
In comparison with mono, the stereo channel needs double storage size. However, the stereo channel can provide listeners with a more natural experience.
If there is no special audio quality needed, the mono channel is good enough for recording video demonstrations or software simulations.
- Quality: Select the audio quality in the range from 1 to 100. The higher the quality, the larger the output audio file size and vice versa.
Note: This option is only activated when you select the Vorbis codec.
- Bit Rate: This option is only activated when you select the MP3 codec. You can select one from four options from the Bit Rate list. This is the number of bits that are conveyed per second. The higher the bit rate you select, the better the audio quality is.
You should select 256Kbps bit rate that can provide much better audio quality than 128Kbps bit rate does with a quite small file size.
Advance Screenshot Capture
This section is built exclusively for recording Software Simulation. To be more precise, before you click a button for a period of time, ActivePresenter will take a screenshot. Its default duration is 500ms. You can click the up or down arrow in the spin box to change the duration as you want.
Note: The Audio & Video tab of the Recording Settings for Video dialog has the Webcam Settings section instead. This section lets you select one from two video codec types which are explained above.
Cursor Tab
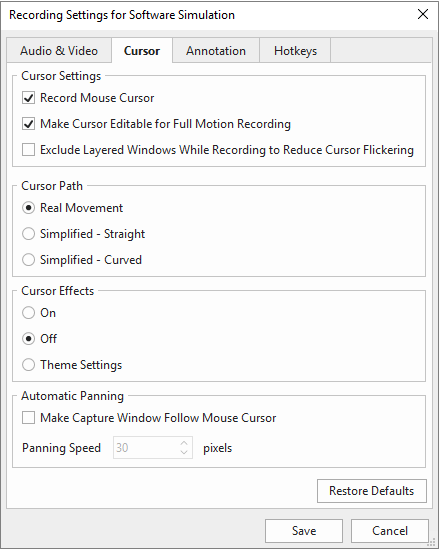
The Cursor tab allows you to have settings for the cursor in recorded videos/software simulations.
Cursor Settings
- Record Mouse Cursor: ActivePresenter will record mouse cursor for your record videos that makes it easier for the audience to follow your steps. Otherwise, your video will have no mouse cursor recorded.
- Make Cursor Editable in Full Motion Recording: If this checkbox is selected, you will be able to edit the cursor properties such as cursor highlight, mouse click sounds and effects in your recorded video.
- Exclude Layered Window While Recording to Reduce Cursor Flickering: When recording videos or creating software simulations, some layered windows may appear on the screen. In that case, ActivePresenter will exclude those windows that you don’t want to record.
Cursor Path
- Real Movement: Your mouse movements on the screen will be recorded truthfully in real time.
- Simplified: Your mouse movements on the screen will be recorded and saved as straight or curved lines.
Note: This section is only available in recording software simulations.
Cursor Effects
The cursor effects like cursor highlight, mouse click sounds and effects will be included or excluded in your recorded videos/software simulations. You can set it from this section before recording, which helps you save a lot of time in the editing phase.
- On: The mouse movements on the screen have full cursor default effects.
- Off: The mouse movements on screen have no cursor effects.
- Theme Settings: The mouse movements on screen may have custom cursor effects depending on the custom theme. For example, you can customize the default cursor effects of the Cursor Path object in the Object Settings View. Then, save the current theme as a custom theme. Lastly, use that custom theme to record videos/software simulations. For more details, let’s see the tutorial: Record Screen with Custom Cursor Effects.
Automatic Panning
Automatic Panning is used if the blue rectangle is smaller than the recorded application screen. Plus, if you want to freely move the blue rectangle to any part of the screen while recording, this feature is right for you.
- Make Capture Window Follow Mouse Cursor: Whenever you move the mouse on the screen, the blue rectangle will follow it. It’s useful especially if your target recorded application has many controls.
- Panning Speed: The speed that the blue rectangle will follow your mouse movement.
Annotation Tab
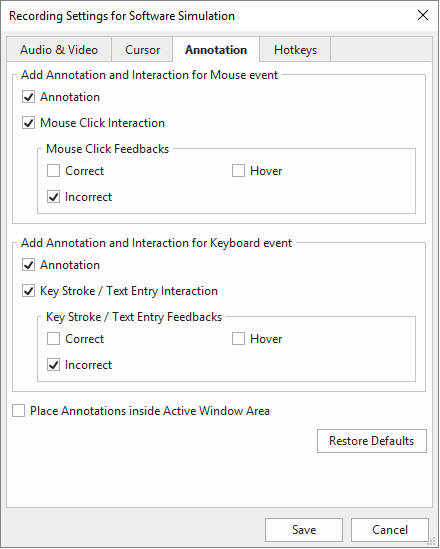
This tab gives you controls of annotations and interactions for the mouse and keyboard that are automatically added during recording software simulations.
- Annotation: Select these check boxes if you want to add annotations as hints or feedback to guide learners.
When recording software simulations, this option should be selected. Annotations can be shapes with text inside that tell learners how to behave in a specific step.
- Mouse Click Interaction and Key Stroke/Text Entry Interaction: Select these check boxes if you want to provide feedback messages corresponding to user actions (Correct, Incorrect, and Hover).
This feature is very useful especially in creating software simulations. For example, you can let the simulation show correct messages when users take correct actions. On the other hand, Incorrect messages can let users know that they have done a wrong action.
- Place Annotations inside Active Window Area: Let you place all the annotations that are automatically added during the capture inside the Active Window area.
When recording videos or simulations, you may want to capture only a specific window sometimes (e.g. confirmation dialog). ActivePresenter can automatically detect that area and save the information to captured slides through the Active Window feature.
This option is important especially when you chose to view or export the Active Window area only.
Hotkeys Tab
The Hotkeys tab allows you to set the shortcuts for some of the most usually used functions such as Pause/Resume, Stop, etc. Note that because of the differences between macOS and Windows keyboards, the Hotkeys tab in ActivePresenter will look differently on these devices. Please see below images:
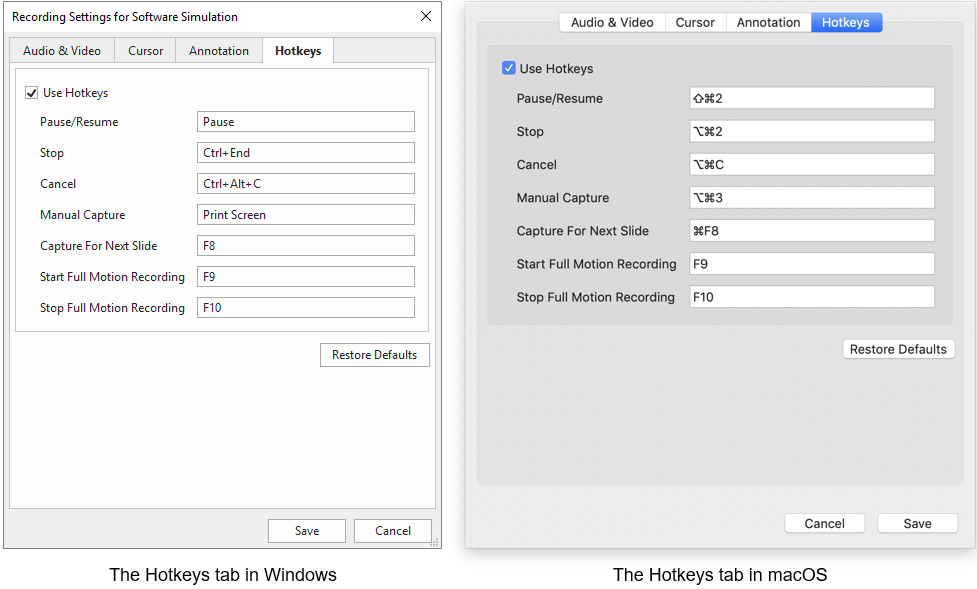
Remember to select the Use Hotkeys check box to activate all of its properties. Then click any command box and press a key or a combination of keys to assign new hotkeys.
Note: In ActivePresenter, you can also customize hotkeys for many other commands such as Cut, Copy, Delete, etc. To know more about how to do that, refer to How to Customize Hotkeys.
After all the changes, you can still go back to default values by clicking the Restore Defaults button.
Finally, click Save to save all the customizations you have in each tab and close the dialog.
That’s how to work with the Recording Settings dialogs. Understanding them can help you create more professional video demonstrations and software simulations with ActivePresenter 8. Customize it the way you want and don’t forget to visit our tutorial page for more useful tips.
Related topics: