ActivePresenter 8 is one of the best tools for interactive software simulations. The app allows you to record any application on the screen and save the process as a slide-based project including:
- Image slides (for mouse click, key stroke actions);
- Video slides (for mouse scroll, drag-n-drop actions).
These slides clearly show the procedure you have taken with the software. With the Recording software simulation feature in ActivePresenter 8, illustrating any software becomes even much easier than before.
(Note: If you want to record your screen and get a single full-motion video slide, please notice the Record Video feature.)
Access Record Software Simulation Function
To start recording a software simulation, do one of the following:
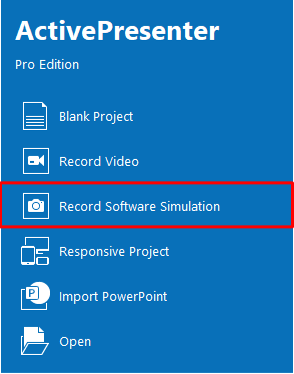
- Click Record Software Simulation on the Start Page.
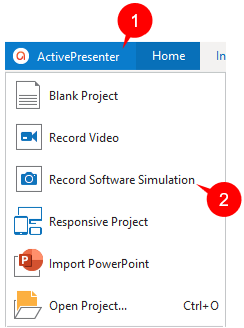
- In the current opening project, click the ActivePresenter button (1) and select Record Software Simulation (2).
- Open the Home tab or the Insert tab > New Slide > Record Software Simulation. Alternatively, in the Home tab > Record Screen > Record Software Simulation.
After that, you will see:
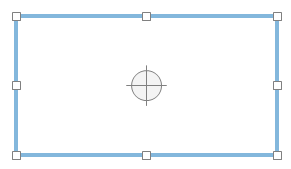
- A blue rectangle which is also known as a recording area (any action taken inside the blue rectangle will be recorded):
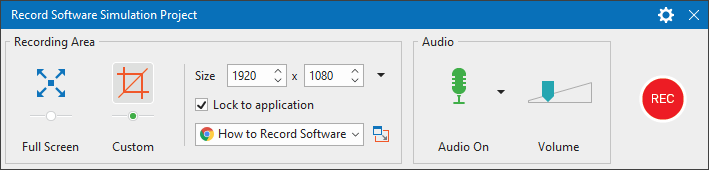
- A Record Software Simulation Project dialog:
- A Recording Toolbar dialog:
Note: The Recording Toolbar dialog is not shown by default. To show it, check the Show Recording Toolbar in the Settings menu explained in the latter part of this article.
Work with the Recording Area
The blue rectangle indicates that ActivePresenter will record everything that happens inside of it while ignoring the rest of the screen. The fancy cross-hair in the middle is just a visual reminder that this is a target-seeker window.
You can freely drag any side of the floating frame to change the captured size.
Work with Record Software Simulation Project Dialog
Recording Area Section
- Full Screen: Allow recording full screen.
When you select this option, the blue rectangle will disappear. You don’t have to specify the size and recorded application.
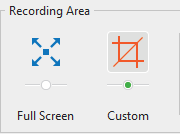
- Custom: Allow recording just a specific part of the screen. Take the following steps:
- Select Custom in the Recording Area section.
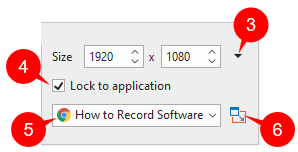
- Specify the size in the Size spin boxes, or select one of the preset sizes from the drop-down list (3).
- (Optional): Click the Lock to application check box (4) to lock to the recorded application. This feature is designed to help users easily fit the recording area to the size of a specific application window. Thanks to that, users don’t need to manually resize it.
- (Optional): Select one application from the list (5). After that, this lets the blue rectangle stick to and follow where the recorded application moves.
- Click the (6) button to change the lock mode. Select the Fit To Boundary mode to resize the selected application to fit the capture area. Meanwhile, the Fit To Application mode helps to fit the capture area to the selected application.
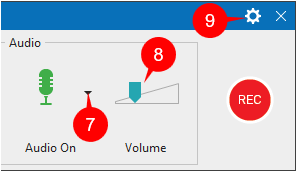
Audio Section
This section allows you to set the audio device and volume for the recording. Do as follows to record audio (system audio and audio from a microphone):
Step 1: Click the Audio button (7) to turn the audio recording mode on, and select the audio device detected.
Step 2: Drag the volume scale (8) to change the recording volume.
Note:
- Recording webcam is not available when you record software simulations.
- You should not record audio and simulation simultaneously because the recorded audio files may be inserted in different slides. Instead, you should record voice when the recording is finished.
Settings Menu of the Record Software Simulation Project Dialog
So, we have come through most of the important steps to record a software simulation. The following sections will show you some other content for more professional outputs.
Click the Settings icon (9) to open the Settings menu with four options:
- Recording Settings…: Show the Recording Settings for Software Simulation dialog that will be explained in another article.
- Show Recording Area: Toggle to show or hide the blue rectangle. Normally, you should let the blue rectangle be visible so you can see what is going to be recorded.
- Show Recording Toolbar: Toggle to show or hide the Recording Toolbar.
- Calibrate Audio Input…: Click to calibrate audio input.
This feature is more critical for recording video demonstrations where recording audio and screen simultaneously is usually needed. Refer to the How to Calibrate Audio Input article for more details about this feature.
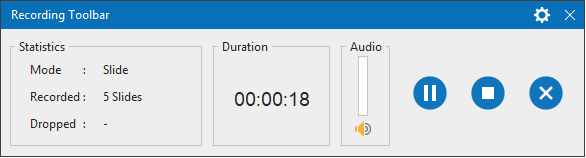
Work with Recording Toolbar
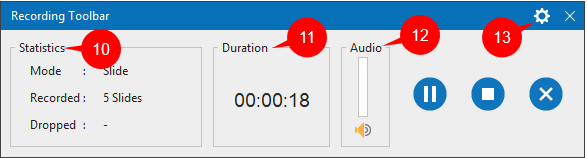
- Statistics section (10): Show the project statistics:
- Mode: Show the current recording project mode (Video/Slide). Whenever you scroll the mouse or carry a drag-n-drop action, ActivePresenter will automatically switch to the Full Motion Recording mode (Video) to capture it. Otherwise, it will switch back to the previous capture mode (Slide).
- Recorded/Frames: Show the current recorded slide/frame number of the recording project.
- Dropped: Show the number of missed frames of the recorded video.
- Duration section (11): Show the current duration of the recorded project.
- Audio section (12): Display the audio sound level.
- Click the Settings icon (13) to have more options in showing or not showing the Statistics, Duration, Audio, and Webcam section.
Start and Stop Recording
After all the changes and settings needed, click the Record button to start recording. ActivePresenter will record anything that happens in the blue rectangle.
When you finish the recording, press CTRL+END (for Windows) or ⌥⌘2 (for macOS) to stop it. After that, the recorded project will show a series of slides containing steps that you have carried out. For more information about starting and stopping recording, refer to this tutorial.
As a result, all actions on the screen will be converted into a slide-based project. ActivePresenter can automatically create slide names, smart annotations, cursor paths, mouse clicks, key strokes, text boxes, and feedback messages. Thus you can save yourself a lot of time and effort in the editing phase. Otherwise, freely change it the way you want as described details in this tutorial: Edit Software Simulations.
Export to Different Output Formats
Finally, export the project to HTML5 which is the most suitable output format for interactive simulation. With HTML5 exporting, learners can view and interact with the content. Meanwhile, if you want to create training manuals, exporting the project to document formats is here to help.
So, download ActivePresenter 8 and start to create professional simulations for your software today. Feel free to email us anytime if you need support.
More articles you may want to know: