There are so many screencasting tools available now like ActivePresenter. This can be viewed as a result of an increasing demand for recording screen coming from almost all fields. If you are a beginner in the world of screencasting and you desperately want to do something that matters on your own. Then, this article is what you should not miss. Because it provides some little-known screencasting tips for beginners so as you can get the most out of screencasting when you are a newbie.
Speaking of powerful yet user-friendly screencasting tools, ActivePresenter stands out as an excellent choice for beginners and experienced users alike. Its intuitive interface makes it easy to capture your screen, record webcam footage, and even add voiceovers with just a few clicks. Beyond basic recording, ActivePresenter offers a suite of editing features that allow you to trim, cut, add annotations, highlights, and interactive elements to your videos, transforming simple screen recordings into engaging tutorials, presentations, or software demonstrations. With its free version offering a robust set of features and affordable paid upgrades for advanced capabilities, ActivePresenter empowers you to create professional-looking screencasts without a steep learning curve or significant investment.

Screencasting? Recording Screen? And Screencast? Are They the One?
Actually, both screencasting and recording screen imply a process when you record any activity on the computer screen, and the result you receive is a so-called screencast. That means, if you record screen, you have a screencast. Keep in mind that screencasting is different from capturing screen as screenshots. They are single pictures of a computer screen captured and saved as still images that you don’t need any special application or tool to acquire. Rather, this functionality is usually baked into Windows and Mac computers. For example, pressing the PrtScn key on your keyboard means you are taking a screenshot. However, if you want to record your screen as screencasts, you have to call upon a screencasting tool such as ActivePresenter.
Why You Use Screencasts
YouTube is one of video sharing platforms with so many screencasts of video bloggers, technical trainers or software companies. They create and publish their videos with the purpose of helping people to learn how to use a particular software, fix some basic problems or sharing their game tips and tricks. Just type some keywords like “How to delete Facebook messages” or “Ways to block friends on Snapchat”, you will see a lot of video tutorials as screencasts. What’s more, screencasts now play an important role in designing interactive eLearning contents, video tutorials, demonstration videos and explainer videos. A large number of teachers, trainers, and even marketers have been making use of all the benefits of this technique to save time, reduce cost and boost productivity as well as business operations.
“I am a newbie. I record a video, and it’s really bad!”
I used to be a newbie jumping into the screencasting world without basic understanding. Thus, I know your trouble. Have you ever forgotten an element or messed up a certain action on the screen when recording? Have you ever recorded a 10-minute video only to end up with the feeling of frustration because of its quality? Don’t be afraid! Failure to record something in the first time is a cornerstone basing on that you learn and progress. When you fail, you learn more. Trust me! I listed a bunch of tips over the course of my experience below hoping that they can help your screencasting process streamlined.
How to Create a Screencast If You Are a Beginner?
Screencasting is all about the process. This process should include 3 stages, namely pre-recording, recording and post-recording. All of them are described in details below.
Pre-recording
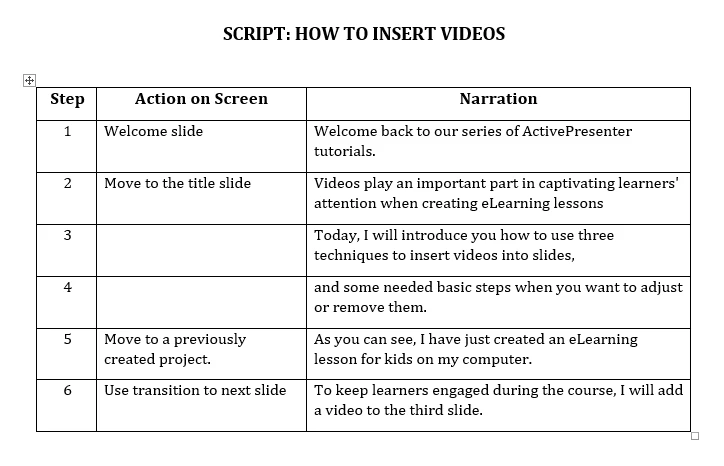
You may come across the famous quote from Benjamin Franklin: “By failing to prepare, you are preparing to fail”. It seems to be always right regardless the field. If this is your first time seeing it, I highly recommend that you have to read this quote again and again. Without exception, prepare everything needed before starting recording. Don’t rush, otherwise, you will pay the price. Script! Script! Script! Think about a script as a way to check what you want to show and how to express it. For instance, when I recorded a video tutorial like this, I wrote a script first (see the picture below). As you can see, I divided a paper into 2 columns. One was for steps, and the other was for narration. Each sentence was put into each row. Consider that you should keep your content concise and simple to understand by cutting out any unnecessary thing inside. Additionally, don’t use too long sentences because they might confuse your audience and make your screencasts difficult to follow. Audio (System Audio, Voice Narration, and Audio Track) To have amazing screencasts, you should pay as much attention to the sound as visual. The reason is simple. If your audio is too much noise and ugly, your video quality will be reduced leading to less impressing audiences no matter how brilliant your contents are. Here are some tips to minimize that situation:
- Ensure that your surrounding environment is quiet. Don’t record when some people are talking around. This is a very important and practical note when you record voice narration.
- Disable all notifications and alerts coming from messaging apps and social platforms like Facebook, Skype, and Snapchat.
- Pick up a good device to make sure that you get a clear and nice sound. You can use an external microphone to record audio.
- Utilize external webcam and early on test it out to ensure that everything runs smoothly.
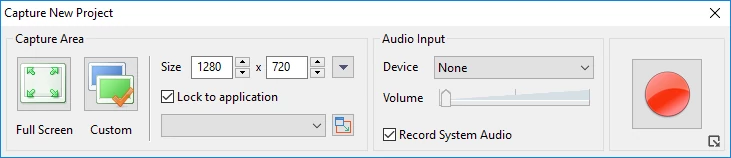
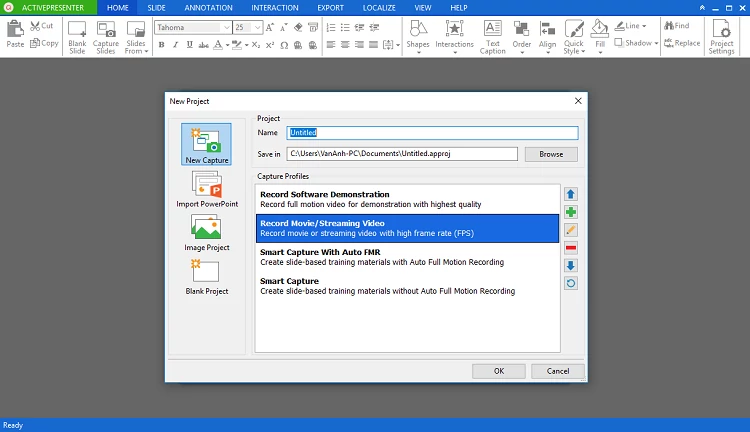
In the case of recording a voice-over, a good advice that reading one line of your script at a time with brief pauses in between will make it easier for you to edit after recording. Customize Settings Apart from audio and script, you had better define exactly what areas or actions that need to be focused on. Don’t record at Full Screen if this mode doesn’t help you to clarify your purpose. Some screencasting tools like ActivePresenter support a very useful feature called “Lock to Application”. To be more specific, it allows you to choose your desired app and increase the concentration during the recording. Added to that, hide your bookmarks bar in your browsers in terms of recording websites and online software. Also, lock up any other icon and folder that you don’t want to appear in your screencasts. Where you want to upload your video to should be taken into account as well. For example, if it’s YouTube, 1280×720 or 16:9 resolution is great to go.
Recording
Of these three stages, this is the most challenging one because you probably have to record again and again in order for obtaining an acceptable raw video. To solve this problem, remember to stay on task, limit all types of distractions (like messages and calls) and keep calm. Don’t stress out if you have to record some videos several times because most people face this trouble like you in the beginning. Furthermore, be focused while navigating your content. Keep your viewers engaged because their attention span gets shorter and shorter.
Post-recording
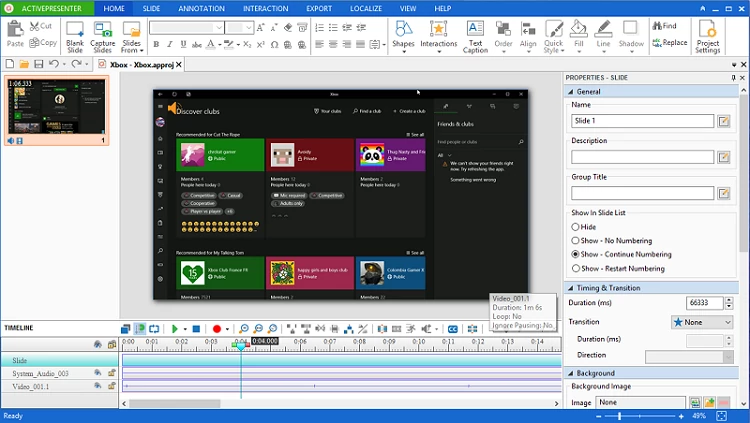
Not all screencasting tools in the market now provide the ability to edit recorded videos inside the app. Some of them just support very basic options like preview, export, and share, except for ActivePresenter. A set of available video editing functionalities after recording is what makes ActivePresenter stand out among screen recording tools. This application is an ideal choice for both beginners and professional users who want to create impressive simulations, explained or how-to videos.
Video Editing Features in ActivePresenter
Now, you have all necessary skills to design a screencast for your own. Let’s try it today with ActivePresenter. I know it’s easier said than done, but be persistent! Everything needs time to master.