Why should you use video demonstration?
Video demonstrations are ideal for showing exactly what your products/service look like and it is consider being the most effective way to convince your potential and existing customer to make buying decision. On the other hand, video demonstration also a low cost training tool for company/organization that require professional training for new employees. Making a fantastic video may prove that you are professional and show your respect to customers.
With a correct tool, making a demo video is now much more easier than ever before. We, Atomi systems created ActivePresenter – best screencasting software for Windows and Mac, latest updated to 6.0.5 version with various unique features which will help you create your own videos within a short time.
So, download the software now to experience the smooth procedure when making a demo video. After having installed it, let’s continue to the next part to learn how to create a video demonstration with ActivePresenter.

Learn how to create video demonstration with ActivePresenter below
ActivePresenter allows you to create video demonstrations that show all actions that you have done on your screen faithfully including mouse movement, content animations and so on. It’s a great choice for you if you want to show others the process of something. In this article, I will explain to you how to create a successful video step by step with ActivePresenter.
Capture Profiles for Video Demonstrations
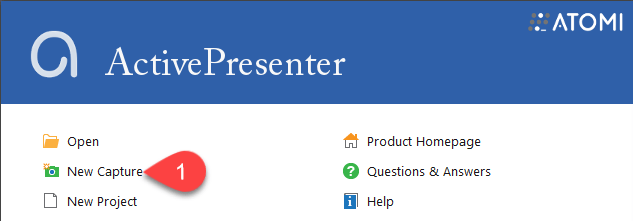
Step 1: Click the New Capture icon. (1)
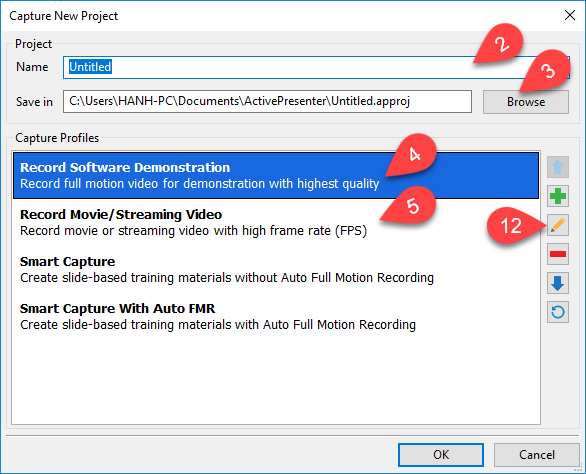
Step 2: Name your project (2) and choose the location to save your work (3) in the Capture New Project window appears.
Under the Capture Profiles, ActivePresenter has four options for specified purposes.
Step 3: Select Capture Profile to use.
To create video demonstrations, you can choose either the Record Software Demonstration (4) or Record Movie/Streaming Video profile (5). Both of them will create a result as a video showing exactly what you have done on the screen.
In order to know more the difference between two of them, please refer to Capture Profiles for Creating Video Demonstrations.
Capture Dialog in Details
Before starting the record, ActivePresenter provides you the Capture Dialog allowing you to have settings on your capture. Take following steps to work with it:
Step 4: Select capture range in the Capture Area section. (6)
You can choose to record full screen or just a specified part of the screen.
Step 5 (Optional): Select one of the preset sizes to record your screen. (7)
Step 6 (Optional): Lock to the application to record. (8)
This means that the record window will follow where the application moves to.
Step 7: Select the Device and Volume for the record under the Audio Input section. (9)
If you check the Record System Audio checkbox (10), ActivePresenter will record any audio which is currently playing in your system.
Step 8: Click the Start Record button (11) to start recording.

Press Ctrl + End to stop when you want to finish the record.
Capture Profile Editor in Details
Basically, that’s enough for creating a video demonstration. However, ActivePresenter provides you more controls over the capture through the Capture Profile Editor. You can make some adjustments here before starting to record.
In the Capture New Project window, click theEdit Capture Profile icon (12). You will see the dialog appears, let’s keep going:
Audio and Video settings tab
The Audio & Video tab contains two sections: video and audio settings.
- Video Settings.
- Select Video Codec (11)
Flash Screen Video: ActivePresenter will use the lossless algorithm in encoding. Hence, the quality is reserved.
MPEG1, MPEG2 or H264: ActivePresenter will use the lossy algorithm, so the file size will be reduced.
- Define Frame Rate (12)
A higher frame rate will increase the size of the recorded video. While a lower value will make your video jerky. The most commonly used range is 20-30 frames/s.
- Define Key Frame Every x frames (13)
Frame Every x frames is the number of continuous non-key frames between key frames.
When you change the frame rate. ActivePresenter will adjust this setting so that the video will have exactly one key frame every four seconds.
- Define Video Quality (14)
In terms of the quality, the higher number you select the better video quality and the larger the file size.
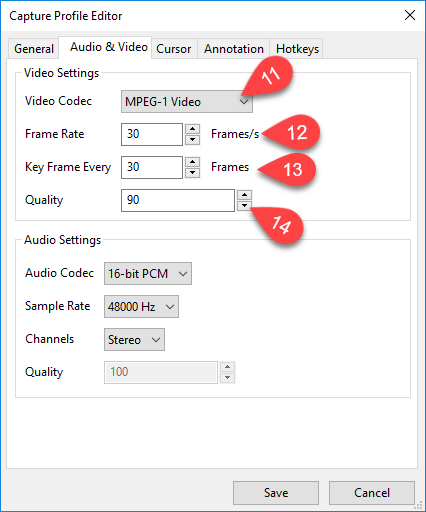
- Audio Settings.
Likewise, you can take further steps to adjust the audio to record your screen.
Cursor tab
The Cursor tab offers you more adjustments for the mouse cursor.
- Record Mouse Cursor (15): Record mouse cursor in your demonstration video.
This can make it’s easier for your audiences to follow your steps on the screen.
- Make Cursor Editable for Full Motion Recording (16): Allow editing properties of the mouse in recorded video such as cursor highlight, mouse click sound, and effects.
- More Settings… (17): Allow you to have more settings in terms of cursor highlight movement path, click sound and effect.

Now you can start recording your screen and have your own projects with more customizations.
That’s what you should know to have a successful video demonstration with ActivePresenter. Let’s try it today and please feel free to send us an email if you need more support. See our Product Pricing here.
Keep in mind that, when buying our product mean you are supported and get Free of charge updates. See our Software Upgrade policy here.