Have you ever wished to get result, or even more, to revisit what you have done after completing a course? If your answer is yes, this tutorial is definitely for you. In this tutorial, we will walk through a very new feature from ActivePresenter 7. That’s Review Course. You will see how amazing it is when learners can see correct and incorrect answers, correct values, the overall result of each interaction and slide.
To review a course, ActivePresenter requires to use some particular actions and a variable: Review Presentation action, Show Responses action, Show Feedback Layer action and apReviewMode variable.
Today, this article will guide you how to set up those above features to review a course.
How to Set Up the Review Course?
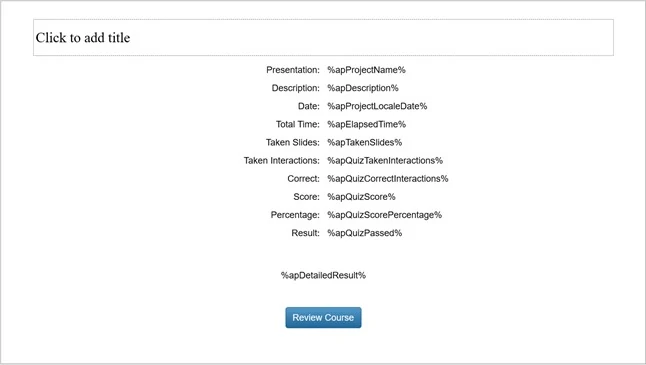
At the end of a course or presentation, it is necessary to insert a Report Slide to review learners’ performance by going to the Slide tab and selecting Report Slide.
The Report Slide displays with three parts: title part, displayed parameters part and a Review Course button.
So, how can we see the course reviewed? When you preview a course, click the Review Course button on the Report Slide. Your course will go back to the first slide to help you follow and review all graded questions. To do that, you have to set up Review Presentation action for it.
Review Presentation Action
Go to the Properties pane of the Review Course button > On Click event > Review Presentation action from the action menu. Note that you cannot review a course if you choose another normal action.
Now, learners will not only receive the course’s result but also go back to the first slide to see how they have worked.
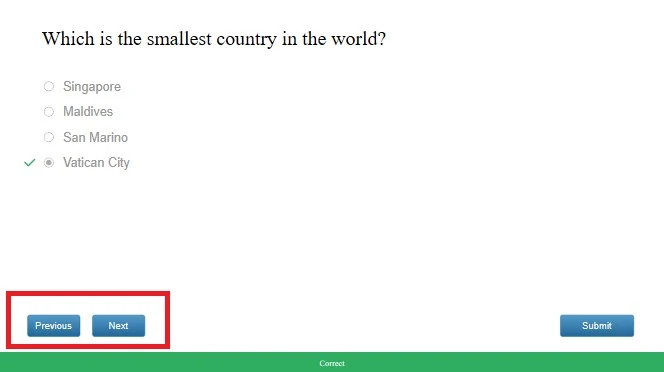
As mentioned before, when you review a course in ActivePresenter, it’ll show you correct or incorrect answer, correct value and overall result of each question. Additionally, you can click on the previous or next button to track your answers. All above functions can be active because we already set up them default in On Load event of slide. Let’s see how to use those functions to review a course in details.
Show Responses Action
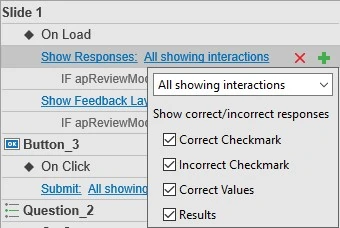
As soon as clicking the Properties pane of each slide, it can be seen that the Show Responses action (1) is already set up from the action menu.
This action allows you to show responses for all graded interactions. You can determine which object will show responses as well as which types of responses to be shown. Click All showing interactions combo box to see four default types of responses:
- Correct/ Incorrect Checkmark: Show correct/incorrect check marks next to correct/ incorrect answers.
- Correct Values: Show correct values next to interaction objects. Available for mouse clicks, key strokes, text boxes, fill in blank, fill in multiple blanks, and essay questions.
- Results: Show the overall result of the graded interaction at the bottom of a slide. If the slide has more than one graded interaction, all the results will overlap, so only the result of the last graded interaction can be seen. However, you can determine which result to be displayed as you wish. In common cases, there is only one graded interaction in a slide, so its result is treated as the overall result of the slide.
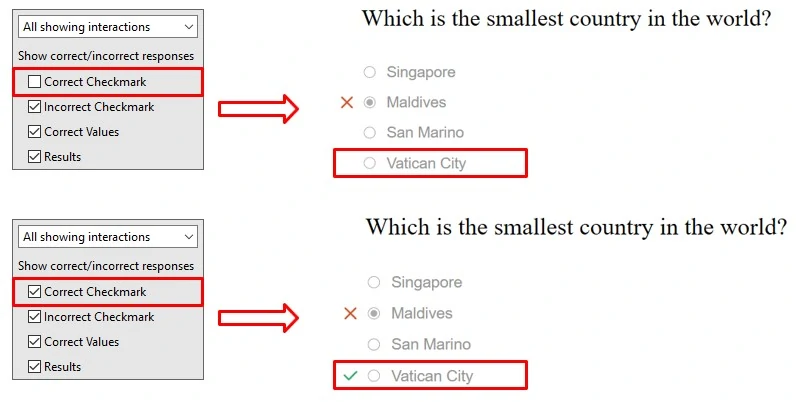
For example, in case you don’t select the Correct Checkmark check box, when clicking the Review Course button, the correct check mark will not be shown if answer is incorrect. On the contrary, it will be shown if we select the Correct Checkmark check box. See the below image for easy understanding.
Show Feedback Layer Action
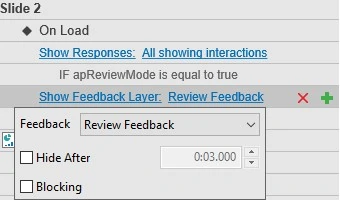
Besides the Show Responses action, Show Feedback Layer action (2) is another action that needs to be added to help learners review their course. ActivePresenter will show all correct/ incorrect responses for graded interaction on the review feedback layer.
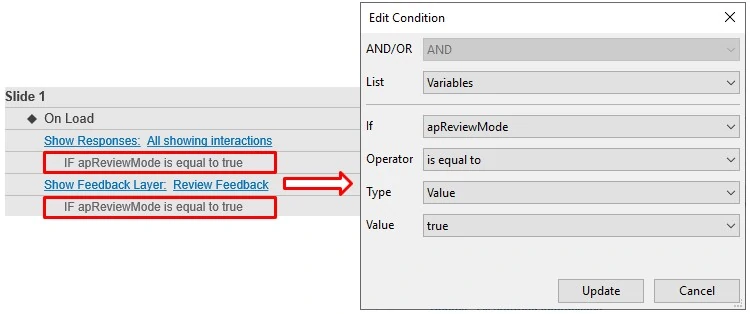
By default, ActivePresenter displays the Review Feedback layer. This feedback layer is used in the review mode. It is presented in the On Load event of the slide by default. You have to use the apReviewMode variable to check if the presentation is in the review mode or not. When selecting this feedback layer, there are two check boxes as shown below:
- Hide after: Hide the feedback layer after a period of time.
- Blocking: Block the main timeline until the feedback layer is hidden.
So, when reviewing a course, you will see two blue buttons (Previous and Next) in the left corner of review screen, which let you navigate the presentation when reviewing a course. The Previous button is for going to the previous slide and the Next button is for going to the next slide.
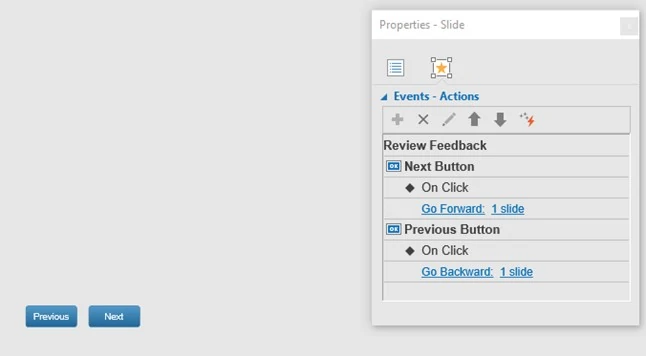
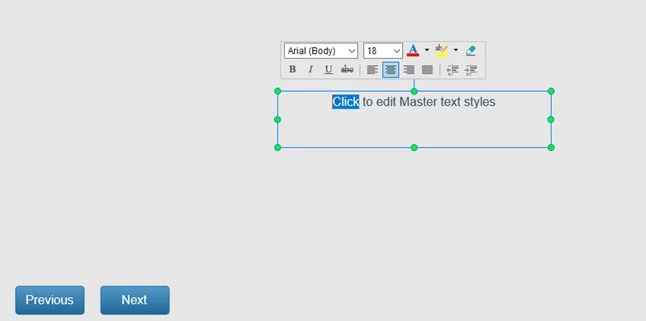
To see how two buttons are set up, click the Feedback Master in the View tab. A default Feedback Master includes at least one Master Layout and 8 built-in Feedback Layers appearing on the left side of screen. You can easily find out Review Feedback Layer with Previous button and Next button that are default. From its Events – Actions, adding On Click event and Go Forward: 1 slide action for Next button, Go Backward: 1 slide action for Previous button.
apReviewMode Variable
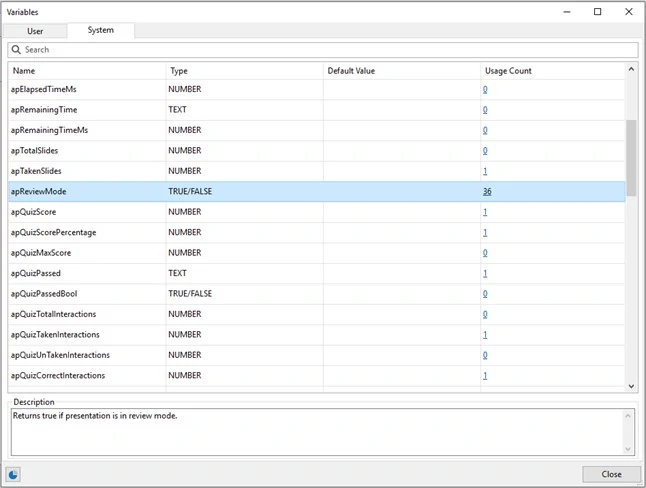
Basically, the review mode is accessible from the Report Slide. Click Variables from the Home tab to see apReviewMode variable. If the course is in the review mode, this variable value is equal to true, and vice versa.
One more time, you can check it in the condition of action from the Properties pane. Under each action is its condition (the variable value is equal to true).
How to Customize the Feedback Layer
ActivePresenter lets you customize your Feedback Layer. In other words, you’re able to create your own set of the Feedback Layer. Note that you need to have a basic knowledge of Using Slide Master to do this task.
ActivePresenter provides you the Feedback Master tab with tools allowing you to make the adjustment for the feedback messages.
With this tab, you can:
- Insert layer: The newly inserted layer will have the same style with the master feedback layout.
- Delete or rename selected layers
- Define which placeholders will be included on the selected layer (title, text, button).
- Insert images, objects to layer.
For example, you are in the Review Feedback Layer and you cannot see its title, text and button. Now, you want to add text to give learners more information about the correct answer. So, click the Text box and edit text as normal.
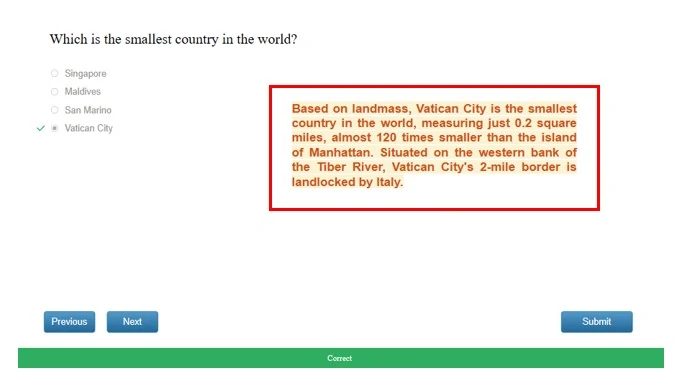
After modifying the feedback layers from the Feedback Master view, click Close Master View in the Feedback Master tab. All the changes you made will be applied to all feedback messages. Now, click HTML5 Preview to see the result.
The information in the red rectangle is added from the Review Feedback Layer.
Note: Review Feedback Layer is created by default for all slides. However, you can customize the Review Feedback Layer for each slide as you wish.
To sum up, the Review Course plays an important role on creating professional eLearning course. Hope that this inspires you to create great interactive eLearning content with ActivePresenter. Contact us if you need any support.
