Last Updated On: April 7, 2020
Mouse clicks are interaction objects placed in any position on a slide where users must click to trigger the next action. They are often used in software simulations to teach the use of applications. For example, place a mouse click object on a button or a menu where users must click to perform a certain task in an application. When you record software simulations, ActivePresenter automatically inserts mouse clicks wherever and whenever you make a click.
Mouse clicks use On Click event to trigger actions, just like buttons, but they are designed to assess user knowledge of a target application. Mouse clicks validate mouse actions as correct and incorrect and can give users points for correct actions.
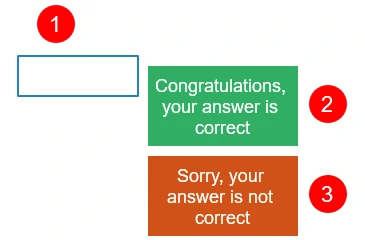
 By default, a mouse click object consists of three separate elements: (1) a target area, (2) a Correct message, and (3) an Incorrect message.
 When the interactive presentation is played, it displays only the target area (1) and waits for users to click anywhere on the slide. If users click the target area, the Correct message (2) appears, otherwise the Incorrect message (3) appears. You can prompt users to click on a specific area by inserting a shape with some guidance.
 You can make the target area invisible so that users cannot see the correct click area. Do either of the following:
 Step 3: Place the cursor over the Correct Value box and click the mouse button with or without the modifier keys to define a value.
If you don’t want a correct value anymore, click the Remove button (5) next to that value to remove it.
Besides, it’s great to let users know there is a clickable area on screen. For this reason, change the cursor for the target area to a hand cursor (6). That way, the mouse pointer will turn into a hand cursor when it’s over the correct area in the output.
Step 3: Place the cursor over the Correct Value box and click the mouse button with or without the modifier keys to define a value.
If you don’t want a correct value anymore, click the Remove button (5) next to that value to remove it.
Besides, it’s great to let users know there is a clickable area on screen. For this reason, change the cursor for the target area to a hand cursor (6). That way, the mouse pointer will turn into a hand cursor when it’s over the correct area in the output.
 By default, mouse clicks have four events, namely On Click, On Correct, On Incorrect, and On Timeout. You can add two other events, namely On Rollover and On Rollout. These events are helpful when you want to create the hover effect.
For more details, see Working with Events – Actions.
By default, mouse clicks have four events, namely On Click, On Correct, On Incorrect, and On Timeout. You can add two other events, namely On Rollover and On Rollout. These events are helpful when you want to create the hover effect.
For more details, see Working with Events – Actions.
Inserting Mouse Clicks
To insert a mouse click, click the Interactions tab > Mouse Click. Alternatively, click the Home tab > Interactions > Mouse Click.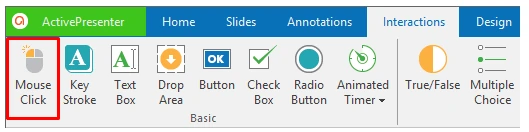 By default, a mouse click object consists of three separate elements: (1) a target area, (2) a Correct message, and (3) an Incorrect message.
 When the interactive presentation is played, it displays only the target area (1) and waits for users to click anywhere on the slide. If users click the target area, the Correct message (2) appears, otherwise the Incorrect message (3) appears. You can prompt users to click on a specific area by inserting a shape with some guidance.
 You can make the target area invisible so that users cannot see the correct click area. Do either of the following:
- Set the line of the target area to No Line. Select the target area, navigate to the Properties pane > Style & Effects > Line > No Line.
- Use Show In Mode property. Just select the target area, then navigate to the Properties pane > Size & Properties > Show In Mode > select modes that you want to show the click area (for example, Demonstration and Tutorial) and deselect the rest (for example, Practice and Test) to hide it.
Setting Correct Values for Mouse Clicks
Mouse click objects accept three types of mouse clicks (left-click, right-click, and left double-click) with or without modifier keys (SHIFT, CTRL, and ALT). To define a correct action, do the following: Step 1: Select the target area (1). Step 2: Click the Properties pane > Interactivity > General > List of Correct Values > Add Value (4).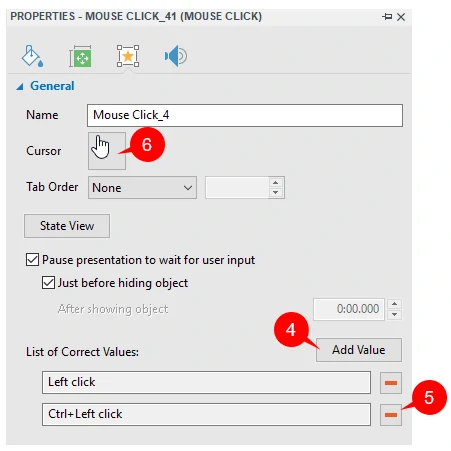 Step 3: Place the cursor over the Correct Value box and click the mouse button with or without the modifier keys to define a value.
If you don’t want a correct value anymore, click the Remove button (5) next to that value to remove it.
Besides, it’s great to let users know there is a clickable area on screen. For this reason, change the cursor for the target area to a hand cursor (6). That way, the mouse pointer will turn into a hand cursor when it’s over the correct area in the output.
Step 3: Place the cursor over the Correct Value box and click the mouse button with or without the modifier keys to define a value.
If you don’t want a correct value anymore, click the Remove button (5) next to that value to remove it.
Besides, it’s great to let users know there is a clickable area on screen. For this reason, change the cursor for the target area to a hand cursor (6). That way, the mouse pointer will turn into a hand cursor when it’s over the correct area in the output.
Setting Score and Reporting
To set score and reporting, see Question Score & Reporting.Setting Events and Actions
To set up events and actions, access the Events – Actions section in the Interactivity tab of the Properties pane.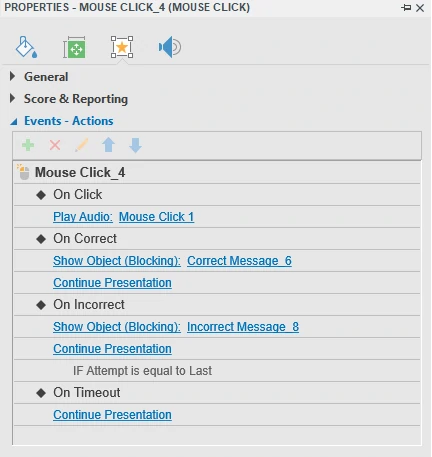 By default, mouse clicks have four events, namely On Click, On Correct, On Incorrect, and On Timeout. You can add two other events, namely On Rollover and On Rollout. These events are helpful when you want to create the hover effect.
For more details, see Working with Events – Actions.
By default, mouse clicks have four events, namely On Click, On Correct, On Incorrect, and On Timeout. You can add two other events, namely On Rollover and On Rollout. These events are helpful when you want to create the hover effect.
For more details, see Working with Events – Actions.