In ActivePresenter, it’s easy to create drag-n-drop interactions using Drop Area. You can even make this type of interaction in just a few minutes. How? This tutorial will show you all techniques to do that.
Overview of Drop Area
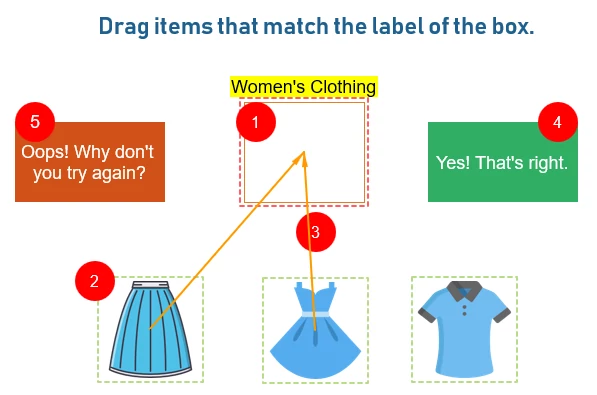
Drop Area is suitable for creating drag-n-drop interactions. These interactions work the same way as when you drag a file into a folder to copy it. But instead of the file, you now drag an object and drop it into another. Below is a typical example of a drag-n-drop interaction created with Drop Area.
If you want to assess learners’ responses instantly when they drop a drag source, and you need only one drop area, use Drop Area. Otherwise, think about Drag-n-Drop question.
Things to Remember When Using Drop Area
Below are some things you need to know about Drop Area object:
- A Drop Area object gives you a drop area (1) where you can drag one or more objects as drag sources (2) onto it, like the example above.
- An object as a drag source has a light green marker. Meanwhile, an object as a drop area has a light red marker. This marker doesn’t appear in any output format but the editor.
- There’s an orange drag-drop connector (3) which connects drag source with the drop area. This connector denotes that dropping the drag source to the drop area is a correct action. For this reason, it appears only when you drag the drag source to the drop area.
- Correct and Incorrect messages (4, 5) are feedback messages automatically created by ActivePresenter. But you can add other feedback messages like Timeout and Hint; then, customize them if you like.
- A drop area can accept one or multiple drag sources. In addition, the app lets you add objects, customize them, and set them as drag sources. Then, set scores and events – actions for drag sources and drop area. We’ll discuss these techniques in the later part of this tutorial.
- If there are more than one accepted drag sources when learners drop an accepted drag source onto the drop area, it replaces the previously dropped drag source.
Note: Drop Area is different from Drop Target as described below.
- Drop Area is to score learns’ answers. Meanwhile, scoring isn’t available for Drop Target which only has events like On Accept and On Reject.
- You can’t set an object as Drop Area, convert an object into a drop area or turn a drag source into a drop area. But you can do these things with Drop Target.
Creating Drag-n-Drop Interactions with Drop Area
This part shows you how to insert a Drop Area object, add drag sources to its, and customize the drop area. Besides, you’ll learn about steps to set scores, reporting, and events – actions for both the drop area and drag sources.
Inserting Drop Area into Slides
To insert a Drop Area object, go to the Interactions tab > Drop Area . Then, you see the default Drop Area like this.
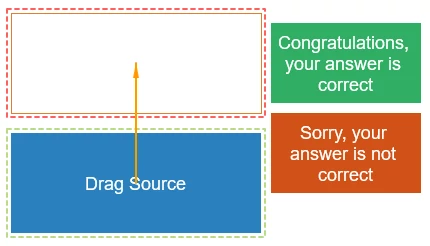
A Drop Area object includes five default elements: a drop area (with light red marker), a drag source (with light green marker), a drag-n-drop connector (an orrange arrow), a Correct message, and an Incorrect message. Note that you can make the markers and the drag-n-drop connector shown or hidden by clicking the Drag-n-Drop button in the View tab. You can also customize these elements and add as many drag sources you want.
Converting Objects into Drag Sources
To convert objects into drag sources, follow these steps:
Step 1: Select objects. Note that you can select multiple objects at once.
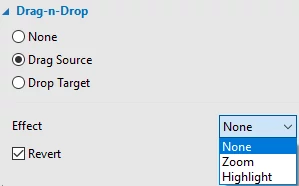
Step 2: In the Properties pane > Interactivity > Drag-n-Drop > Drag Source.
Step 3: Use these options to adjust the properties of drag sources:
- Effect: Specify a type of effect for selected drag sources. The effect appears when learners drag them. For example, if the Zoom effect is assigned to an object as a drag source, the object will be zoomed out when learners drag it.
- Revert: Define whether selected drag sources are sent back to their original positions when learners drop them outside the drop area.
Tip:
- You should insert all objects before converting them into drag sources. This way, you can reduce the editing time since you can edit and convert multiple objects at once.
- It’s good to rename drag sources and drop area. This will help you identify them easily in many places.
- You’re free to edit objects as drag sources/drop area as you do with a normal object. So, make use of them to change the appearance of your quizzes.
Setting Correct Answers
Use these steps to set correct answers. Do as follows:
Step 1: Select the drop area.
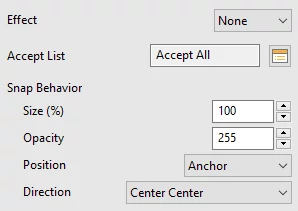
Step 2: In the Properties pane > Drag-n-Drop.
- Effect: Specify the effect for the drop area. The effect appears when learners drag any drag source over the drop area.
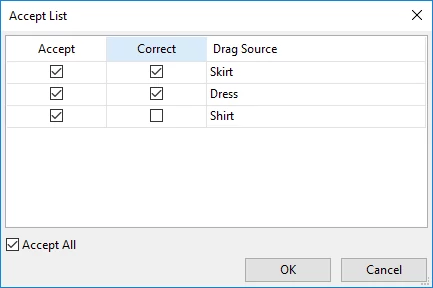
- Accept List: Click
to show the Accept List dialog.
Select check boxes in the Accept column to specify drag sources that can be dropped into the drop area. If you allow learners to drag all drag sources into the drop area, click Accept All. The Correct column is meant for selecting drag sources as correct answers. The Drag Source column displays names of drag sources.
- Snap Behavior: Edit properties of drag sources after they are dropped into the drop area. Select Size to resize drag sources. Select Opacity to set the opacity level for drag sources from 0 to 255. Select Position to define the location of drag sources with three options:
Absolute: Keep drag sources at the same position as where learners drop them.
Anchor: Snap drag sources to an anchor in the drop area. Choose one of nine anchors in the Direction list like Top Left and Top Center.
Tile: Arrange drag sources so they fill the drop area without covering each other. Select one of 8 tiling directions in the Direction list like From Top, Left to Right.
Tip: Besides using Accept List, there’s another way to set a drag source as a correct answer. Simply put, click the drag source to show the marker and drag it into the drop area. Then, the drag-drop connector appears. After that, to remove a drag source as correct answer, do either of the following:
- Click the drag-drop connector and press the DELETE key.
- Right-click the drag-drop connector > Delete.
Setting Scores and Reporting
Free to use the Score & Reporting feature to control how the quiz should be played and reported. Do the following:
Step 1: Select the drop area.
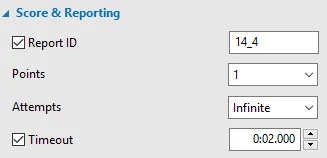
Step 2: In the Properties pane > Interactivity > Score & Reporting. Then, you see the following options:
- Report ID: This is selected by default and used for reporting the test result. Note that you can enter only alphanumeric characters (A-Z, a-z, 0-9) and underscore (_) to this box. Besides, the maximum length is 250 characters.
- Points: This lets you set points for each correct answer. Enter your value in the Points spin box or select a value from the Points drop-down list.
- Attempts: This is to set the maximum number of attempts that learners can make. Beyond this number, users can’t interact with objects anymore.
- Timeout: This allows you to specify a time limit. Adding the time limit ensures that learners complete your quiz in a controlled amount of time.
Setting Events – Actions
ActivePresenter provides default events – actions for Drop Area. But you’re free to edit them the way you want. Remember that you can customize events – actions for both drag sources and the drop area.
Do the following:
Step 1: Select the drop area or drag sources.
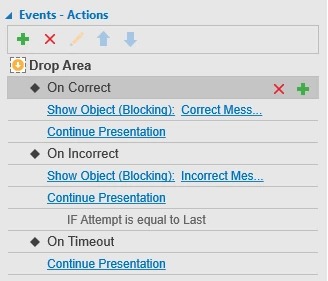
Step 1: In the Properties pane > Interactivity > Events – Actions. If you select the drop area early on, then you see the Events – Actions section like this:
In a word, a Drop Area object comes with the following events:
- On Accept: Occur when any accepted drag source is dropped into the drop area.
- On Reject: Occur when any rejected drag source is dropped into the drop area.
- On Drag Enter: Occur when the drag source enters the drop area.
- On Drag Leave: Occur when the drag source leaves the drop area.
- On Correct: Occur when users give a correct response.
- On Incorrect: Occur when users give an incorrect response.
- On Timeout: Occur when viewers don’t respond within the specified time.
- On Rollover: Occur when the mouse rolls over the shape of objects. In other words, the app triggers this event when the mouse enters the boundary of the shape).
- On Rollout: Occur when the mouse rolls out of the shape of objects. In other words, the app triggers this event when the mouse exits the boundary of the shape).
For more details about the procedure, see Working with Events – Actions.
Inserting Feedback Messages
As said earlier, you can add many types of feedback messages to Drop Area. Besides, the app allows you to style them, change their positions, and add events – actions. For more information, see Working with Feedback Messages.
That’s all about working with Drop Area. Make use of this feature to create drag-n-drop interactions you want. Visit the following links if you want to learn more about how to work with other types of interactive objects in ActivePresenter:
Working with Mouse Clicks
Working with Key Strokes
Working with Text Boxes
Working with Buttons
Working with Check Boxes and Radio Buttons
Working with Animated Timer
