When it comes to making training content, you will want to brand your course. With ActivePresenter 8, adding logos to training courses is just a breeze. In fact, ActivePresenter offers you several ways to add company logos to training content effectively and quickly. In this article, we’ll walk through and learn more about each option:
- Use Slide Masters
- Show the Logo over Multiple Slides
- Use Player Settings
- Use Custom Themes or Slide Templates
Now, let’s get started!
Use Slide Masters
This is the first way to add company logos to your training courses. Overall, Slide Masters give your entire project a uniform appearance. When you edit a slide master, your changes will take effect in all slides linking with it.
It is clear that using slide masters is an ideal way to add company logos to your training content because you can decide which layouts to display the logo. Besides, this avoids accidentally editing or deleting the logo in the normal view (when you work with slides) as the logo then appears as a background object. Thus, to edit a logo added to a slide master, you must switch to the master view.
Now, do as below guiding:
Step 1: In the View tab > click Slide Master.
Step 2: Select the master layout and insert a logo into it (Insert tab > Image).
As a result, the logo appears in the master layout and all custom layouts within the hierarchy. Then, you can resize and reposition it as you want.
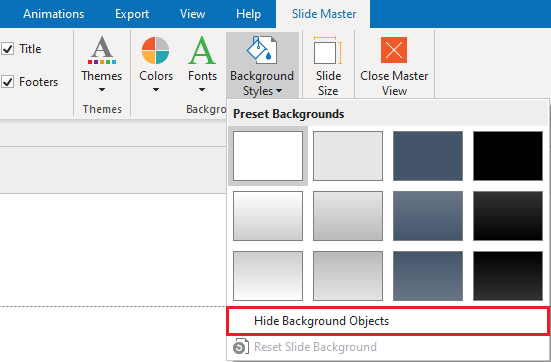
Step 3: Place the logo in the bottom layer of the stack order of slide objects. This helps the slide content be shown fully. To do that, right-click the logo > Display Order > Send to Back.
Besides, you can hide the logo in some custom layouts by selecting the layout > Background Styles > Hide Background Objects.
Step 4: Click Close Master View to save the change and go back to the normal view. Next, you can work with slides in your project the same way as you normally do.
To get detailed information about using Slide Masters, refer to How to Use Slide Masters in ActivePresenter 8.
Show the Logo over Multiple Slides
In this part, we will show you another way to add company logos to your training content. That is using the Show over Multiple Slides option. As the name implies, this option shows a single object over multiple slides in a project.
So, follow the steps:
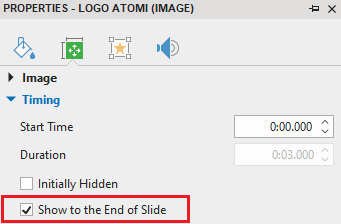
Step 1: Insert your logo into a slide (Insert tab > Image). Your logo automatically shows to the end of the slide (Properties pane > Size & Properties > Timing > Show to the End of Slide). Then, you are free to resize and reposition the logo as you want.
Step 2: Right-click the logo > Show over Multiple Slides. Next, choose to place the logo in the top or bottom layer of the object stack order.

After that, you can see a small icon ![]() that appears next to the logo name in the Timeline pane. It indicates that the logo is displayed over multiple slides.
that appears next to the logo name in the Timeline pane. It indicates that the logo is displayed over multiple slides.
At this point, the logo appears in all the slides starting from the current slide. This is due to the Show to the End of Project option (right-click the logo time bar > Show to the End of Project). So, if you inserted the logo into the first slide, then it would show over all the slides in the project. And your work is done here. That said, you can totally decide in which slides your logo will appear. Take these additional steps:
Step 3: In the Timeline pane, click All Slides to view all the slides in the project.
Step 4: (Optional) Drag the logo time bar along the timeline and/or change its length to decide where the logo is visible.
Use Player Settings
In general, using Player Settings is also a good way to add company logos to your training courses. Thanks to this feature, your company logo always appears at the top of the side bar. Now, do as follows:
Step 1: In the Export tab > click Player Settings. The Settings window will appear to let you customize it.
Step 2: Make the logo appear in the Side Bar by selecting the Author Image check box (General tab > Parameters pane > General Parameters > Side Bar).
Step 3: Import your logo by selecting an image from your current project or from your computer. When done, your company logo will appear in the Player Settings window like the below screenshot:
Step 4: Click OK to close the Settings window.
Tip: In the Player Settings window, ActivePresenter allows adding not only company logos but also company name, description or even customizing more. Find more information in the article Customize HTML5 Player Settings in Active Presenter 8.
Use Custom Themes or Slide Templates
Let’s say you want to utilize one theme containing company logos to create many projects. Besides mentioned ways, you can take advantage of Slide Templates or Custom Themes to get the same result.
After adding company logos to your current project, ActivePresenter allows you to save it as a custom theme or slide template and reuse it later on. Check out the tutorial How to Use Custom Themes in ActivePresenter 8 and Create and Use Slide Templates in ActivePresenter 8 to get detailed information.
So, you know how to deal with corporate branding in your training content by adding a logo. Hope that this helps. Download ActivePresenter and feel free to contact us if you need any help. Visit our Facebook, Twitter, Tutorial page, and YouTube channel to get more useful articles and tutorial videos.
See Also: