This tutorial will get you through how to export projects to HTML5 in ActivePresenter 8. The HTML5 output uses the HTML5 standards that allow learners to view and interact with the content on the World Wide Web. It is the ultimate output for exporting interactive software simulations and quizzes.
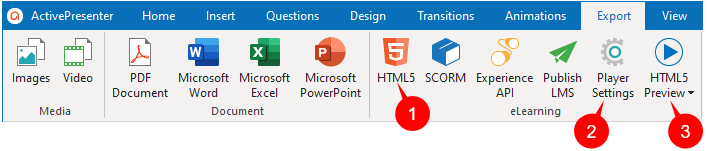
First, to export projects to HTML5, open the Export tab and click HTML5 (1).
This opens the Export to HTML5 dialog having two tabs which are General and Reporting. We will get to know both of them in detail.
Note:
- You can customize the settings for the Player Settings of the HTML5 output. This means you can change the skin of the player, the table of contents, output language, etc. Click the Player Settings button (2) to access those settings. For more information, please refer to Customize HTML5 Player Settings.
- ActivePresenter allows previewing the output before actually exporting it. Just click the HTML5 Preview button (3) to do that. See Work with HTML5 Preview for more information.
General Tab
The General tab provides you with many settings for the final output. For example, you can select which operation modes to export, define the pass/fail condition of the test, etc.
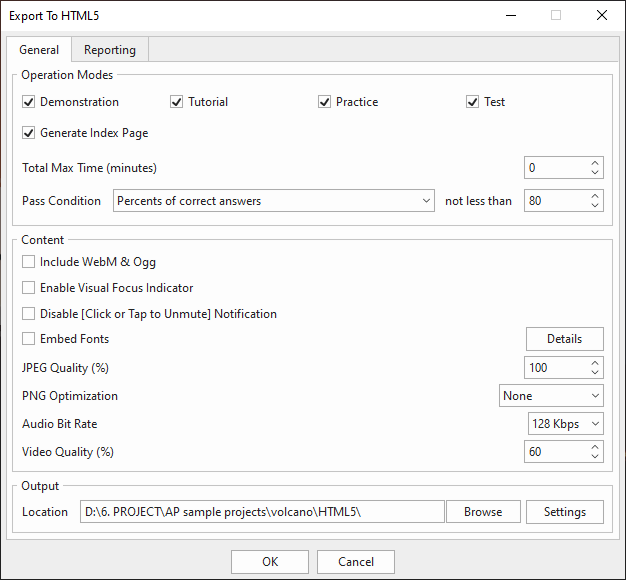
Operation Modes
- Four operation modes:
When exporting projects to HTML5, you will need to consider which operation modes you are going with. Select the mode to export between Demonstration, Tutorial, Practice, and Test. The selected modes will be available for users. Please refer to the tutorial Four Operation Modes for more information.
- Generate Index Page: Select this check box to generate the HTML index page which contains the entry to open all selected modes.
- Total Max Time (in minutes): This is the total time which is taken by all objects to complete their lifecycles plus the time for students to answer. It also includes the pausing time of the presentation to wait for user answers. Set the value to 0 to disable this feature.
- Pass Condition: Determine the overall pass/fail result of students when they take a test. See Set Pass/Fail Conditions for Lessons for more information.
Content
The options in this section are applied to the audio and visual elements of slides.
- Include WebM & Ogg: Select this check box to allow viewing the HTML5 content on browsers that don’t support MP4 and MP3 but support WebM and Ogg.
- Enable Visual Focus Indicator: If you select this check box, the object that gains focus will have a dashed outline.
Note: If your projects have some accessibility methods, for example, Tab Order, you should select this option.
- Disable [Click or Tab to Unmute] Notification: Some browsers don’t allow content containing audio to play automatically without the user interaction. In that case, the HTML5 player will mute audio to enable autoplay. The player will display the message to notify users to click to unmute audio. Select this checkbox to hide the message.
- Embed Fonts: Embed fonts that are used in content into output using CSS3 Web font specification. This makes the content look consistent between platforms and devices.
- JPEG Quality (%): This option only affects images that are exported in JPEG format.
- PNG Compression Level: These are relative compression levels. Note that the higher the compression level, the longer it takes to export.
- Audio Bit Rate: Specify the audio bit rate in the output if any. The higher the value, the higher the audio quality, and the larger output file size.
- Video Quality (%): Specify quality for videos in the output if any. The higher the value, the higher the video quality, and the larger output file size.
Output
Click the Settings button to have further settings for the output as below.
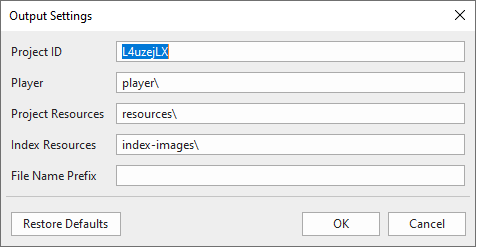
- Project ID: This unique reference number is used for reporting the test result. Only text that contains alphanumeric characters (A-Z, a-z, 0-9) and underscore (_) is allowed (maximum length=250 characters).
- Player: The location for storing HTML5 player script and CSS files.
- Project Resources: The location for storing project images, audio, and video.
- Index Resources: The location for storing index page images.
- File Name Prefix: The file names of project-related files such as resources and project CSS and JavaScript files will begin with this prefix. This option may be used in the scenario that the system needs to put files of multiple projects into one folder.
Reporting Tab
From version 8.1 and earlier, the Reporting tab in the Export To HTML5 dialog includes both eLearning (LMS) and report options as shown in the image below:
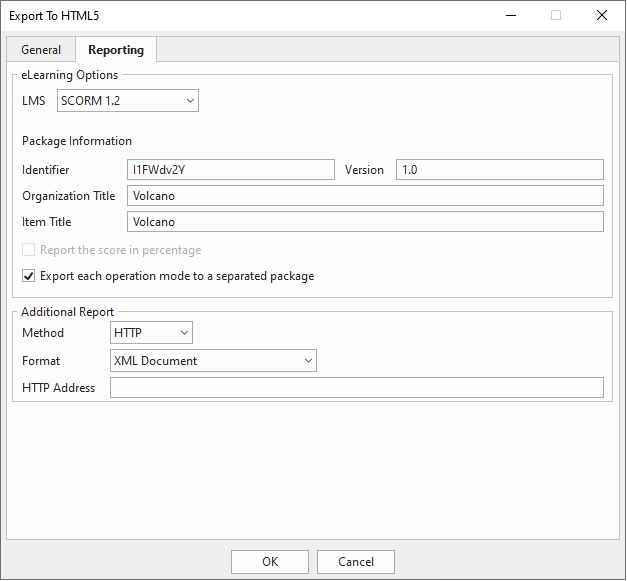
However, in the latest version (8.2), the eLearning Options are separated from the Reporting tab of this dialog. These options are Export To SCORM and Export To Experience API, which now can be found in the Export tab, next to the HTML5 button. You can refer to those tutorials for more information.
Below is the new Reporting tab in version 8.2:
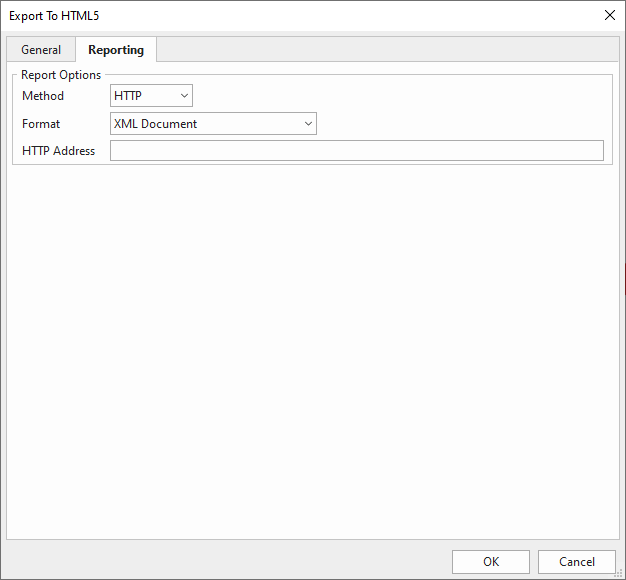
Report Options
The Report Options section lets you determine how to report the test result of students. They are useful when you don’t have an LMS or you want to handle the report by yourself.
- Method: Choose between No Report (do not send the report) or HTTP (send the report through the HTTP request).
- Format: Choose between two reporting formats which are XML Document or JSON (JavaScript Object Notation).
- HTTP Address: This is the HTTP address of a server-side script that will process the report data (the data is either in XML or JSON format).
For more information, please take a look at this tutorial: Send Quiz Report to Google Sheets or to an Email Box.
When satisfied with all the settings and adjustments, just click the OK button in the Export To HTML5 dialog to start exporting.
So, that’s how to export projects to HTML5 in ActivePresenter. Try it today and don’t hesitate to contact us if you need support.
See Also: