ActivePresenter 9 allows you to export projects to document formats such as PDF, Word, or Excel so that you can save, or print them to create handouts. Let’s learn more in this tutorial.
To export projects to any type of document format, let’s access the Export tab and select one. As a result, this opens corresponding dialogs in which you can define many options for exporting.

Keep reading to know details about them.
- Export Projects to PDF Document
- Export Projects to Microsoft Word
- Export Projects to Microsoft Excel

Export Projects to PDF Document
When you export a project to a PDF document in ActivePresenter 9, the slides are exported as images and then embedded into the PDF files. This means that you can’t edit slide objects. However, you can still define many options for exporting from the Export To PDF Document dialog. It helps you ensure that your PDF document meets your needs and requirements. The dialog has 2 tabs:
General Tab

Firstly, we’ll walk through four main sections:
Rendering Options
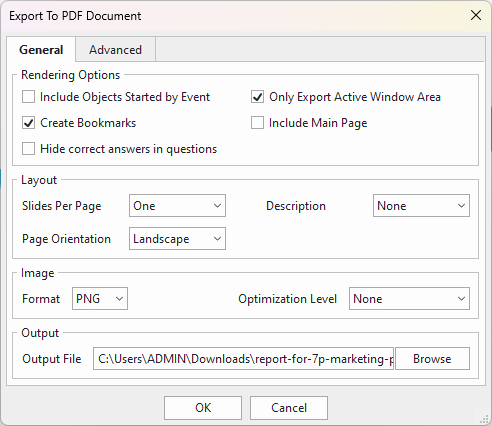
ActivePresenter 9 allows you to choose which properties of the project to render in the output. To do that, just select the corresponding checkbox.
- Include objects started by event: Export objects started by events-actions.
- Create bookmarks: Create document outline from slide names.
- Hide correct answers in questions: Not show correct answers when exporting questions.
- Only export active window area: Only export a specific area. To define the exporting area, open the View tab > View Active Window. Then, click the Edit Active Window to specify an area. See Work with Active Window for details.
- Include main page: Export the page that has a brief description of a project such as a project name and author.
Layout
This section lets you specify the page orientation, and the number of slides on each PDF page.
- Slides Per Page: Decide the number of slides per PDF page.
- One: Export a single slide per page.
- Two: Export two slides per page.
- Contiguous: The slides are written contiguously on a page until there is not enough space, then it will be moved to the next page.
- Page Orientation: Export to either landscape or portrait. The page size is always A4. ActivePresenter 9 uses fixed margins of 1” (2.54 cm) on all sides.
- Description: Export slide description and specify which side of the slide to place it (Top, Left, Right, or Bottom). On the other hand, selecting None to disable this option.
Image
The Image section lets you define the quality of the document background.
- Format: Select either JPEG (lossy compression) or PNG (lossless compression). Due to their specs and compression algorithms, JPEG is best suitable for pictures while PNG is best suitable for computer graphics (screenshots, drawings, etc.).
- Optimization Level: Applicable to the PNG format only. This option specifies a relative compression level (none, low, normal, high, ultra). In general, the higher the compression level, the smaller the output file size, and the longer it takes to export.
- Quality: Applicable to the JPEG format only. Specify image quality in the range of 1% to 100%. The higher the quality, the larger the output file size.
Output
- Output File: Specify the file path and name for the PDF document.
Advanced Tab

The Advanced tab also has 4 sections:
Description
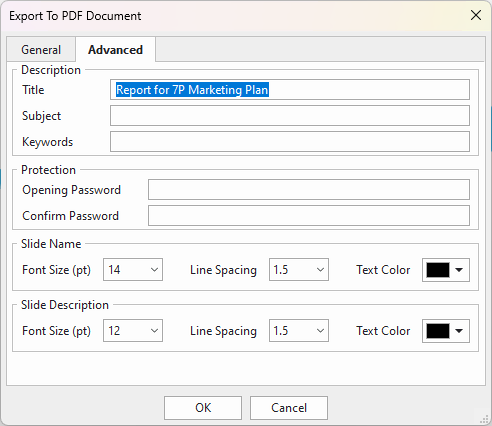
The Description section allows you to create title, subject and keywords for the PDF document. When opening the PDF file, you can see these properties in the Document properties.
- Title: Title of the exported PDF document. The title also appears in the windows bar (or in the tab in the case of a tabbed PDF reader).
- Subject: Subject of the PDF document.
- Keywords: Keywords defined in the PDF document.
Protection
In this section, you can set a security password for opening the PDF document.
- Opening password: Set a password for opening this PDF document.
- Confirm password: Enter the password again manually (no copy-paste from the previous field).
Slide Name
Customize the font size, line spacing and text color of the slide name in the PDF document if you want.
Slide Description
Similar to the Slide Name section, this section allows you to customize the appearance of the slide description in the PDF output like font size, line spacing and text color.
Export Projects to Microsoft Word
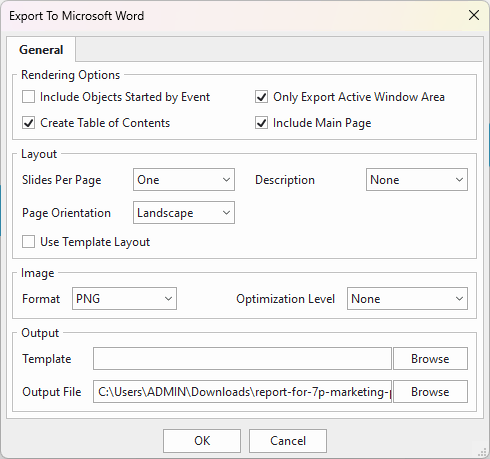
The Export To Microsoft Word dialog has only the General tab. This tab shares some similarities with those of exporting to PDF documents.

Besides, it offers some different properties:
- Create Table of Contents: Add a table of contents to the exported document with hyperlinks to slides.
- Use Template Layout: Use the layout specified in the Word template.
- Template: Specify the location of the template file. In case you want the exported file to have a particular template, choose one from existing Word templates.
Export Projects to Microsoft Excel
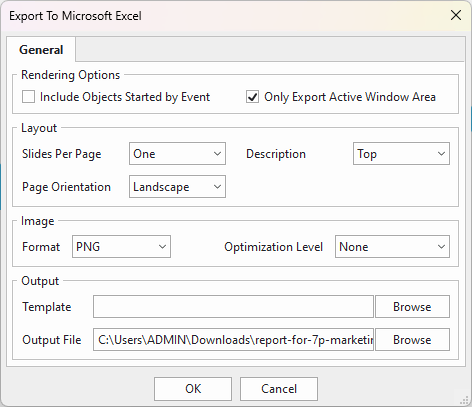
When it comes to exporting projects to Excel, it’s quite the same as those of exporting to Word. You can also browse a particular template to export.

Note: When exporting to Microsoft Word or Microsoft Excel, slides will be converted into text, images, as well as objects and inserted into a Word or Excel file afterward. As a result, those objects are editable.
So, you know how to export projects to document formats in ActivePresenter 9. Visit our Tutorial page, and YouTube channel to get more useful information when using ActivePresenter features.
See more: