If you’re looking for a way to share eLearning content, exporting your project as an xAPI package can be a solution. xAPI is one of the popular standards in the eLearning field making it easy to deliver your content, manage learners and track their learning progress.
In this tutorial, you will learn how to export your content as an xAPI package in ActivePresenter 9.

What is xAPI?
xAPI stands for experience API, a specification that enables the tracking, storing, and sharing of learning experiences across different platforms and scenarios. Unlike traditional learning systems that rely on web browsers, LMS, or internet connection, xAPI allows learners to access learning content anytime and anywhere, both online and offline. xAPI also supports a wide range of learning modalities, such as mobile learning, simulations, virtual worlds, serious games, real-world activities, experiential learning, social learning, offline learning, and collaborative learning. xAPI is also known as Tin Can API, because it can send and receive data in small packets like tin cans.
Export Projects as xAPI Packages
To export your project as an xAPI package, open the Export tab > Experience API. Then, the Export To Experience API dialog appears including two tabs: General tab and eLearning tab.
General Tab
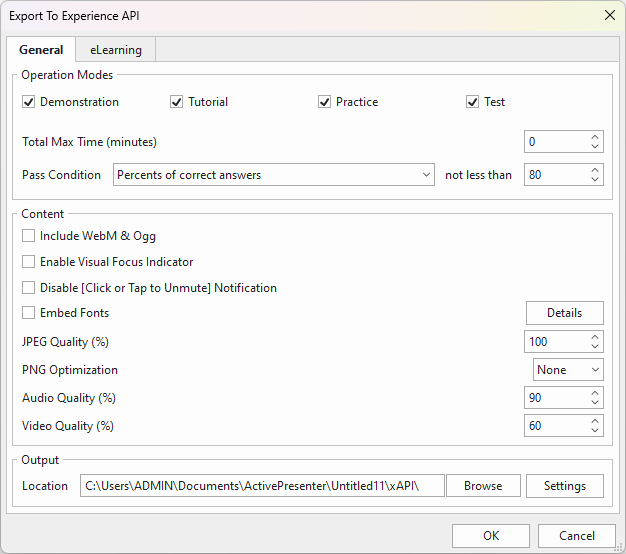
Operation Modes
- Four Operation Modes: ActivePresenter 9 offers you 4 modes to export: Demonstration, Tutorial, Practice, and Test. To learn more about them, see Four Operation Modes.
- Total Max Time (in minutes): This is the total time taken by all objects to complete their life cycles plus the time for students to answer. It also includes the pausing time of the presentation to wait for user answers. Set the value to 0 to disable this feature.
- Pass Condition: You can determine the overall pass/fail result of students when they take a test. See Set Pass/Fail Conditions for a Test for more information.
Content
The options in this section are applied to the audio and visual elements of slides.
- Include WebM & Ogg: Allow viewing the content on browsers that don’t support MP4 and MP3 but support WebM and Ogg.
- Enable Visual Focus Indicator: Show a dashed outline around the focused objects.
Note: If your projects have some accessibility methods, for example, Tab Order, you should select this option.
- Disable [Click or Tab to Unmute] Notification: Select this option to hide the [Click or Tab to Unmute] notification in the output. This message is to notify users to interact with the content to turn on the audio.
- Embed Fonts: Embed fonts that are used in content into output using CSS3 Web font specification. This makes the content look consistent between platforms and devices. Click the Details button to select the fonts to embed.
- JPEG Quality (%): Adjust the quality of the images that are exported in JPEG format.
- PNG Optimization: Select a compression level applied to PNG images. Note that the higher the level, the longer the export.
- Audio Quality: Specify the audio quality in the output if any. The higher the value, the higher the audio quality, and the larger output file size.
- Video Quality (%): Specify quality for videos in the output if any. The higher the value, the higher the video quality, and the larger output file size.
Output
Browse the location to save the exported xAPI package. Besides, click the Settings button to have further settings for the output as below.
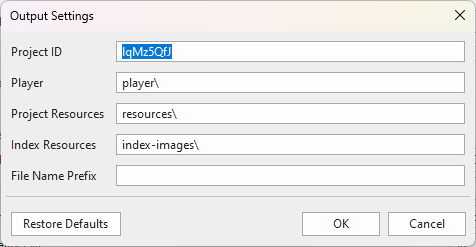
- Project ID: This unique reference number is to report the test result. Only text that contains alphanumeric characters (A-Z, a-z, 0-9) and underscore (_) is allowed (the maximum length is 250 characters).
- Player: The location for storing player script and CSS files.
- Project Resources: The location for storing project images, audio tracks, and videos.
- Index Resources: The location for storing index page images.
- File Name Prefix: The file names of project-related files such as resources and project CSS and JavaScript files will begin with this prefix. This option may be used in the scenario that the system needs to put files of multiple projects into one folder.
- Restore Defaults: Discard all changes you’ve done.
eLearning Tab

This tab consists of two main sections: Experience API Options and Additional Report:
Experience API Options
This section allows you to package the content to the xAPI standard for uploading to LMS.
- Identifier: Specify a name used by an LMS to identify different manifests. ActivePresenter 9 automatically generates it, but you can change it if needed.
- Title: Enter the title of your project.
- Description: Enter the description of your project.
For more details about how to track learners with an LMS, you can refer to Tracking Training Courses in an LMS.
Additional Report
This section provides you with additional methods to track users’ activities.
- Method: Choose either of the following options: No Report (do not send the report), or HTTP (send a report through the HTTP request). If you select HTTP, the following options will be enable:
- Format: Choose between two formats: XML Document or JSON (JavaScript Object Notation).
- HTTP Address: This is the HTTP address of a server-side script that will process the report data (the data is either in XML or JSON format).
Please take a look at this tutorial to know how to send report data (course result) to an HTTP address even if you don’t have an LMS.
That’s how to export your project as an xAPI package in ActivePresenter 9. Follow our Tutorials page and YouTube channel for more helpful articles and videos.
See more: