ActivePresenter 9 offers the capability to run the content through its four specific modes: Demonstration, Tutorial, Practice, and Test, also called operation modes. These modes serve distinct purposes, and this tutorial will delve into how to effectively utilize each of them.
Table of Contents:
Overview
Four operation modes in ActivePresenter 9 come in handy when you create HTML5 content like interactive software simulations, courses, or quizzes. Each of these modes is suitable for specific purposes. In general, the Demonstration mode is most different from the others. In this mode, the content will be shown as a demonstration, hence, learners will not be able to interact with it. The content is just paused or resumed if they click it. Meanwhile, in the other modes (Tutorial, Practice, and Test), learners can interact with the content.
- Demonstration: This mode displays the task to learners as a demonstration. Learners are not supposed to interact with the content but only to view it.
- Tutorial: This mode allows learners to try the steps with hint messages and annotations provided to each one.
- Practice and Test: Learners have a chance to try the task themselves to see how well they understand it. There will be no hint message or annotation in these modes. The only difference between these two modes is that interactions (Mouse Click, Key Stroke, and Drop Area) will only appear in the Practice mode if learners perform the steps incorrectly.
The table below shows the differences between the four operation modes in ActivePresenter 9:
| Function | Demonstra -tion Mode | Tutorial Mode | Practice Mode | Test Mode |
| The simulation automatically runs based on the time you have set for objects and slides. | ||||
| The presentation jumps to the next slide when the current slide comes to the end. | ||||
| If the toolbar is available, users can control the presentation such as navigating to a certain slide and pausing/resuming the simulation. | ||||
| ActivePresenter assesses user response and executes associated actions that you have defined before | ||||
| It has option to create a report of user results and send it to a specified HTTP address. | ||||
| It has the option to create a report of user results and send it to a specified HTTP address. | ||||
| The simulation displays interactive hidden objects when users fail to execute associated actions in the predefined time. | N/A | |||
| The authors can limit the maximum time in which users are allowed to complete the test. |
Four Operation Modes in ActivePresenter 9
Choose Operation Modes to Show Objects
In ActivePresenter 9, the Show In Mode section is set reasonably in most cases. For example, cursor paths only appear in the Demonstration mode by default. If you want to customize these modes, you can change the default Show in Mode options of each object in the Properties pane. To do that, follow these steps:
Step 1: Select one or more objects.
Step 2: Navigate to the Properties pane > Size & Properties > Show in Mode. The four operation mode options will show below:

Then, select any check box to choose the corresponding mode for the selected object. Remember you can select multiple modes for a single object.
Note: You can choose operation modes for all objects on the same slide only. You can’t do this for all objects on multiple slides at a time.
Choose Operation Modes to Export Projects
To choose operation modes to export a project, do the following:
Step 1: In the Export tab > HTML5. This opens the Export To HTML5 dialog.
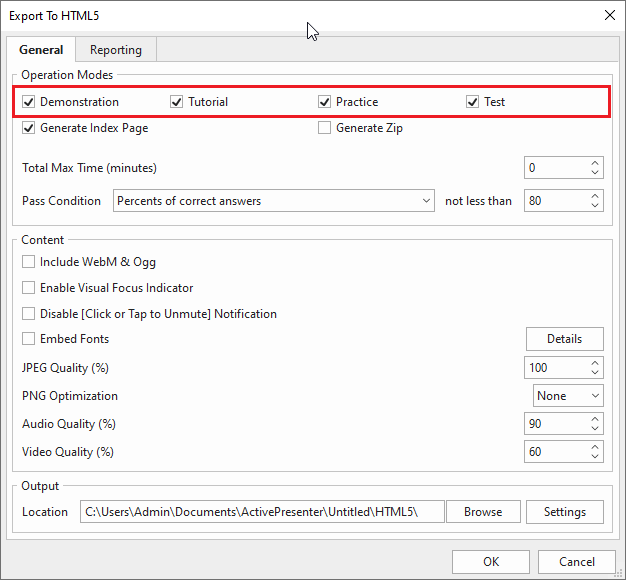
Step 2: Look at the Operation Modes section in the General tab, and select any modes you wish. Then, customize options like Total Max Time and Pass Condition. Note that the Total Max Time option is only available for the Test mode.
Note:
- When exporting a project to video, the video output is automatically in the Demonstration mode.
- By default, all four operation modes are selected. But you can select only the modes you want.
That’s how to work with operation modes in ActivePresenter 9. To apply this technique, you can show learners the task in Demonstration mode. Then, let them try it by themselves in Tutorial or Practice mode before bringing them to Test mode. Remember that ActivePresenter allows you to create any and all these modes with a single video without recording several times. Contact us if you need any help!
See Also: