Crossword game is both interesting and intellectual at the same time. You can use it to provide learners with vocabulary in a particular field or test their knowledge in a refreshing way.
Today, we’ll learn how to create this type of game with ActivePresenter 7: Fruit Names.
But first, you will need to download ActivePresenter as this game is designed in this software. ActivePresenter is an all-in-one authoring tool to create amazing interactive eLearning games like this. So, feel free to download, install, and use it for free with no limitation in time or functionality.

How to play the crossword game
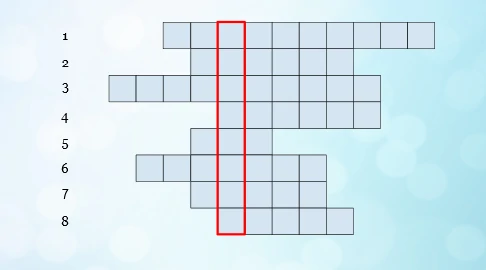
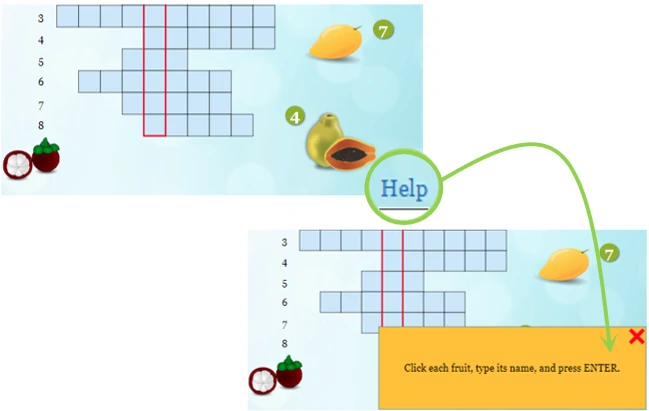
There are eight across words (eight rows, from 1 to 8) and one down word (the column with a red border). Each across word is a fruit name that you have to find out. The name of the fruit fits perfectly each row (one letter in each shape). Each row is a clue to find out the word in the column. Specifically, the down word is based on the network answers of eight across words.
All you have to do is click the fruits, type their name in the text boxes that appear and press ENTER.
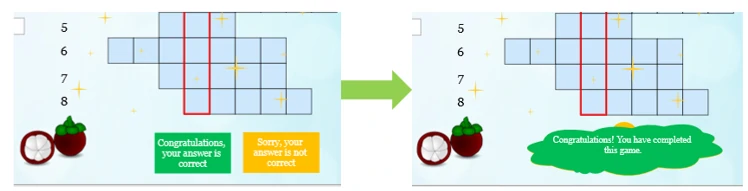
If your answer is correct, the crossword is updated. After finding out all of eight words correctly, the vertical word is fully revealed. A group of yellow stars along with a correct message display as congratulations.
If your answer isn’t correct, there is no change in the crossword while an incorrect message appears telling that you’ve given a wrong answer. In this case, try it again as many times as you wish.
You can start with the fruit number one and continue to the last or randomly select any one.
Game design idea
The project of the game has two slides: welcome screen slide and crossword slide. Both of them have the custom background created using images and themes.
Most of the game content can be created with ActivePresenter objects, features, and functions (shapes, text caption, events – actions, etc.). Some others can be created using external resources (fruit image, etc.)
For some actions, JavaScript is needed. It’s OK if you aren’t familiar with JS because I will provide you with the JS code so that you can copy it.
Now, let’s start! with the following procedure:
- Design slide background
- Create welcome screen slide
- Create crossword slide
- Add events – actions to fruit images and fruit name boxes
- Create Help button
- Export the game project
Design slide background
The project has two slides with the same background. You can design the background graphic for one slide, then copy to a new one (right-click the slide > Copy > right-click anywhere in the slide pane > Paste).
Using the background graphic effectively makes the game look more engaging. There are more than one way to create a slide background graphic, using theme is one of them. Many prebuilt themes are ready to use in ActivePresenter 7 (Design tab > select a theme).
For more details about how to use and customize a theme, see the Working with Themes & Templates series on our tutorial page.

Besides, you can simply insert a favorite picture into a blank slide (Annotations tab > Image) and make it the background of the slide (right-click the image > Merge it into background). After that, edit the slide background as you wish.
Create welcome screen slide
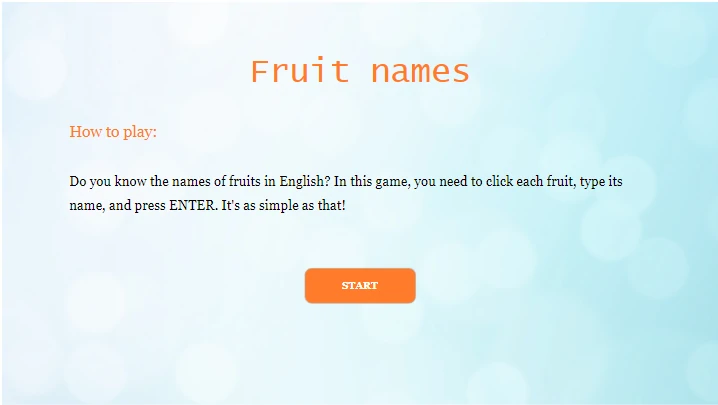
The first slide of the project has the following information: The game title, the introduction text telling users how to play the game, and the Start button that users can click to start playing. Except for the Start button created with the button object, other elements can be created using shapes.
Important Note #1: Because the game contains many shapes and text boxes, naming them effectively avoids you from mistaking this shape with others. You can name them conforming to the following rules:
- For name text box of the fruit: Row_X_1 or Column_X_2, in which X is the fruit number ranging from 1 to 8 (i.e. Row_1_1, Row_2_1)
- For each shape of the row in the crossword: X_Y, in which X is the row number and Y is the order of the shape in the row (i.e. 1_1, 2_1).
Important Note #2: To create this game, you have to know how to work with events and actions of an object. If you don’t, you’d better take a look at Working with events – actions to learn about it beforehand.
1. Game title and instruction text box
Insert two shapes or text captions (Annotations tab > Shape/Text Caption), one for the game title and the other for the introduction. Type the text in each of them and change their appearance to make them “visible” by letting them have no fill and no line (Properties pane > Style & Effects tab).
2. Start button
Users can click the Start button to play the game. The button brings them to the next screen containing the crossword. This can be done using events and actions. Besides, use the object states feature to give the button different looks when users hover or click them.
Perform the following steps to have this button:
Step 1: Insert the button and change its style
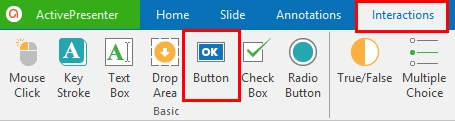
Insert a button (Interactions tab > Button), type the button name (you can name it Start, Play, or Let’s go, etc.), and customize its appearance. To change the shape style and color, go to the Properties pane > Style & Effects tab > Fill, Line, Shadow.
There is another way to change the button style which is choosing one from many ready-to-use styles in the Format tab (select the button > Format tab).
Step 2: Give the button different states
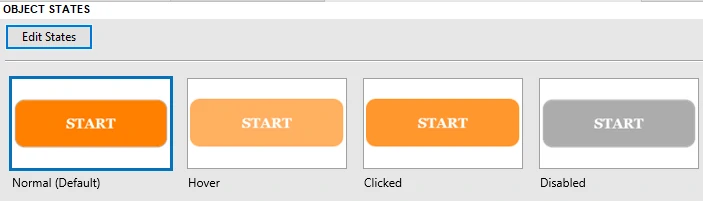
A button can have multiple states that display different appearances depending on how users interact with it.
For that to happen, select the button, open the Object States window (select the button > View tab > Object States) and click Edit States to enable the editing function. Change the fill, line, and color for each state of the button (Normal, Hover, and Clicked).
Note: As you can see in the project, there is a Note box at the bottom of the first slide. Actually, you don’t have to create it. I use it to let you know how you should name objects to have a better experience. Players don’t have to know it. However, just in case you want to know, this text box has hidden initial state. Throughout the project, I don’t use any action to call it, so it doesn’t display, meaning game players cannot see it.
Step 3: Make the Start button work by adding events – actions
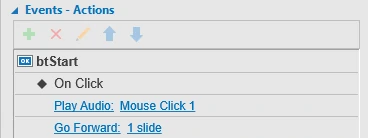
Events and actions make the Start button interactive and become actually start. When users click on it, the game begins and a short music track plays. Add the event On Click and add actions Play Audio and Go Forward to that event, as in the screenshot below:
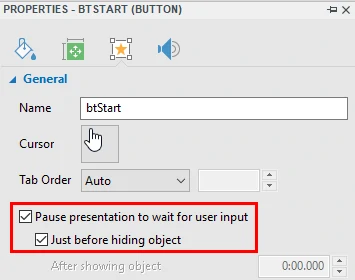
Step 4: Make the game pause to wait for user action
Normally, when the first slides ends, the second slide will display even when users don’t click the Start button yet. To avoid this, select the button and go to check the Pause presentation to wait for user input check box in the Properties pane.
Create crossword slide
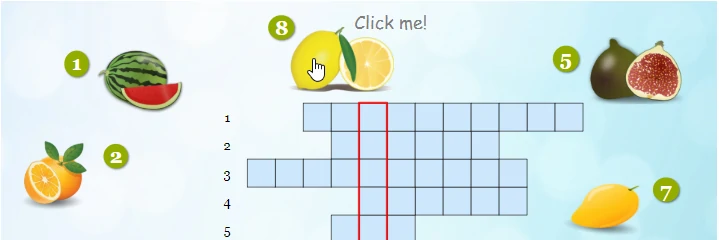
The crossword has eight across words that can be created using the shape object. Each fruit has a number which is corresponding to the row number. So, you need to insert eight fruit images, use the text box object to create fruit name boxes, and use the shape object to create fruit numbers.
The Click me! text appears when users click the fruit. You can use text captions to create them.
Note: In a slide, there are many objects that can be overlapping sometimes, making object selection on the Canvas tricky. In that case, just select objects from the Selection pane (View tab > Selection). You can also toggle the object’s visibility (click the button to control whether to display an object on the Canvas) to select it easily.
1. Create the Crossword
A row in the crossword consists of shapes. The number of shapes depends on how many letters a fruit name has. The common practice is to insert one shape and customize it (light blue fill, black solid line). Then, copy and paste it to create the first row. After that, use the copy and paste command to create other seven rows. For the row that has fewer letters, just delete shapes.
The Canvas snapping (View tab > Canvas Snapping) and Object ordering and aligning feature enable you to line up shapes easily.
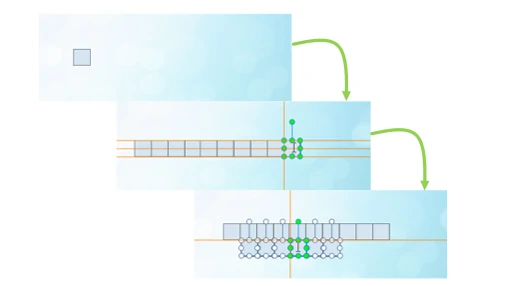
After creating 8 rows, insert a highlight object (Annotations tab > Highlight), change it into a red border line and place it in the down word position.
Next, create the number for each row (1 to 8) by inserting a text caption (Annotations tab > Text Caption), typing a number, and changing its appearance.
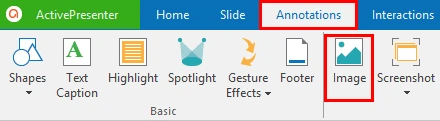
2. Insert fruit images and their numbers
To insert an image from your computer, open the Annotations tab and click Image.
You’d better name those image conforming to the format imgRowX, in which X is the fruit number. X is also the row number in the crossword. For example, the row number of the lemon is 8 so I named it imgRow8.
When it comes to the fruit number, use the shape object with a number inside.
Note: Making the fruit images interactive by adding events and actions will be saved for the next parts.
3. Work with fruit name boxes and Click me! text
There are eight name boxes in total, each for one fruit image. Only when players click the fruit image, does the corresponding text box appear. This means one text box can display on the screen at one time while others are hidden. Events – actions are needed.
When users type a correct fruit name in the text box, it is considered as a correct answer and vice versa. For that to happen, you need to define the correct answer for each text box.
Note: To save time, you’d better finish the work with one text box from step 1 to step 3, then copy and paste it to create others. Some properties such as initially hidden state and the number of attempts are copied and you don’t need to change them.
Step 1: Insert a text box for each fruit image (Interactions tab > Text Box)
By default, a text box has a correct and an incorrect message with prebuilt shape and color. You can change the appearance of those feedback messages (select the messages > Format tab).

Place them at the bottom of the slide. Mind that this couple of messages is used for all of the text boxes. So, when copying the text box to create new ones, don’t copy its messages.
As a reminder, you should change the name of the text box conforming to the format said earlier (i.e. Row_8_1 is the name text box of the fruit number eight).
Next, set the text box and feedback messages state initially hidden (right-click object > Initially Hidden) to hide them until being called out by an action.
Step 2: Define the correct answer for the text box
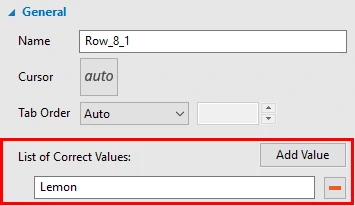
Each text box contains the name of a fruit, which is the correct answer.
To define this value, select the text box and access the General tab (Properties pane > Interactivity > General). Click Add Values and type the correct fruit name in the List of Correct Values box. For example, the correct answer to the image number eight is Lemon.
Step 3: Define the number of points and attempts for the text box
In the Score & Reporting section (Properties pane > Interactivity tab), set the number of points for each correct answer to be 1. This is not for ranking or tracking users but for counting the total points. If users gain 8 points, they complete the game.
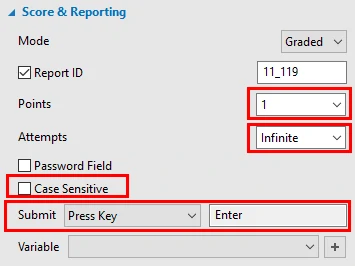
Next, select Infinite from the Attempts box. This allows players to try again with the answer as many times as they want.
Additionally, set Enter as the submit key so that users can press Enter when they finish typing answer.
Note: Don’t forget to uncheck the Case Sensitive option. Otherwise, players have to type exactly each upper letter (if any) to have a correct answer, which is not necessary for this game.
For more details about defining the correct answer, score and reporting of interactive objects, refer to:
Step 4: Create Click me! text
When users hover over the fruit image, the text Click me! appears telling users to click the fruit. To have this text, insert a text caption (Annotations tab > Text Caption). Rename it (i.e. txtClick_8), customize it, and set it initially hidden (right-click the object > Initially Hidden). This hides the text so players cannot see it until they hover over the fruit. This actions can be triggered by using actions. Keep reading, the next part will show you how.
4. Create a Timeline for fruit name text boxes and Click me! text captions
In this stage, you will add a Timeline to control animations of the fruit name boxes and the Click me! text. Thanks to that, you can use an action to show/hide them with ease.
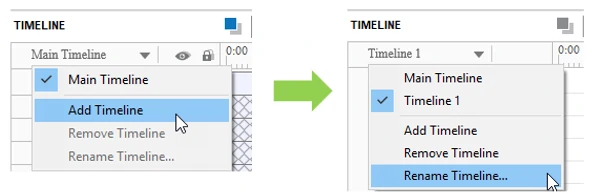
Step 1: Add an interactive Timeline
To create a new Timeline, click the Timeline list box and select Add Timeline. Change its name to Hide text boxes (click the Timeline list box again and select Rename Timeline…). You can also choose another meaningful name to you, as long as it helps you recall it distinctly.
See Working with Multiple Timelines for more information.
Step 2: Add animations to all text boxes and text captions
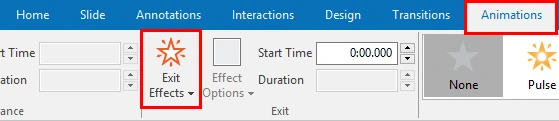
Adding animations to objects in the interactive Timeline is like doing that in the main Timeline. Select all text captions and text boxes (hold CTRL while clicking to select multiple of them), open the Animations tab and select the Disappear exit effect.
Next, make the effect duration shorter (right-click the animation time bar > Animation Settings).
5. Work with the group of yellow stars
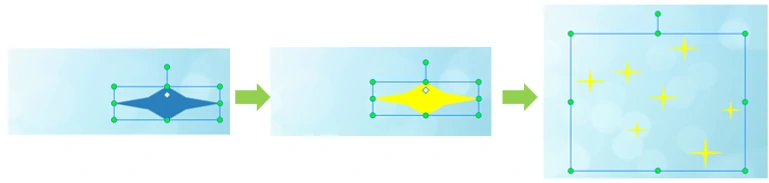
When users finish the game, some yellow stars appear twinkling to congratulate them. This can be done by using the shape object and object animation.
Step 1: Create the star group
Each star in the group is a four-point star shape. You can insert one (Annotations tab > Shapes > Stars), customize it and copy it to create others.
Next, group all of these shapes to one group (select them > right-click > Group), allowing you to move them together easily. Grouping also lets you animate them faster since you just need to animate one group as an object instead of each shape individually.
Step 2: Animate the star group
For easily animating the group, create an interactive Timeline (Congratulations) for it. Refer to Create a Timeline for fruit name text boxes and Click me! text captions above for details.
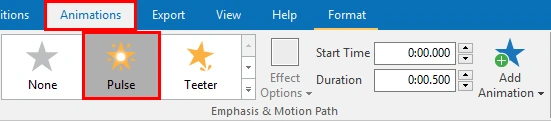
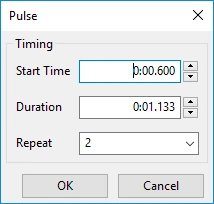
In the added Timeline, add the Pulse emphasis effect to the group, making the stars appear twinkling (select the group object > Animations tab > Emphasis & Motion Path > Pulse).
Next, make the effect repeat by editing the animation. Select how many times the animation will repeat before the objects stay still from the Repeat box.
Add events – actions to fruit images and fruit name boxes
When players hover over any of the fruits, it is highlighted (slightly shaking) for a while. This can be done by using events – actions. However, if an image has been answered before, it isn’t highlighted when being hovered anymore. For that to happen, using a variable is a must.
For the fruit name box, if users enter a right name, the corresponding row in the crossword will show the name. Otherwise, nothing changes except for an incorrect message. When users complete the game, a correct message appears along with some yellow stars and a short music track to congratulate them. Events and actions are needed.
Note: The procedure requires a certain degree of skill of events – actions. If you don’t have the profound understanding of them yet, take a look at some tutorials on our tutorial page.
1. Add events and actions to fruit images
There are three types of interaction that users can have with a fruit image: click, rollover, and rollout. Each of them triggers particular actions, for example, play audio, show object, or adjust variable, etc. For that to happen, you have to add three events (On Click, On Rollover, and on Rollout) to the image, then add actions to each of event afterward.
Note: Because eight images have the same type of interactions, I’ll demonstrate with the fruit number eight. You can do the same with seven others.
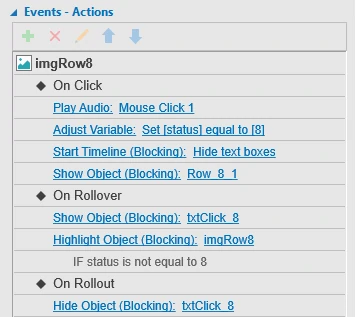
#1. On Click event:
Whenever players click the fruit image, the following actions take place:
- A text box (Row_8_1) in which users can type the fruit name appears.
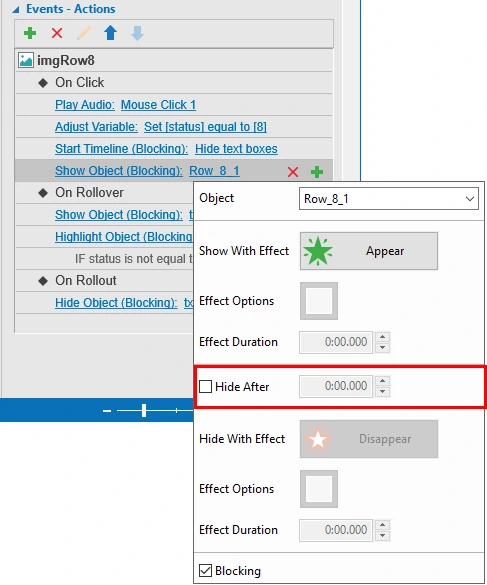
For that to happen, use the Show Object action to show the name box number 8 (Row_8_1), and use the Start Timeline action to call the Hide text boxes Timeline created before.
Remember to deselect the Hide After option. Otherwise, the name box may disappear even before users can type the text.
- A short audio track (Mouse Click 1) plays.
Simply use the Play Audio action and select a built-in track or import a file from your computer.
- A variable is adjusted.
Use a variable to check the answering status of the fruit image. When users hover over the fruit that has been answered correctly before, it won’t gain the highlight anymore.
So, how to add a new variable?
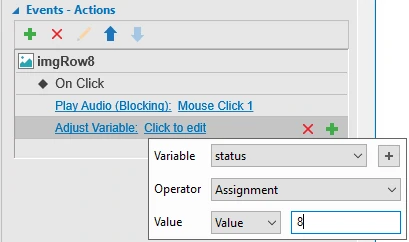
Firstly, click the Add Variable button on the Adjust variable entry. You can also create a new variable from the Home tab (Home tab > Variables) beforehand and select it to adjust in this step.
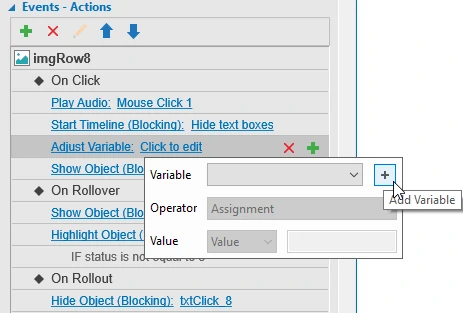
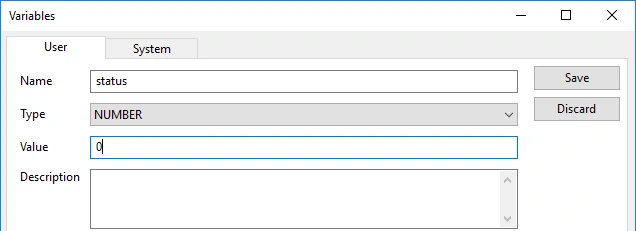
Next, in the pop-up dialog, click Add new, specify the name (status), type (NUMBER), initial value (0) and click Save.
Then, select the operator (Assignment), and define 8 as the value.
For other fruit images from number one to seven, you can simply select the status variable from the list and set the value from 1 to 7 correspondingly.
See the following tutorials to know more about variables:
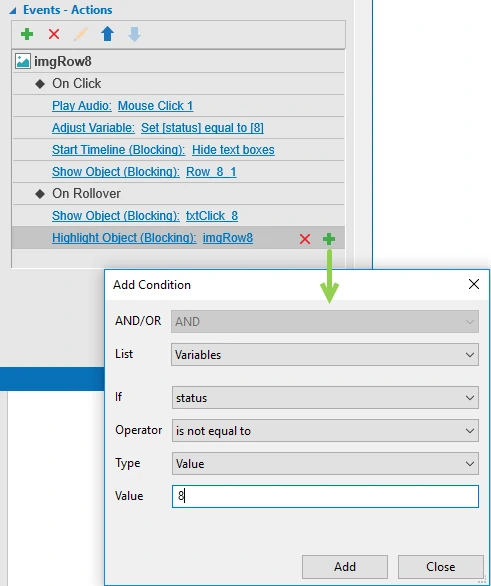
#2. On Rollover event:
The On Rollover event of the image needs two actions. One is to highlight the image (imgRow8) and the other is to show the Click me! text (txtClick_8).
A fruit that has been answered correctly won’t gain the highlight anymore. So, the highlight action needs a condition. The condition is the total number of users isn’t equal to 8.
#3. On Rollout event:
The Click me! text displays until users roll the mouse out of the fruit. Use the action Hide Object: txtClick_8 to get it done.
2. Add events and actions to fruit name boxes
As being said earlier, the answer that players give can be right or wrong. On Correct and On Incorrect events are of help to let the game behave differently for each case. If the answer is correct, the crossword is updated. Besides, the correct message and the group of stars appear if users have given the correct answer to the name of eight fruits, meaning they’ve gained 8 points in total (condition for actions is needed).
#1. On Correct event:
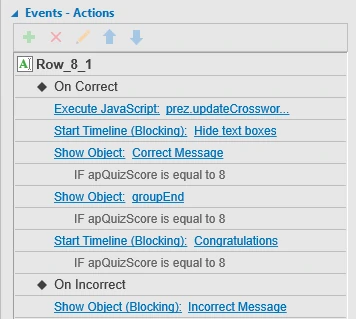
When users enter a right answer in the name box, the following actions take place:
- The On Correct event executes a JavaScript function that updates the crossword, making the fruit name appear in the crossword.
For that to happen, first, copy and paste the following JavaScript code to the Event tab of the project (ActivePresenter button > Project > Properties > Event):
if (!prez.updateCrossword) {
        	prez.updateCrossword = function(name) {
                    	var names = name.split('_');
                    	if (names.length != 3 || (names[0] != 'Row' && names[0] != 'Column')) {
                                	alert('Invalid text box name: ' + name + '. Text box name should be something like Row_1_1, Column_1_2');
                                	return;
                    	}
                    	var textbox = this.object(name);
                    	if (!textbox) {
                                	alert('No text box named: ' + name);
                                	return;
                    	}
                    	var isRow = names[0] == 'Row',
                                	rowCode = parseInt(names[1]),
                                	columnCode = parseInt(names[2]),
                                	textboxValue = textbox.text().toUpperCase(),
                                	i, n, charShape;
                    	for (i = 0, n = textboxValue.length; i < n; ++i) {

          charShape=this.object(rowCode + '_' + columnCode);
                                	if (charShape)
                                            	charShape.text(textboxValue.charAt(i));

                                	else
                                            	alert('No shape named: ' + String.fromCharCode(rowCode, columnCode));
                                	if (isRow)
                                            	++columnCode;
                                	else
                                            	++rowCode;
                    	}

        	};
}
Then, use the Execute JavaScript action to execute the script. Paste the following script in the Write JavaScript Code window:

- The name box disappears. Use the Start Timeline action to hide the Timeline of the text boxes.
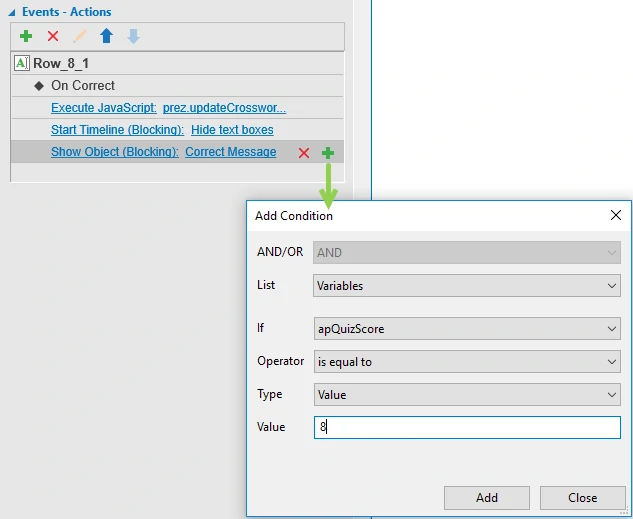
- Show the correct message if the total number of points is 8.
- Show the group of stars if the total number of points is 8.
For the last two actions to happen properly, add the condition (the total number equals 8) to them.
To add a condition, click the Add Condition button on the action entry. In the dialog that appears, define the information in which apQuizScore is a system variable that returns the total score users have gained.
#2. On Incorrect event:
If the answer is incorrect, an incorrect message appears letting users know they should try it again. There is no condition needed, simply add the Show Object action and select the incorrect message object.
Create Help button
The Help button at the bottom-right corner of the screen provides users with support. When users click on it, an explanatory dialog appears telling them how to play the game. Users can close this dialog by clicking the closing icon (the red cross button) and continue playing. To have the Help button work that way, utilize events – actions.
Step 1: Create the Help button and the explanatory dialog
Firstly, insert a button (Interactions tab > Button), change its fill (no fill) and line (no line), then type text (Help) inside it. Place it at the corner of the slide.
Next, create the explanatory dialog: Insert a shape, customize it the way you like and type text in.
Then, create the closing icon: This closing icon is actually a button, so insert a button and fill it with the red cross image (Properties pane > Styles & Effects tab > Fill > Image Fill).
Group the explanatory dialog and the closing icon into one group (right-click them > Group). Rename the group (groupHelp) and place it at the bottom right corner of the slide. Objects in one group can be hidden together by one action.
Finally, let the group have the initial hidden state to make it hide until users click the Help button.
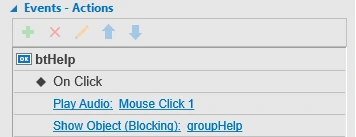
Step 2: Make the Help button work by adding events – actions
You need to add events – actions to the Help button and the closing icon.
For the Help button, add the event On Click to it and add two actions. One is to play a short audio track, the other is to show the group (explanatory shape and the closing icon).
The closing icon also needs the On Click event and two actions. One is to play an audio track while the other is to hide the group (groupHelp).
Note: When the duration of the last slide is over, game objects will be disabled, meaning users cannot play the game anymore. To avoid this, make the game continue playing when the slide duration is over. To do this, make the Help button pause the game to wait for user input (Properties pane > Interactivity tab > Pause presentation to wait for user input).

Export the game project
When you finish creating the project, export it to the HTML5 output.

Remember to select Tutorial, Practice or Test mode. Don’t select the Demonstration mode since it doesn’t allow for interaction between users and the game content. In other words, the Demonstration mode makes the game viewable only.

Tip: Before actually exporting the project, preview it on the web browser is available. Just click the HTML5 Preview button in the Home tab or Export tab.
That’s all about creating the crossword game: Fruit game with ActivePresenter 7. Use this guide to create the game and go further in the eLearning game industry with a wide range of powerful features.
Don’t hesitate to ask us if you need any support.