An interactive solar system will enhance the student experience when learning about Geography and Astronomy. Let’s learn how to create this type of interaction with Saola Animate 3, one of the best HTML5 Animation Software in today’s article.
When mentioning the solar system, most of us will think about the sun and the planetary system. Basically, there are 8 planets in orbit around the giant sun. In particular, each planet has its own name and characteristics. The closest neighbor of the sun is Mercury, followed by Venus, Earth, and Mars. Next are Jupiter and Saturn. Farther out are Uranus and Neptune.
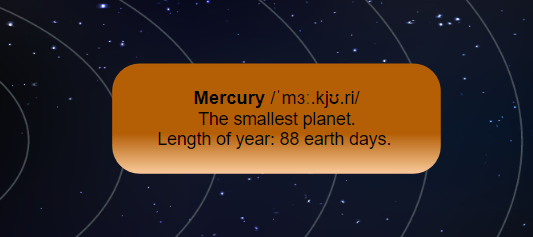
So, creating an interactive solar system means making a lively solar system with basic information about planets. Whenever you hover the mouse over any planet, it stops moving to show information. On the contrary, when you hover the mouse out any ones, its information will be hidden and the planet will continue to move. Thanks to that, students can explore, learn and deepen their knowledge without boredom.
Now, download Saola Animate 3 and explore how to create an interactive and engaging solar system.

Then, you can download the sample project here.
Prepare for Creating an Interactive Solar System
Before creating, check out this preparation stage. When everything’s ready, your work time will speed up.
Firstly, start Saola Animate. Then, click the New button on the Welcome Screen to create a new project. Define the project size corresponding to the image size.
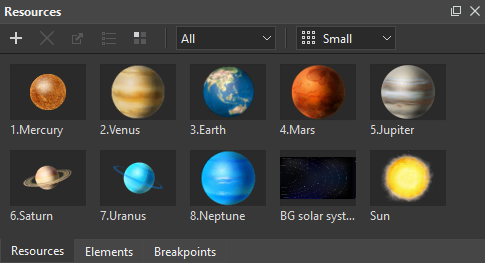
Secondly, add all the desired images from your computer to the Resources pane of the app (View tab > Resources pane > Import Resources button > From File). This project needs one background image, 8 planet images, and one sun image.
Thirdly, set up a background image for the scene (Properties pane > Styles tab > Fill section > Image Fill > From Resources). Also, drag the sun and the planet images then drop them into the right order.
Now, it’s time to find out the way to create an interactive and stunning solar system. Enlisted below are steps to create an interactive solar system with Saola Animate:
- Create Planetary Motion
- Provide Information for the Sun and the Planets
- Add Interactivity for the Elements
- Preview and Export the Project
Let’s walk through each part, respectively.
Create Planetary Motion
As you may know, in the solar system, the planets orbit around the sun and rotate around themselves. To create these kinds of motion, make use of multiple timelines in Saola Animate 3. These additional timelines allow managing complex interactions and animations in your project. Here, you can create 8 other timelines for 8 planets. Besides, create a new one for the Sun elements. Just follow the steps below to achieve your goal:
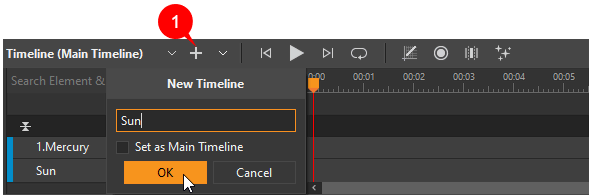
Create New Timelines
Step 1: Click the New Timeline button (1) > enter a meaningful name for it. Once clicking OK, the newly created timeline will be directly selected for editing.
Repeat the performances so that you can create new timelines for all the elements.
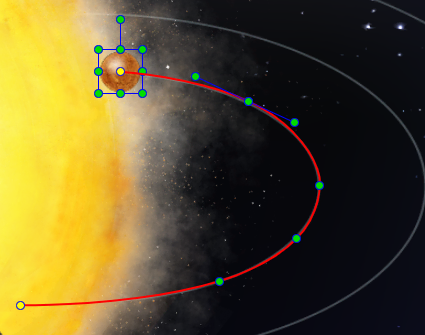
Step 2: Make a planet orbit around the sun in the interactive solar system.
Select a planet and click the Auto-Keyframe Mode button to turn this mode on. Then, drag the Playhead along the Timeline and place it at any timestamp that you want. After that, click on the created motion path on the Canvas and customize the curve level.
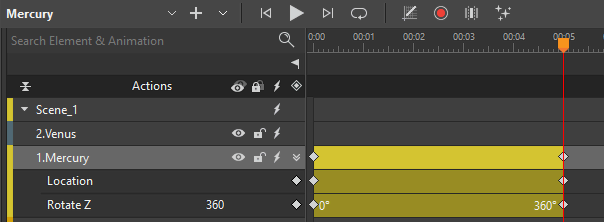
Step 3: Make a planet rotate around itself.
Place the Playhead at 0:00 then add a Rotate Z keyframe (Properties pane > Position & Size tab > Transform section > Rotate Z). As you can see, the Rotate Z value is 00 here. Next, move the Playhead to a desired location and type a new value into the Rotate Z box. For example, 3600.
Step 4 (Optionally): Add Display keyframes and the Fade effect to make the planets’ appearance more realistic. This step can be applied to the planets close to the sun. For instance, Mercury, Venus, Earth, Mars, and Jupiter.
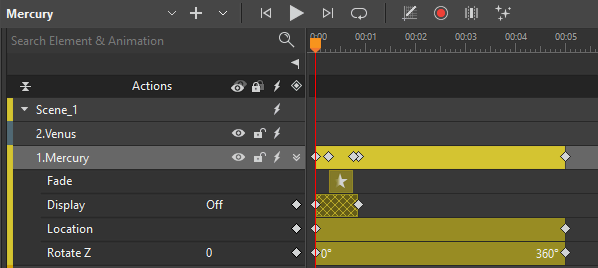
Step 5: Copy the Location and Rotate Z animation segments and paste them into the other planets in their own added timeline.
Note: Regarding the Sun element, you just need to add a Rotate Z to make it rotate around its axis.
Start Timeline with Project
After creating 9 new timelines, let’s insert a trigger to make the sun and the planet elements start moving when the project runs.
Now, click the Insert Trigger button in the Timeline or press ALT+T. Then, add the Start Timeline action as shown in the image below:
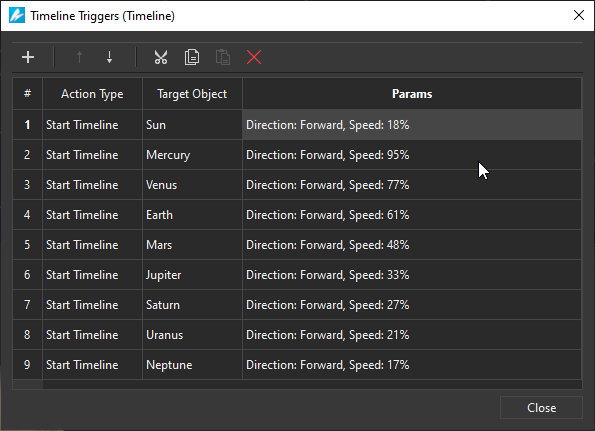
Here, you are free to customize the direction and speed of elements as you want. There are all the steps to create planetary motion in the interactive solar system. If you go the right way, here is the result:
Provide Information for the Sun and the Planets
In this part, you’ll know how to provide the sun and planet elements with their basic information. This helps students understand and remember knowledge while interacting with the solar system.
Now, do as follows:
- Click Shape in the dockable toolbar and select one from the built-in list.
- Click and drag the mouse on the Canvas to define the position and size of the element.
- Enter whatever information you want into the shape, then navigate to the Styles and Effects tab of the Properties pane to adjust the shape appearance.
- Rename the shapes by double-clicking the shape name in the Timeline pane. Note that you should name each formative shape after the planet it belongs to.
- Add events – actions to these newly added shapes to hide them when the interactive solar system starts. Just click the Event Handlers button at the Scene elements in the Timeline pane. After that, select the Scene Activate event > click the Add Action button > Hide/Show > Hide Element > select your target element.

Let’s move on to the next part to learn more about adding interactivity to the sun and planet elements with Saola Animate.
Add Interactivity to the Sun and Planet Elements
To complete this interactive and appealing solar system, the last step we should take is adding interactivity to the elements. As mentioned before, the sun and planets will move once the project starts. If you hover the mouse over any element, it will stop moving and show the information. In contrast, when hovering the mouse out of any element, the planet information will be hidden and it continues orbiting.
Take the following steps to get it done:
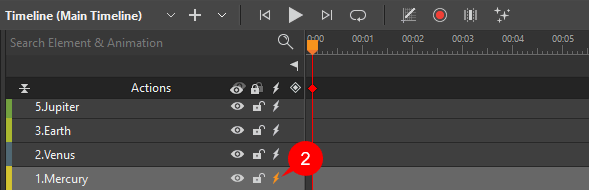
Step 1: Click the Event Handers button (2) at each element in the Timeline pane.
Then, you can see the Element Event Handler dialog pops up.
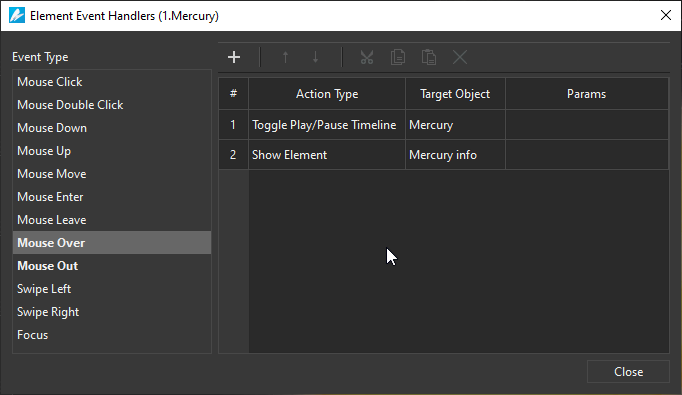
Step 2: Select the Mouse Over event from the Event Type list. After that, click the Add Action button to add two actions below:
- Timeline > Toggle Play/Pause Timeline > select your target timeline.
- Hide/Show > Show Element > select your target planet information element.
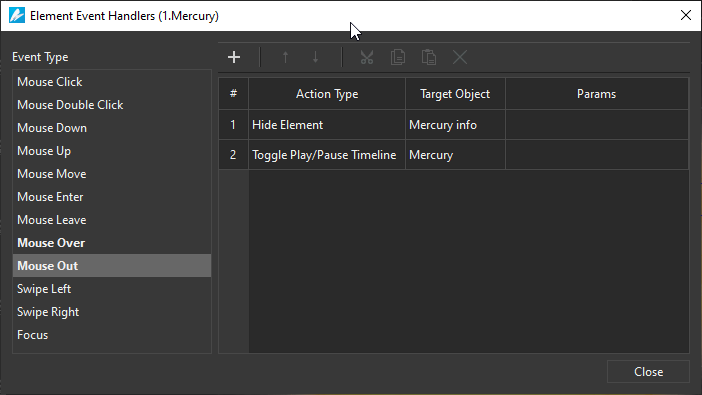
Step 3: Select the Mouse Out event from the Event Type list. Next, click the Add Action button to add two actions below:
- Hide/Show > Hide Element > select your target planet information element.
- Timeline > Toggle Play/Pause Timeline > select your target timeline.
Preview and Export the Interactive Solar System Project
After all, it’s now time to check your work before exporting the project to HTML5. Just press F5 on the keyboard or click Preview Project in Browser button (3) in the dockable toolbar. This helps you see how well your project runs. If there is anything that doesn’t satisfy you, you can go back to the editor and make further changes.

When everything’s perfect, just export your interactive solar system to HTML5 and share it with others. Click the Export to HTML5 button (4) or press CTRL+ALT+E, alternately.
Final Words
So, creating an interactive and lively solar system has never been easier with Saola Animate 3. Hope that this article inspires you to create your own engaging content. Stay tuned for more upcoming handy articles. Feel free to contact us if you need any assistance when using the app. Have a great day!