The Timeline pane is where you devote most of your time to building HTML5 animation. Thus, it’s a must to master the timeline.
This tutorial covers:
- Navigating the Timeline
- Snapping in Timeline
- Zooming Timeline In and Out
- Managing Timeline View
- Showing, Hiding, and Locking Elements
Navigating the Timeline
Knowing how to navigate the timeline is crucial to create and fine-tune HTML5 animation. For example, you’re looking for the points of time where you want your animation to start and end, or a perfect time to place a timeline trigger.
Saola Animate offers many controls to navigate the timeline by moving the Playhead. Do one or more of the following:
- Drag the Playhead to the desired location.
- Click the timeline ruler at the time where you want to move the Playhead. That way, the Playhead will immediately jump to that location.
- Change the time value in the time control (also the current time indicator). Just click on the time control to make it editable, then scroll the mouse wheel or enter a new value.
- Use shortcuts or the Playback buttons. Press SPACE BAR or click Play/Stop or to start or stop animation in real time. Press HOME or click Go to Start to jump to the start of the timeline. And press END or click Go to End to jump to the end of the animation. Also, click Loop Playback to play the animation in a loop.
Additionally, to aid you in navigating, the Timeline pane comes equipped with two useful controls: snapping and zooming. The following parts discuss each of them in turn.
Snapping in Timeline
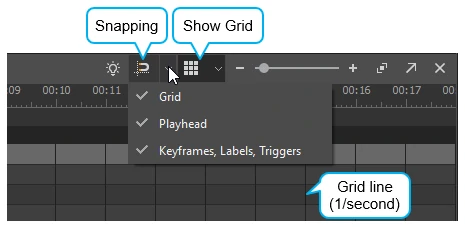
Dragging the Playhead along the timeline, you may notice some snapping actions. For example, the Playhead jumps to keyframes, triggers, or particular tick marks on the timeline ruler.
Timeline snapping lets you move the Playhead and timeline items such as keyframes, labels, and triggers as you wish. It helps out not only when you add keyframes or timeline triggers but also when you edit and fine-tune HTML5 animation. Timeline snapping lets you easily line up keyframes and animation segments on the timeline.
Timeline snapping is turned on by default with three modes:
- Snap to Grid: The Playhead and timeline items snap to the grid lines. Grid lines give precise measurements of the timeline by displaying subtle vertical lines at regular intervals. They only appear when you click the Show Grid button.
- Snap to Playhead: Timeline items snap to the Playhead.
- Snap to Keyframes, Labels, Triggers: The Playhead and timeline items snap to the position of timeline items.
Note: When you enable timeline snapping without any modes, the Playhead and timeline items will only snap to special tick marks on the timeline ruler. These tick marks appear depending on the zoom level of the timeline.
Zooming Timeline In and Out
As your animation can be fairly long, you may not be able to see all animation segments on the timeline. In that case, use the zoom controls to zoom the timeline in and out to get better view of the animation.
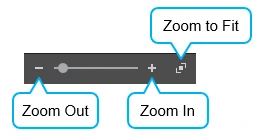
The Timeline Zoom controls appear as follows:
- Zoom slider: Drag the slider to the right, toward the + button to zoom in. Or, click the + button multiple times to zoom in to the level you want. Conversely, drag the slider to the left or click the – button to zoom out.
- Zoom to Fit: Click the button to fit the existing animation to the timeline view.
Additionally, you can use the mouse wheel to zoom the timeline. Place the cursor on the timeline, then hold down CTRL while scrolling the mouse wheel to zoom in or out.
Managing Timeline View
The Timeline pane lists out a scene together with its elements and all animated properties. To the left of each element name, there’s a small color bar which labels each element and its animation segments with a specific color. That way, Saola Animate helps you quickly identify which animations belong to an element.
If you’re creating complex animations, the list of elements and properties can go on forever. Fortunately, you have some controls to manage view in the Timeline pane.
Showing and Hiding Element Properties
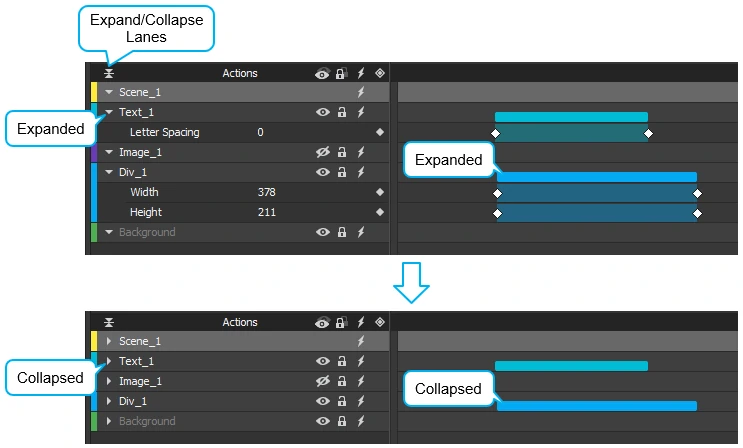
Click the triangle button to show or hide all animated properties of an element. If you want to expand or collapse all elements at once, click the Expand/Collapse Lanes button on the Actions bar.
Filtering Elements
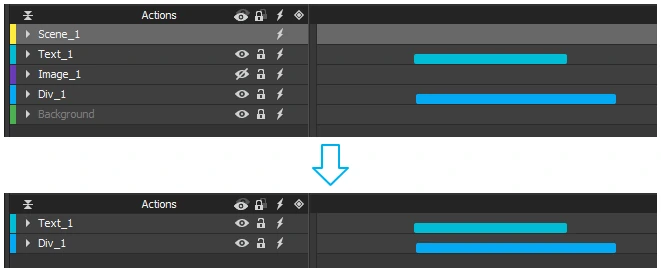
A scene may have a background image that stays unchanged over time. Obviously, you don’t need to clutter up the timeline with those static elements. So, you can filter out elements that contain no animation at all using the Show Animated Elements Only button.
This filter only affects what you see on the timeline, it doesn’t influence what appears on the Canvas.
Showing, Hiding, and Locking Elements
It’s often hard to work with a lot of elements and complex animations. Chances are you cannot select an element on the Canvas because it’s behind others. To find a way out, you need look for that element on the timeline by scrolling the mouse wheel. You may also likely select the wrong element by accident because elements are placed so closely.
To solve these problems, Saola Animate provides two different controls: Visibility and Locking. Find these controls in the Timeline pane and the Elements pane.
Showing and Hiding Elements
The Visibility decides whether to display elements in a scene while editing. This control is best used to help you hide some elements on the Canvas so that you can focus on the target elements. Bear in mind that this is only an interface feature allowing you to work with many elements. It does not affect the HTML5 animation you get after exporting the project.
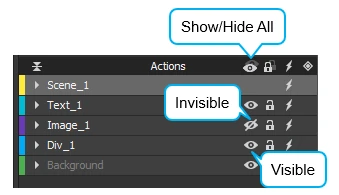
In the Timeline pane or the Elements pane, notice the Show/Hide button next to the element names. An open eye means that an element is visible, whereas an eye with a slash indicates that it is invisible.
To show/hide all elements in a scene at once, click the Show/Hide All button on the Actions bar.
Take note of the following:
- When you hide a group, its child elements are also invisible.
- When an element is hidden on the Canvas, it can still be selected and edited from other panes.
- To control the visibility in the finished HTML5 animation, animate the Opacity or Display property. This is useful when you want an element to fade in or out a scene. Or, you want an element to appear later in the animation and then make it disappear. Animate the Opacity from 0% to 100% to fade an element in, and from 100% to 0% to fade it out. Meanwhile, for the Display property, choose Off to make an element invisible and On to make it suddenly appear in a scene.
Locking and Unlocking Elements
Moving an element by mistake is a bad experience. For example, you want to move a text element but accidentally seize and drag a background photo. To avoid that, you can lock elements in their location. That way, elements cannot be selected, moved, or edited, but they still remain visible with the Visibility state on.
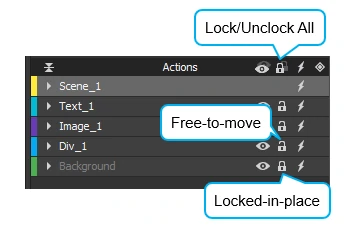
To lock an element, click the Lock/Unlock button next to the Show/Hide button. By default, elements are in the “unlock” state which is indicated by an open lock. At that time, you’re free to select them and make an edit. When you lock elements in place, the button turns into a closed clock and the element names get dim.
To lock/unlock all elements in a scene at once, click the Lock/Unlock All button on the Actions bar.
You can also watch the video tutorial below to learn how to show/hide and lock/unlock elements:
So we’ve walked you through some basics and controls of the Timeline pane. Stay tuned for the coming tutorial as it will focus on different aspects of this pane, obviously helping out in creating interactive HTML5 animation.

