Last Updated On: April 13, 2020
In software simulations, you often want to simulate keyboard actions that interact with the target software. Key strokes are interaction objects that help you do that by responding when users press a key (combination). When you record software simulations, key strokes are automatically inserted whenever you press a keyboard shortcut.
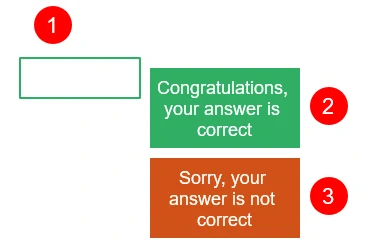
 By default, a key stroke consists of three separate elements: (1) a target area, (2) a Correct message, and (3) an Incorrect message.
 When the interactive presentation is played, initially the key stroke displays nothing. It just waits for users to enter a shortcut (such as CTRL+SHIFT+P) while ignoring any text string. If the entered shortcut matches the reference, the Correct message (2) appears, otherwise the Incorrect message (3) appears. For example, if the predefined value is CTRL+SHIFT+P, but a user presses CTRL+P without holding down the SHIFT key, he is doing incorrectly.
 Step 3: Click inside the Correct Value text box and press a key with or without the modifier keys to define a value.
If you don’t want a value anymore, click the Remove button (5) next to that value to remove it.
Be sure to fully test your key stroke in the published output to avoid any unexpected behavior. Don’t use keys or key combinations that are common in browsers such as CTRL+F or ALT+D.
Step 3: Click inside the Correct Value text box and press a key with or without the modifier keys to define a value.
If you don’t want a value anymore, click the Remove button (5) next to that value to remove it.
Be sure to fully test your key stroke in the published output to avoid any unexpected behavior. Don’t use keys or key combinations that are common in browsers such as CTRL+F or ALT+D.
 By default, key strokes have three events, namely On Correct, On Incorrect, and On Timeout. You can add three other events, namely On Key Press (occurs when each key or combination of keys is pressed), On Rollover, and On Rollout.
For more details, see Working with Events – Actions.
By default, key strokes have three events, namely On Correct, On Incorrect, and On Timeout. You can add three other events, namely On Key Press (occurs when each key or combination of keys is pressed), On Rollover, and On Rollout.
For more details, see Working with Events – Actions.
Inserting Key Strokes
To insert a key stroke, click the Interactions tab > Key Stroke. Alternatively, click the Home tab > Interactions > Key Stroke.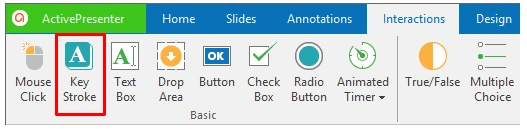 By default, a key stroke consists of three separate elements: (1) a target area, (2) a Correct message, and (3) an Incorrect message.
 When the interactive presentation is played, initially the key stroke displays nothing. It just waits for users to enter a shortcut (such as CTRL+SHIFT+P) while ignoring any text string. If the entered shortcut matches the reference, the Correct message (2) appears, otherwise the Incorrect message (3) appears. For example, if the predefined value is CTRL+SHIFT+P, but a user presses CTRL+P without holding down the SHIFT key, he is doing incorrectly.
Setting Correct Values
Key strokes accept all keys or combination of keys on the keyboard except the WINDOWS key. To define a correct action, do the following: Step 1: Select the target area element (1). Step 2: Click the Properties pane > Interactivity > General > List of Correct Values > Add Value (4).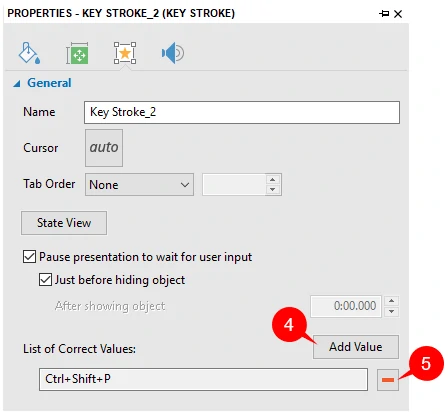 Step 3: Click inside the Correct Value text box and press a key with or without the modifier keys to define a value.
If you don’t want a value anymore, click the Remove button (5) next to that value to remove it.
Be sure to fully test your key stroke in the published output to avoid any unexpected behavior. Don’t use keys or key combinations that are common in browsers such as CTRL+F or ALT+D.
Step 3: Click inside the Correct Value text box and press a key with or without the modifier keys to define a value.
If you don’t want a value anymore, click the Remove button (5) next to that value to remove it.
Be sure to fully test your key stroke in the published output to avoid any unexpected behavior. Don’t use keys or key combinations that are common in browsers such as CTRL+F or ALT+D.
Setting Score and Reporting
To set score and reporting for key strokes, see Question Score & Reporting.Setting Events and Actions
To set up events and actions for key strokes, access the Events – Actions section in the Properties pane.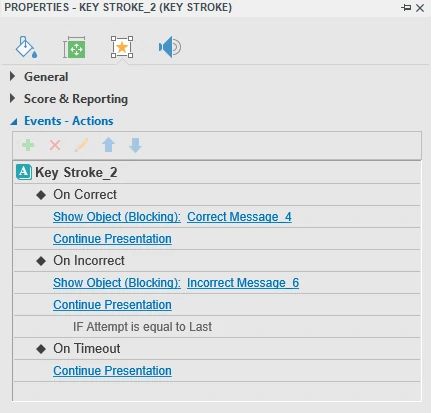 By default, key strokes have three events, namely On Correct, On Incorrect, and On Timeout. You can add three other events, namely On Key Press (occurs when each key or combination of keys is pressed), On Rollover, and On Rollout.
For more details, see Working with Events – Actions.
By default, key strokes have three events, namely On Correct, On Incorrect, and On Timeout. You can add three other events, namely On Key Press (occurs when each key or combination of keys is pressed), On Rollover, and On Rollout.
For more details, see Working with Events – Actions.