After completing a project in ActivePresenter 9, you can export it to many output formats depending on your needs such as image, video, document format, HTML5, and more. This tutorial will show you how to export projects to videos.
Table of contents:

Export Projects to Video
Video is one of the eight output formats that ActivePresenter 9 allows users to export their projects. When exporting to video, learners can not interact with the content. So, it is suitable for making demonstration, introduction or entertainment videos.
To export a project to a video, open the Export tab > Video. Remember that you save every work before exporting.

Save Slides as Video
Responding to users’ requests, ActivePresenter 9 implemented a new feature that allows you to export single or multiple slides to a video. This feature comes in handy when you only want to export one or some slides in a big project. To do that, select the slides that you want to export > Export tab > Video > tick the Selected Slides checkbox in the Export To Video dialog that appears. Alternatively, right-click one or more slides on the Canvas or Slide pane > select Save Slide As Video…/Save Selected Slides As Video…
Note that, you can select multiple slides by pressing the CTRL key.
Customize Export Properties
No matter if you export the whole project or just some slides to video, it shares similarities in export properties that you can customize.
General Tab
This tab provides you with four groups of options to customize: Rendering Options, Video, Audio, and Output.
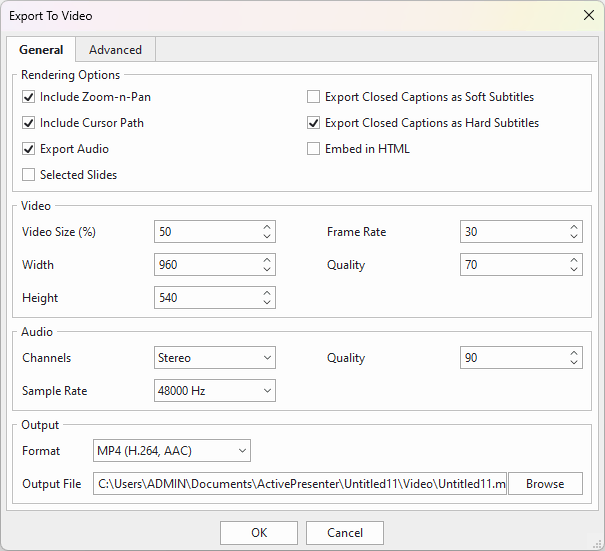
1. Rendering Options
In this section, you can decide which properties to render in your recorded or edited video by checking or unchecking their checkboxes.
- Include Zoom-n-Pan: Select this option to include the zoom-n-pan effect that you’ve inserted in the output video.
- Include Cursor Path: Keep this option selected to include the mouse cursor and mouse movements recorded in the output video.
- Export Audio: Allow you to export the audio file in your project (both system audio and voice over file) along with the output video.
- Selected Slides: Select this option to export the selected slides only.
- Export Closed Captions as Soft Subtitles: Export closed captions as separate subtitle files (*.srt and *.vtt). In this way, you can change their font, font size and color. Also, you can customize the *.srt and *.vtt files to display the subtitles in a different language.
- Export Closed Captions as Hard Subtitles: Export video with subtitles hard-coded into the output video. In this way, you cannot change any attribute of the Closed Captions anymore.
- Embed in HTML: Select to export your project to a video, then embed it in an HTML page to be viewed in a browser. This option is available for the MP4 (H.264, AAC), Mp4 (HEVC, ACC), WEBM (VP8, Vorbis), and WEBM (VP9, Vorbis) output formats.
2. Video
Under this section, you can change many properties of the output video.
- Video Size (%): Set the size of the output video. It relates to the project size. By default, the value is 100. It means the output video will have the same size as the project size. If you change this value, it will be scaled using bicubic interpolation.
- Width and Height: Define the width and height of the output video respectively. They will be automatically calculated whenever you specify the video size.
Note: The aspect ratio is fixed when you create the project. You cannot change it at the render time. So, when you specify the width or height, it will automatically calculate the other one as well as the video size.
- Frame Rate: Set the frame rate of the output video between 1 and 60 frames per second (fps). A higher frame rate may increase the video size. The most commonly used range is about 20-30 fps.
Note: A too high value of frame rate may overload some low configuration computers. This causes the loss of video frames when viewing on some computers. On the other hand, too low values make your video appear jerky.
- Quality: Define the video quality in the range from 1 to 100. Higher value, better video quality, and larger file size. This property is available in all output formats, except MKV (FSV1, PCM 16-bit).
3. Audio
This section allows you to change the properties and quality of the audio file in the output video.
- Channels: Select either Mono or Stereo channel. The Stereo channel brings listeners a more natural experience. But, it increases the file size. If you don’t need any special audio quality, the Mono channel is enough for a demonstration video.
- Sample Rate: Select an option in the dropdown list to determine the fidelity or the quality standard of the audio. The higher the fidelity, the better the audio quality.
- Quality: Set the quality of audio. The higher value, the better quality and larger the file size. This property is applicable to MP4 (H.264, AAC), Mp4 (HEVC, ACC), WEBM (VP8, Vorbis), and WEBM (VP9, Vorbis) formats.
- Bit Rate: Define the number of bits conveyed per second by selecting one option in the dropdown list. The higher the bit rate you select, the better the audio quality is. This property is applicable to AVI (MPEG-4, WMA2) and WMV (WMV2, WMA2) formats.
4. Output
Now comes the final section of the General tab.
- Format: Select one format you want to export. ActivePresenter 9 offers many types of video formats, namely MP4 (H.264, AAC), Mp4 (HEVC, ACC), WEBM (VP8, Vorbis), WEBM (VP9, Vorbis), MKV (FSV1, PCM 16-bit), AVI (MPEG-4, WMA2) and WMV (WMV2, WMA2).
- Output File: Specify the file path for the output video.
Advanced Tab
Now, turn to the Advanced tab. This tab is only activated if you select Embedded to HTML in the General tab. In this tab, you can customize the thumbnail of the output video when embedding it to HTML.
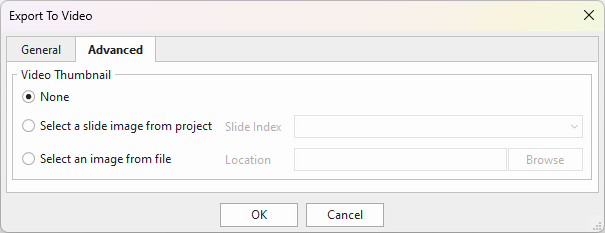
- None: Check this if you don’t want to set any video thumbnail.
- Select a slide image from project: Select to set one slide from the project as the video thumbnail.
- Select an image from file: Select to set an image from your computer as the video thumbnail.
So, that’s how to export projects to video and save slides as video in ActivePresenter 9. Feel free to contact us if you need further help. Don’t forget to visit our Tutorial page and YouTube channel for more helpful posts and videos.
See more: