The use of background music is a good way to make video demos and software simulations more engaging. In today’s article, let’s explore how to set an audio track as background music in your ActivePresenter 9 projects.
As you may know, music in videos is one of the important components to attract viewers. Besides recorded videos, ActivePresenter also allows you to add an audio track to any imported video or presentation and then set it as background music. In case your project has many slides, you can make background music play over them with simple techniques. It is possible to apply the same steps to add a background voice for your projects or presentation.
In case you want to add a background voice for your projects or presentation, you can perform the same steps by adding background music.
This article covers:
Keep reading for details information.
Insert an Audio File into Video/Project
Before setting an audio track as background music, you first insert an audio file into your project. ActivePresenter allows you to achieve that in many different ways. Now, perform either of the following:
- Drag and drop the file from your folder into the app.
- Access the Insert tab > Audio > From File…(1).
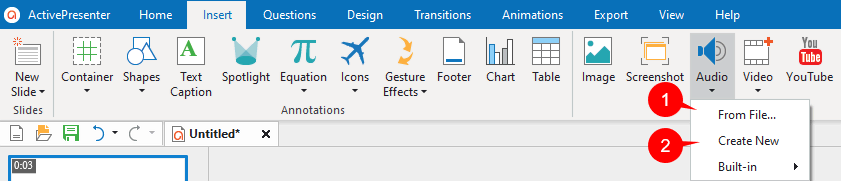
- Access the Insert tab > Audio > Create New (2). Then, perform the same way as when you normally record audio. On the other hand, it is possible to use the Record Narration button in the Timeline pane to do this task.
- Use the Text to Speech feature to convert or generate audio from text. See Convert Text to Speech in ActivePresenter 9 to get full information.
Take a look at the article Insert audio tracks in ActivePresenter 9 for more detail information. With the app, you can add as many tracks as you want to each video or slide in your project. After inserting, you will see an audio object appearing on the Canvas as the ![]() icon. It’s just a visual indicator to remind you that there is an audio object in the slide. Simultaneously, the audio waveform is also shown in the Timeline pane.
icon. It’s just a visual indicator to remind you that there is an audio object in the slide. Simultaneously, the audio waveform is also shown in the Timeline pane.
Set an Audio Track as Background Music
Now, you have an audio track in your project, it’s time to learn how to set it as background music. To get it done, do as follows:
Step 1: Right-click the audio object icon on the Canvas or the audio object time bar on the Timeline pane > Play over Multiple Slides > Top/Bottom Layer to make the background music play continuously across slides.
Both options create the same effect when you don’t show the player controls for the audio. Nevertheless, the layer you place the audio object affects the stack order of the objects on a slide. So, to show the object which is playing over multiple slides, look at the icon that appears next to the object name in the Timeline pane.
Step 2 (Optional): Navigate the Properties pane > Media ![]() > Audio > Playback Options. Here you can consider selecting more options to make your audio track work as your desire.
> Audio > Playback Options. Here you can consider selecting more options to make your audio track work as your desire.
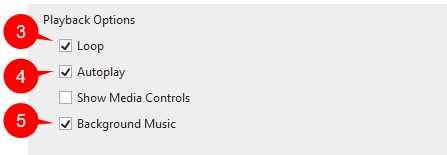
- Loop (3): Make the track replay automatically when the playback is finished. Note that if your audio track duration is shorter than the video/project duration, you can make them equal by right-clicking the audio object time bar > Play to the End of Slide/Project. Alternatively, drag the end point of the audio time bar to the position you want.
- Autoplay (4): Make the audio play automatically when the slide loads.
- Background Music (5): Make the track continue playing when the presentation is paused. For example, in an interactive presentation, background music still plays while the presentation pauses to wait for user input.
It’s simple to set an audio track as background music for your video/project, isn’t it? Download the latest version of ActivePresenter to try out the features and contact us if you need any assistance. In addition, visit our Twitter page and YouTube channel to get more interesting information.
See Also: