How to Work with Theme Fonts in ActivePresenter 9
Apart from Theme Colors, Theme Fonts are also a component of themes. Let’s learn how to work with Theme Fonts in ActivePresenter 9 through this tutorial.
Theme font is a set of fonts including a heading font and a body font. In ActivePresenter 9, you can customize them easily. In addition, it is possible to edit existing theme fonts as well as create new ones. Overall, Theme Fonts in ActivePresenter 9 will help you optimize your work time.
This article covers:
Overview of Theme Fonts
Using Theme Fonts is a good way to create a consistent look for the content in your project. As said before, each theme font includes a heading font and a body font.

- The heading font is used for slide titles.
- The body font is used for the slide subtitle and body text on slides including text that you type into text boxes, captions, buttons, and shapes. In addition, it’s also used for the answer choices in quizzes.
ActivePresenter 9 provides numerous built-in theme fonts in the theme font gallery. To explore them, access the Design tab and select Fonts.

As you can see, the gallery includes three sections:
- Custom: Contain the theme fonts you’ve created.
- Built-in: Contain ready-made theme fonts.
- Other: Allow you to create or reset theme fonts. See the next part of this post for information.
The currently used theme font has a gray outline. Besides, the app displays the name of the theme font, heading font, and body font next to each theme font. You can hover the mouse cursor over any theme font in the gallery to preview how they look on the Canvas.
Apply and Manage Theme Fonts
Now, to apply a theme font to your slides, open the Design tab > Fonts > select the set of fonts you want. This is the fastest way to change the theme fonts of your project. However, note that this way affects only slides that share the same slide masters as the current slide. In other words, it only applies the new theme font for those slides. Theme fonts of other slides which use other slide masters remain unchanged.

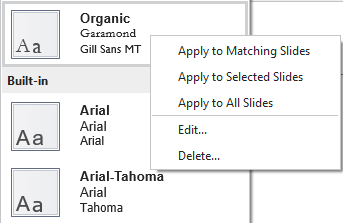
To have more options, right-click any theme font. Then, perform one of the following:
- Apply to Matching Slides: Apply the theme font to the slides that share the same slide master as the current slide. This option works the same way as you left-click to select a theme font.
- Apply to Selected Slides: Apply to the currently selected slides only. If the new theme font doesn’t please you, click Reset Slide Theme Fonts to discard the change.
- Apply to All Slides: Apply to all slides in your working project.
- Edit…: Customize the selected theme font. This option is available for custom theme fonts only.
- Delete…: Remove the selected theme font. After that, that theme font will disappear from the theme font gallery. This option is available for custom theme fonts only.
Create New Theme Fonts
To create a new theme font, follow the below steps:
- Access the Design tab > select Fonts.
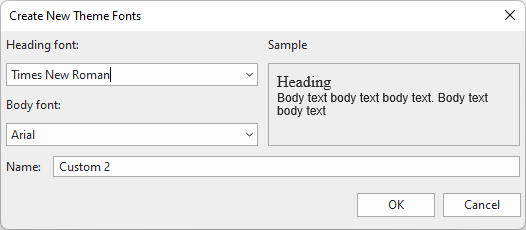
- Click Create New Theme Fonts… to open the Create New Theme Fonts dialog.

- Select your desired fonts from the Heading font and Body font drop-down lists. Then, the selected fonts will be previewed in the Sample box.
- Enter a name for the new theme font in the Name box. Then, this theme font appears in the theme font gallery. After that, you can use it for the current project or reuse it later.
Note: ActivePresenter 9 saves custom theme fonts in C:\Users\<username>\AppData\Roaming\ActivePresenter\themes\fonts (for Windows) or /Users/<username>/Library/Application Support/ActivePresenter/themes/fonts (for macOS). From here, you can:
- Rename theme font files.
- Delete any theme font file. Then, they no longer appear in the theme font gallery.
- Share and reuse theme font files.
If you cannot find this folder, select the Show hidden files, folders and drives option on your computer to see it.
Tip: If your desired fonts don’t appear in the Heading font and Body font drop-down lists, download and install them on your computer. Then, restart the ActivePresenter app and access these lists again. You will see your desired fonts.
Modify Theme Fonts
Like custom theme colors, ActivePresenter 9 also lets you edit custom theme fonts. Here’s how:
Step 1: Click Design > Fonts.
Step 2: Right-click a custom theme font > Edit… Then, do the same steps as creating a new theme font.
So, we’ve gone through all the ways to work with Theme Fonts in ActivePresenter 9. Click the below button to download the app and start your day with ActivePresenter 9.

Also, don’t forget to follow our Tutorials page and YouTube channel to get more useful tips and tricks when using the app.
See more: