Creating hover effects is a simple way to add a subtle level of interaction to your website. This article will provide you a brief overview of hover effects. Besides, it also introduces to you some ways to create hover effects with Saola Animate 3.0.
You’ll walk through:
Hover Effect Overview
Definition and Types of Hover Effects
Hover effects bring about changes in an element when users hover their mouse over it.
These changes can be:
- The alteration of elements’ appearance (fonts, colors, sizes, shapes).
- The display of other elements to show hints or provide instant feedback.
- The initiation of new movements or animations.
You will learn in detail the way to create each type of these hover effects in the next section: Practical Examples of Hover Effects and How to Create.
Tools to Create Hover Effects in Saola Animate 3.0
To create hover effects in Saola Animate 3, you need to add two events to an element, including:
- Mouse Enter: Occur when the mouse cursor moves inside an element.
- Mouse Leave: Occur when the mouse cursor moves outside an element.
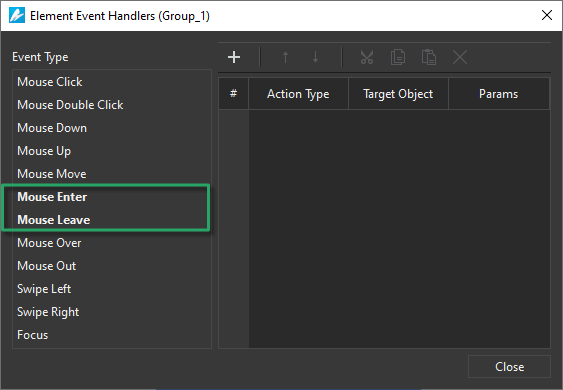
These two events can be found in the Element Event Handlers dialog. To open this dialog, click the Event Handlers button (8) in the Timeline, Properties, or Elements panes.
Notes:
Mouse Enter/ Mouse Leave are the most suitable events to create hover effects for a single element. If you choose the Mouse Over/ Mouse Out events, they may cause undesirable behavior. They differ from Mouse Enter/ Mouse Leave events in the way they handle event bubbling. For more information about the differences, refer to this link.
After adding Mouse Enter/ Mouse Leave events to an element, you need to assign appropriate actions to them. Depending on which types of hover effects you want to create, you will need to use different actions.
Let’s take a look at some practical examples below.
Practical Examples of Hover Effects and How to Create?
In the Create Timeline Labels tutorial, you’ve learned how to create a simple hover effect for buttons. The button’s color is changed when you hover the mouse over it.
In this section, let’s explore some other types of hover effects that you can create in Saola Animate 3.
To get started, you need to prepare necessary elements such as images or shapes. In this example, let’s create a button. Access the Insert toolbar to insert a DIV (1) or a shape (2). Alternatively, you can select a freeform tool (3) to shape the button as you want:

Then, double-click the button to enter text and edit its font, size, and color:

Change Element’s Appearance
As you can see, when hovering the mouse over the Play button, its text color is changed from white to yellow. In addition, the button becomes larger. To create that kind of effect, follow the instructions below:
Step 1: Create Color Change Effect for Text
- Turn on the Auto-Keyframe mode by pressing K on your keyboard.
- Select the element you want to create a hover effect, for example, select the Play button.
- Place the Playhead at the timestamp you want the effect to appear.
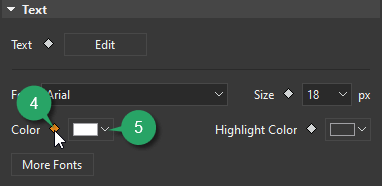
- Navigate to the Properties pane > General tab > Text section > click the diamond (4) to add the starting keyframe:
- Place the Playhead at the timestamp you want the effect to disappear.
- Click the drop-down arrow (5) to select a new color.
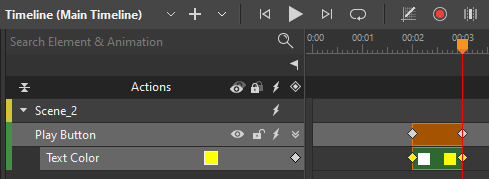
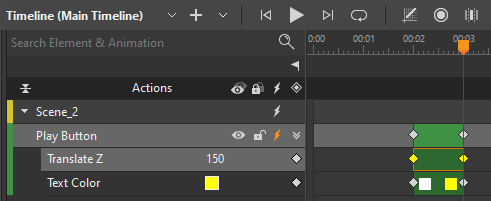
As a result, you created an animation segment in the Timeline pane. This segment demonstrates the change of text color:
Step 2: Create Zoom Effect for Play Button
- Select the Play button.
- Place the Playhead at the timestamp you want the effect to appear.
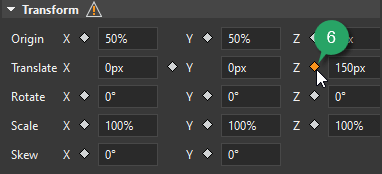
- Navigate to the Properties pane > Position & Size tab > Transform section > click the diamond (6) to add the starting keyframe:
- Place the Playhead at the timestamp you want the effect to disappear.
- Enter the new value, for example 150, into the Translate Z spin box.
By doing so, you created an animation segment displaying the zoom-in effect for the Play button:
Step 3: Add Mouse Enter/ Mouse Leave Events and Pause Timeline At Actions to the Play Button
- Click the Insert Label button (7) to create two labels on the Timeline pane and name them, for example, Normal and Hover:
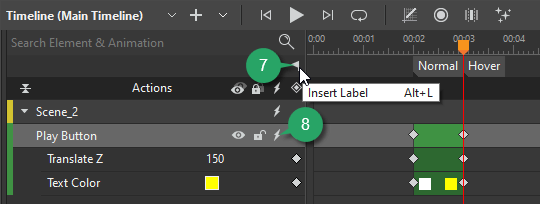
The Normal label is at the timestamp of the starting keyframe. Meanwhile, the Hover label is at the same position with the ending keyframe.
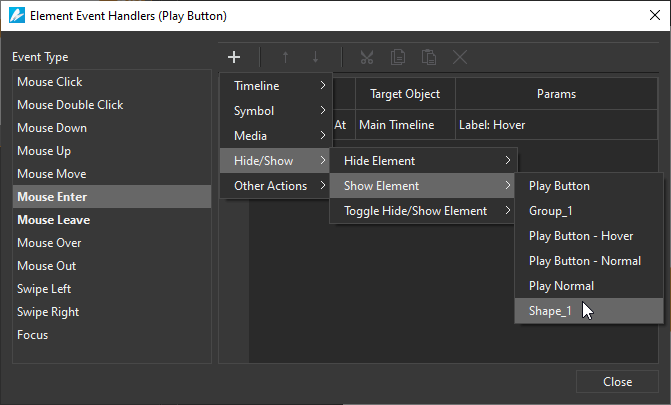
- Click the button (8) to open the Element Event Handlers dialog. Then add the following events and actions:
Select the Mouse Enter event > click the Add Action button > Timeline > Pause Timeline At > Main Timeline > double-click the Params cell > Label > Hover:

Select the Mouse Leave event, click the Add Action button > Timeline > Pause Timeline At > Main Timeline > double-click the Params cell > Label > Normal:

Show/ Hide Hint or Provide Instant Feedback
In the previous part, we make use of the Pause Timeline At action. In this section, let’s take advantage of the Hide/Show actions to create hover effects to show and hide other elements.
- To show another element when the mouse cursor moves inside the Play button:
Select the Mouse Enter event > click the Add Action button > Hide/Show > Show Element > select an element you want to show:
- To hide that element when the mouse cursor moves outside the Play button:
Select the Mouse Leave event > click the Add Action button > Hide/Show > Hide Element > select an element you want to hide.
Notes:
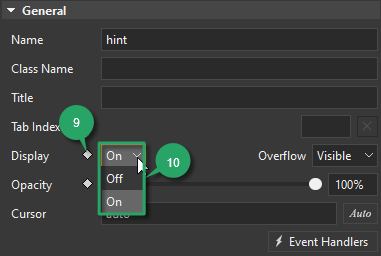
As you can see in this example, only when users hover the mouse over the Play button, does the hint appear. Therefore, you may want to hide the hint in the beginning. To do that, you can use the Display property (in the Properties pane > General tab > General section > Display):
- Select the hint.
- Place the Playhead at the timestamp 0.00 in the Timeline pane.
- Click the diamond (9) to add the starting keyframe and select Off from the Display list.
- Place the Playhead at a new timestamp, then select On from the list.
In case of using buttons, the Display property and the Hide/Show actions will require users to tap twice in iOS to enable the click function. Therefore, if you prefer a single tap, consider using images (instead of buttons) and the Opacity property (instead of the Display property) as instructed in this tutorial.
Initiate New Movements or Animations
To initiate new movements or animations, you can consider using Timeline or Symbol actions such as Play/ Pause Timeline, Play/ Pause Symbol…
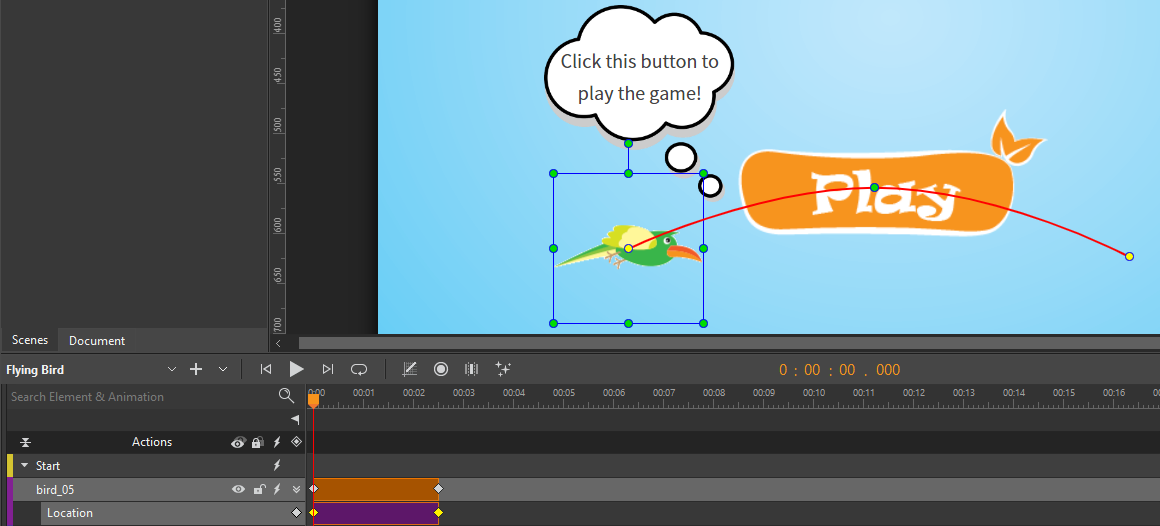
For example, when users hover the mouse over the button, a bird starts flying. When the mouse moves outside the button, the bird stops flying:
Follow the steps below:
- To initiate the flying bird animation: Select the Mouse Enter event > click the Add Action button > Timeline > Start Timeline > select a timeline you want to initiate a movement or animation:
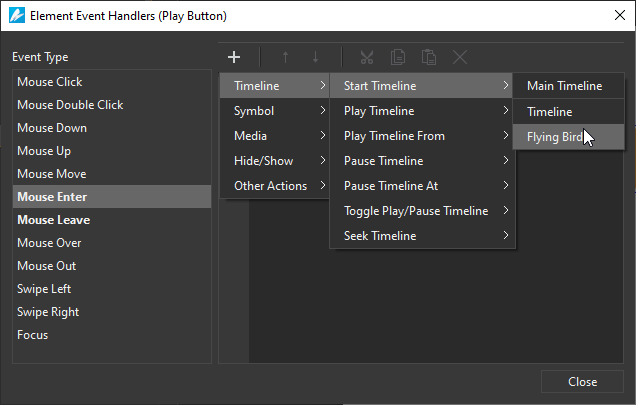
- To pause the animation: Select the Mouse Enter event > click the Add Action button > Timeline > Pause Timeline > select a timeline.
Notes:
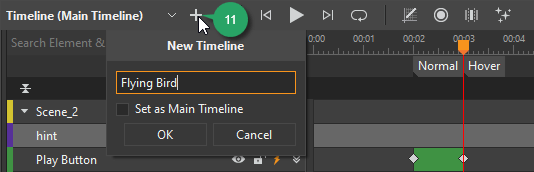
Before adding events – actions as guided above, to create that kind of effect, you need to use the Multiple Timelines and Motion Path features. In detail, you need to:
- Add a new timeline: Click the button (11) to add a new timeline and rename it if you want:
- Insert a new element, for example, a bird image, and create motion path for it using the Location keyframes:
That’s how you can create different types of hover effects in Saola Animates 3.0. In fact, this tutorial just provides you with basic instructions to help you understand the tools to create hover effects. Once you understand how to use these tools, you can completely unleash your creativity to design more stunning and eye-catching effects.
Download Saola Animate 3.0 and let’s unleash your creativity right away!
Related Articles: