In the previous version, you became familiar with animating text by adding keyframes manually. From now on, you can set animations for text by using built-in Saola Animate preset effects. Thanks to that, creating engaging and eye-popping content is just a trouble-free task. To be more precise, you can apply animations for any text-based elements, including texts, DIVs, and shapes. Especially, text animations can be displayed with elements simultaneously or independently. For more details, keep reading this tutorial today.
Let’s explore three parts in turn:
Add and Customize Text
Before creating animations for text, you have to add text-based elements first. Then, you are free to format, style, or apply new text fonts. See Add Text Elements to grab useful information.
Create Text Animations
To create animations for text, follow the steps below:
Step 1: Select the text-based elements, and click Preset Effects in the Timeline pane. After that, pick one effect that you want to apply for text.
See Use Preset Effects for more information.
Step 2: Pay attention to the Text Animation section on the right side of the Preset Effects dialog.
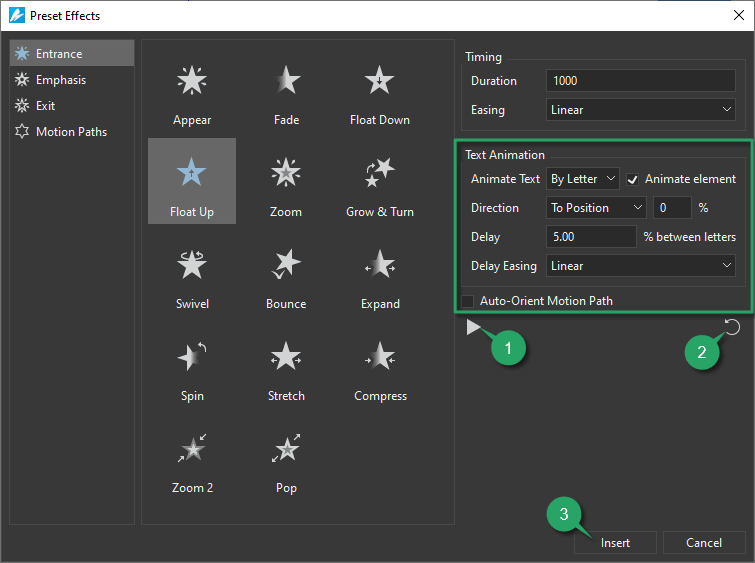
Text Animation section
- Animate Text: Allows animating text By Letter, By Word. By default, None option is selected, which means no text animation is applied to the element.
- Animate element: Allows animating text with or without the element containing the text.
- Direction: Select the direction of the text animation. Basically, Saola Animate provides you several directions to choose from.
- From Start: Animate the text from the first letter/word to the last one.
- From End: Animate the text from the last letter/word to the first one.
- To Center: Animate the text from the first and last letter/word to the center.
- From Center: Animate the text from the middle letter/word.
- From Position: Animate the text from a specific position. Thus, users can enter a value in the next percentage box to define the position.
- To Position: Animate the text from the first/last position to a specific one. Hence, users can enter a value in the next percentage box to define the specific position.
- Random: Animate the text randomly.
- Delay: Set the delay between letters or words in text.
- Delay Easing: Select easing functions for text delay.
- Auto-Orient Motion Path: Allows orienting text in relation to the direction of the motion path.
Note: Click the Preview Effect button (1) to see how your text animates. In addition, if you are not satisfied with the changes, click Restore Defaults (2).
Step 3: Finally, click Insert (3) to finish.
Note:
Exclude the Appear and Disappear effects which have no duration, when you add other animation effects to text-based elements, consider the following:
- The delay time between letters or words appearing is set by the percent of animation duration of the text, other than seconds.
- Other animation effects will be presented in the Timeline pane as effect time bars (colored rectangles). After closing the animation settings dialog, you can still change the delay time. Just drag the text effect time bar (the transparent bar) in the Timeline to get it done.

Edit Added Text Animations
For further customizing, you can double-click its animation segment in the Timeline pane to open the Effect Options dialog. Instead, right-click its animation segment, and select Effect Options.

See Use Preset Effects for more information about customizing this dialog.
Lastly, click OK to complete.
In short, it’s easy to beautify and animate your text with Saola Animate 3. So, feel free to download the app. Moreover, try out this amazing feature.
Related articles: