In today’s fast-paced world, conveying information efficiently is crucial, especially when it comes to training staff on new products, clarifying complex procedures, or sharing essential knowledge.
Among the various methods available, video consistently proves to be one of the quickest and most impactful ways to connect with your audience and ensure understanding.
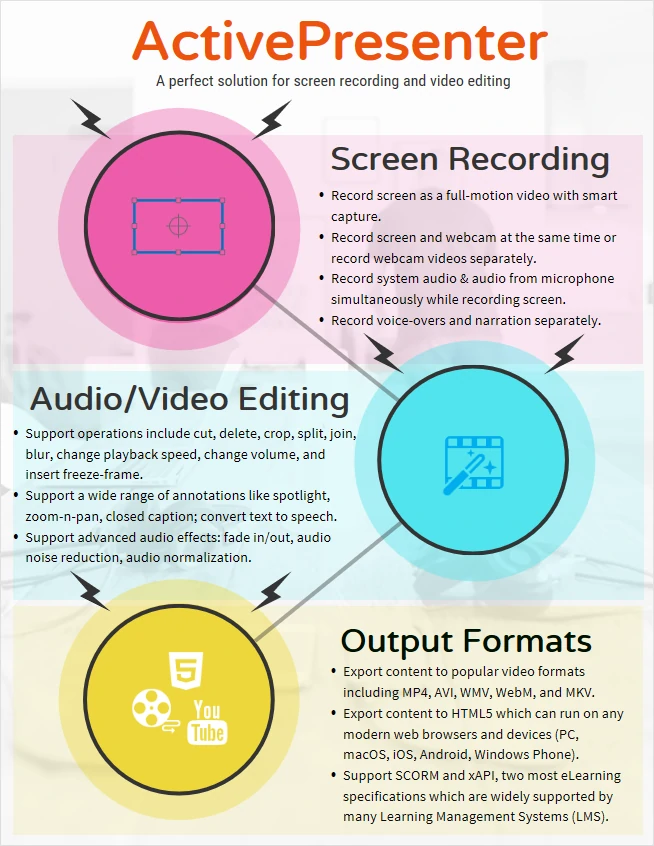
Across a wide range of industries, including technology, healthcare, advertising, and education, instructional videos have become an indispensable tool. If you’re looking for a streamlined way to create these valuable learning resources, ActivePresenter offers a powerful and intuitive solution. This eLearning content builder allows you to simultaneously capture your screen and webcam, enabling you to create personal and engaging tutorials with ease.
Furthermore, ActivePresenter provides a range of annotation features, such as dynamic zoom and pan effects to highlight key areas, and spotlighting tools to direct viewer attention precisely where it’s needed.
This blog post will explore four distinct types of instructional videos that you can readily produce using screen recording techniques, empowering you to enhance your training materials and knowledge-sharing strategies effectively.
4 Types of Instructional Videos with Screen Recording
As its name implies, an instructional video with a screen recording contains instructions to a large extent and uses a screen recorder to capture all the live actions on your screen. More precisely, I’m going to introduce the 4 most common types of them including tutorial, training, presentation, and screencast videos. They are listed in the comparison table below.
| Definition | Length | Characteristics & Examples | |
| Tutorial | You know how to do something in a cool way or you are an expert in any field. It’s a good idea for you to make a screen recording video. In this way, you can teach a process or share your knowledge with others easily and visually. | 2 – 10 mins | It contains step-by-step instructions with explanations, annotations, quizzes to draw the audience’s attention. |
| Training | A form of training includes the necessary facts, processes, data, and information. These elements are used in a video to empower employees, companies, businesses, or organizations. | 5 mins | Real people and scenarios related to topics are likely used in training videos to convey strong messages. However, in terms of delivering difficult and complex content, screen recording is a good choice for you. Because it helps boost the connection between the trainer and trainee. |
| Presentation | A video made of slides played from the beginning to the end of a presentation. Also, you can record audio, webcam, or even add a video of a presenter while slides are being played. | Span the length of the class or presentation, normally 30 – 45 mins | Slide-based presentations are played simultaneously with audio narration, webcam recorded, or a video of a presenter. In this way, the content of each slide, animations, audio, and video are played together, which gives the look and feel of a video. |
| Screencast | A video screen capture usually includes audio narration to teach someone to perform a task or share knowledge. | less than 5 mins | It’s a visual way to communicate an idea or solve a problem because you can quickly create a screencast to answer a question right at the time. Also, this type of instructional video is often used for informal situations. |
Each of these four video types differentiates in use purposes, length, and characteristics. However, they share one thing in common: going through a three-step process including recording screen, editing, and exporting video. More details about these steps will be discussed in the next part.
How to Make Instructional Videos with Screen Recording?
1. Beginning with a Plan
As we may know, the core factor that makes a video popular, or goes viral is obviously its great content. In other words, an impressive video provides new, interesting information and holds the audience’s attention from beginning to end. So, the question is, how can we make such an impressive video? The answer seems to be quite simple: every video starts with a great plan.

First of all, spend some time putting yourself into the audience’s shoes to consider what they tend to learn. Then, make a plan and determine what topic is going to be discussed. Once you have your topic, create an outline with main ideas, and arrange them. The more clearly and logically the video content conveys, the more likely your audiences are going to understand it.
| 💡 Key takeaway: A video’s success relies on excellent content, achievable through thorough planning, understanding the audience, selecting a relevant topic, and presenting information in a clear and logical manner. |
2. Writing a Script
Now you have your plan done. One more preparation before diving into the main steps of creating an instructional video is writing a script.
Scripts always play a vital role in creating instructional videos for many reasons. Above all, you can control every single detail in your video with a well-developed script. Besides, you can also estimate the video length and change it properly thanks to the length of your script. For instance, if there is a time restriction for the video, you will have to adjust the script as concisely as possible. Besides, you are less likely to miss a thing in your video thanks to the fully written script.
| 💡 Key takeaway: Scripts are vital for instructional videos as they offer control over details, enable length adjustment, and reduce the chances of missing important elements. |
3. Finding a Suitable Screen Recording Software
A screen recording application is definitely the first thing that comes to our mind when we have an idea of creating an instructional screen recording video. There is a diverse range of screen recorders in the market. Yet, each one of them is used for a specific purpose. Thus, to choose the one that best suits your needs, you may wonder the following questions. Does the software allow recording narration or webcam? Can I use that app to edit the video after recording the screen? Can I export the content to a video or other formats?
Finding software that integrates all these functionalities can significantly streamline your workflow, allowing you to accomplish all your tasks within a single software.
Fortunately, ActivePresenter, a free screen recorder and video editor with multiple export options, is well-equipped to meet these needs and enhance your productivity.
| 💡 Key takeaway: Choosing the right screen recording application is crucial for instructional videos. ActivePresenter stands out as an excellent choice, offering features like narration recording, webcam use, post-recording editing, and versatile content exporting. |
Before learning how to use ActivePresenter to make an instructional video with screen recording, click the button below to download the outstanding software (free & unlimitd time for trial use) 👇

The following content will cover all the steps to create an instructional video by using ActivePresenter.
4. Record Your Screen
After having the preparation done, it’s time for you to record your screen. First, ensure to close all unnecessary applications and turn off the notifications that may appear when you are recording. Next, open the application you want to record, and start the recording screen with ActivePresenter.
From here, you can choose to record narration and webcam simultaneously or separately. You can also control whether to record the system audio (the audio of the app you want to record) or not. Besides, you can change the cursor effects after recording the screen with the recording settings function. Once you make a mistake, just simply pause and start right before the mistake. In case the video is short, you can discard and record it again to get the smooth motions. This will help you ease your editing later on. For more information, you can take a look at the blog on how to edit video recordings with ActivePresenter.
| 💡 Key takeaway: Prepare for screen recording by closing unnecessary apps and disabling notifications. Use ActivePresenter for flexible recording with options like narration, webcam, and system audio control. |
5. Recording Narration/Converting Text to Speech
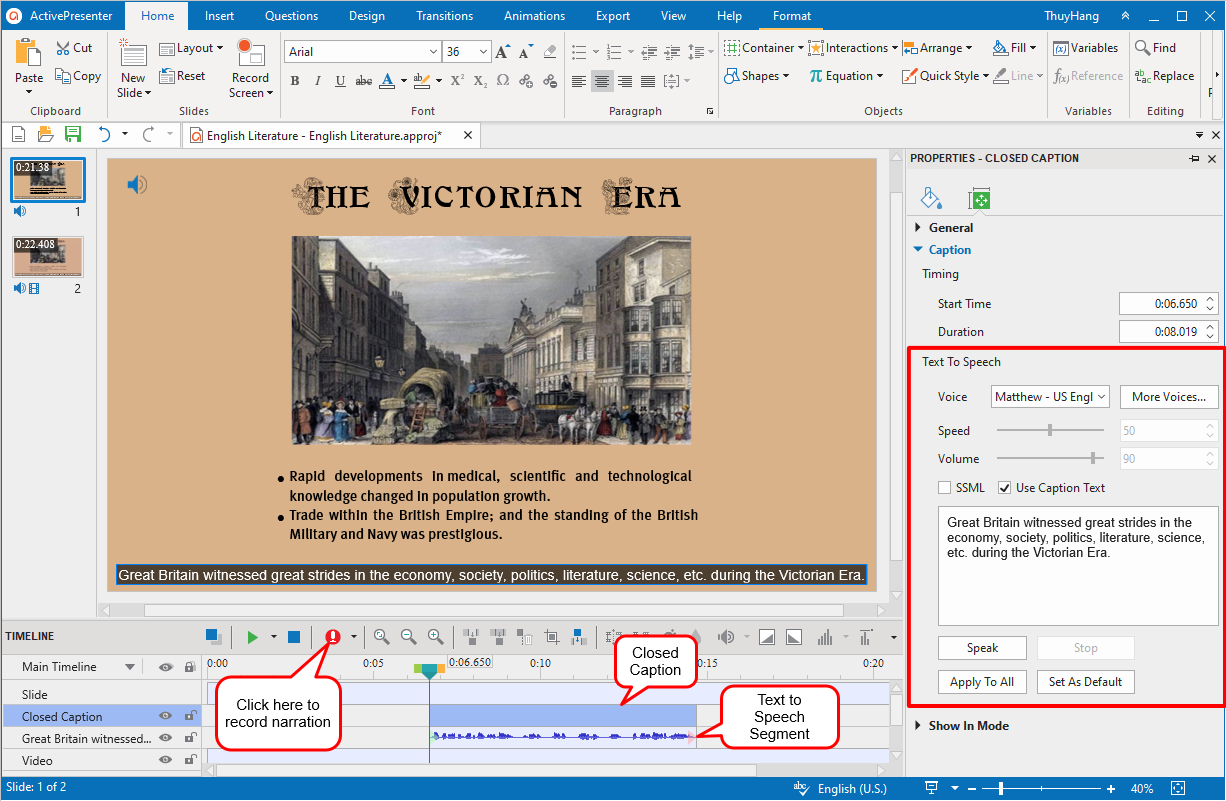
As aforementioned, you can record screen and narration at the same time. Or record your voice-over after recording the screen as the app supports the Record Narration feature in the editing phase. With your script and a recorded video in hand, when you’re ready, start to record a narration. Try to speak clearly and match the tone of the video to appropriately communicate the message. If you make a mistake, just repeat the sentence and continue recording. This way, you will keep the tone, volume, and feeling of the whole video the same. In some circumstances, people have trouble with their voices, such as heavy local accents or speech impairment. Then, using Text to Speech is a perfect solution for them. With Closed Captions added and more voices from Amazon Polly, Google Cloud, and Microsoft Azure, you can convert these Closed Captions to speech with ease.
| 💡 Key takeaway: Record screen and narration together or add narration later with ActivePresenter. Maintain a consistent tone, redo sentences if needed. For voice challenges, use Text to Speech with various voices. |
6. Editing the Recorded Video
With the recorded video and narration done, you will move to the next step, which is editing the video. All the work you have done from the beginning until now is in one slide only. From here, you can edit the video the way you want by using many audio and video editing features supported in the app:
- Cutting out unnecessary ranges by defining them with the Playhead.
- Adding silence/inserting time to video so that you will have some time to explain a concept.
- Using Change Playback Speed if you want to speed up or slow down a part of your video.
- Adding annotations like shapes, zoom-n-pans, spotlights, and animations to the video.
- Reducing noise, changing volume, or fading in/out the background music.
| 💡 Key takeaway: After recording the video and narration, the next step is editing in ActivePresenter. All your work is consolidated into one slide, allowing you to utilize various audio and video editing features. |
7. Exporting the Video
Finally, you will export the video to the format that you want after finishing editing it. ActivePresenter supports exporting to normal videos with many formats such as MP4, MKV, WMV, AVI, WebM, or interactive HTML5 format. Thus, you can publish your video to YouTube, web pages. Or upload your HTML5 courses to an LMS called ActivePresenter Online and share with others easily.

Final Thoughts
Nowadays, you can see instructional videos everywhere, in any field. Because they seem to be the most effective way to give information quickly and visually. It’s now easier to create a video in general and an instructional video in particular.
Ready to bring your instructional video ideas to life? Give ActivePresenter a go and experience firsthand how easily you can create engaging instructional videos.
See Also:
How to Create a Video Presentation with ActivePresenter
Create Training Videos with Screen Recording