A spotlight effect helps maximize the audience’s attention toward an object, text, or image in the slide. With a few clicks, it’s handy to add spotlight effects to slides in ActivePresenter 9. This tutorial will explain how to do it.
In ActivePresenter 9, the spotlight feature keeps the audience focused on one element of the presentation with its minimal design of lights and shades. This tutorial will show you how to use the Spotlight feature through the following steps:
Let’s download the app and start the first step right now:

Insert a Spotlight into the Slide
To insert a spotlight, do the steps below:
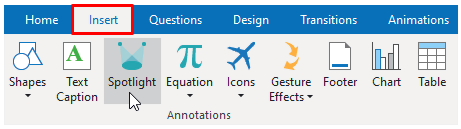
Step 1: Open the Insert tab > Spotlight. Then, the mouse cursor turns into a crosshair.
Step 2: Click or drag the mouse to the specific area on the Canvas and release the mouse button.
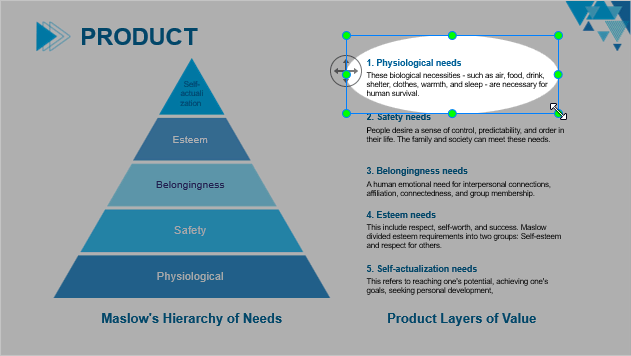
By doing so, a spotlight object is inserted into the slide. It contains 2 parts: the bright (spotlight) and dark area. The former is the specific area that you select to show. The latter is the rest of the screen.
In the following parts, you will learn how to customize the spotlight effects in the app.
Customize the Spotlight Effects
ActivePresenter 9 lets you customize the spotlight effect by changing its shape, position, color and size; adjusting the opacity of the dark area, and modifying its duration.
Change the Spotlight Shape
To change the shape of the spotlight effect, select it > navigate to the Format tab > Change Shape > click a shape in the list.
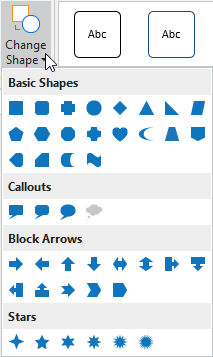
Then, the shape you selected will be applied to the spotlight.
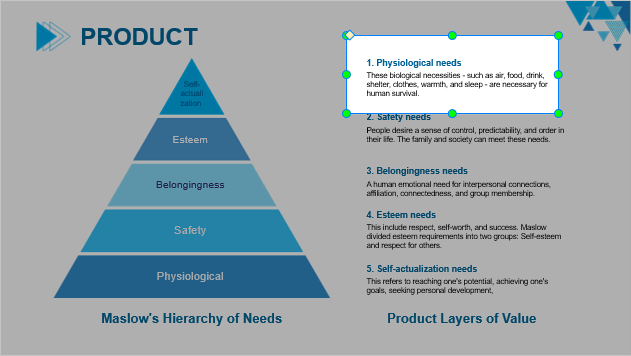
Change the Position and Size of the Spotlight
To change the position of the bright area of the spotlight, simply drag the shape to the desired position. To change its size, drag the resizing handles till it satisfies you.
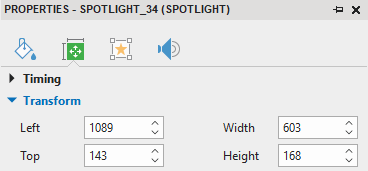
Alternatively, navigate to its Properties pane > Transform section > change the value in the Left, Top, Width, and Height combo boxes.
Adjust the Opacity of the Dark Area
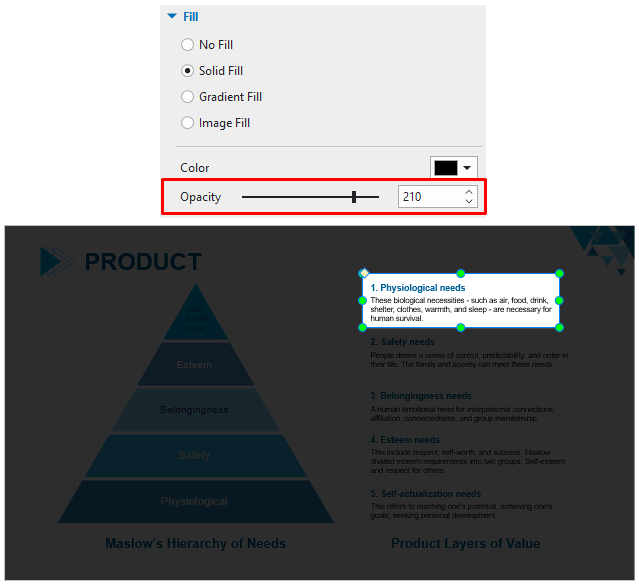
This step is to increase the contrast between the bright and dark areas of the spotlight effects. Therefore, the highlighted object can be seen more obviously. To do that, in the spotlight’s Properties pane > Style & Effects tab > Fill section > change the Color (if needed) > change the value in the Opacity box. Or, drag the opacity slider to archive that.
Modify Start Time and Duration
Like other objects in the project, a spotlight effect has its timing on the Timeline pane. Modifying its start time and duration lets the spotlight appear at the right time. Follow the steps below to get it done:
Step 1: Select the spotlight on Canvas. Its timing on the Timeline pane will be highlighted.
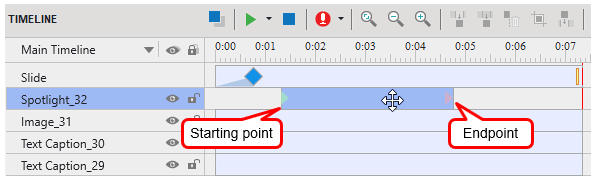
Step 2: Change the start time by doing either of the following steps:
- Drag the object along the Timeline pane to the time stamp you wish.
- Drag its starting point. However, this way will change the spotlight effect’s duration.
- Navigate to its Properties pane > Size & Properties tab > Timing section > enter new values to the Start Time box.
Step 3: Change the spotlight effect’s duration by performing one of the steps below:
- Drag the spotlight object’s endpoint to the position you desired. The duration will show up while you are dragging.
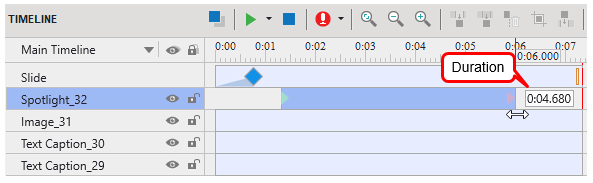
- Change the value in the Duration box of the Timing section in its Properties pane.
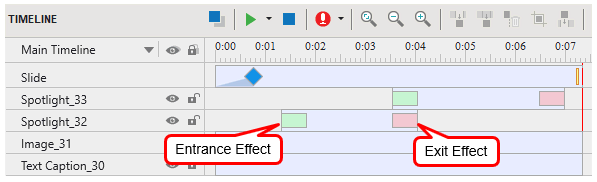
Moreover, you can add the entrance and exit effects to the spotlight effects. To do that, select them and navigate to the Animations tab > select ones in the Entrance and Exit Effects.
Tips: When adding another spotlight right after the first one ends, you should add entrance and exit effects to those objects to make a smooth transition between them. Also, the entrance effect of the second spotlight should appear exactly at the time when the exit effect of the previous one starts.
Note: You cannot highlight several parts of your screen at the same time, which means you cannot add multiple simultaneous spotlights.
That’s all about spotlight effects in ActivePresenter 9. Feel free to contact us if you have any questions. For further information, visit our Tutorials page, YouTube channel, and Blog.
See more: