When listening to your recorded voice, do you feel it sounds weird, not clear, or contains some background noises? Then, have you ever searched for how to make your voice sound better? If yes, this blog can help you find the answer.
Two main factors which help generate a good and clear voice are the voice itself and technical support. Congratulations if you have a beautiful voice with clear and exact pronunciation like announcers. But most of us are not lucky like that. Moreover, even though your voice is not too bad, recording it without experience and in poor condition may make it worse. So, we need some tips and tools to make the voice perfect as recording in a professional studio.
It is a fact that we can’t turn a muddy voice into a good one immediately. This process should be done step by step:
So, let’s deep dive into this blog to know how to make your voice sound better.
1. Before Recording
Preparation is a vital part of any task. It helps the implementation process go smoother and can bring better results. Likewise, whether your recorded voice is acceptable or not partly depends on how well you prepare before recording.
1.1. Prepare the Script in Advance
Don’t ever get started without preparing a script in advance. Without a proper script, you will find yourself getting stuck in the middle or end up with lengthy, rambling audio. Even when you record your voice and the screencast simultaneously, pre-created scripts would do a good job of eliminating unwanted “uh” or “ah” and keeping your speech focused, orderly, and on point.
Nonetheless, it is recommended that you shoot your screencast and add voiceover separately. By focusing on one at a time, you can control your outcome more intuitively.
1.2. Remove Surrounding Noise
Getting out of noisy places when recording is a must to make your voice sound better. Turn off or stay away from electric devices such as fans or air-conditioners. Besides, to accelerate the noise-reducing effectiveness, try to dampen it by utilizing soft or angled materials. Affordable DIY measures may be employed instead of professional sound-proof kits.
1.3. Avoid Carbonated Soft Drinks
You shouldn’t use any soft drinks before you record your voice. Coca-Cola, Pepsi, or other carbonated drinks will produce gas in your stomach which results in awkward voice distortion or embarrassing belch.
1.4. Pick the Right Microphone
To record your voice, you need recording devices or tools for sure. One of the indispensable devices is a high-quality microphone. The better the microphone, the higher the audio quality. A built-in one may help anyway, but it will probably be filled with hisses and clacks of your keyboard. A standalone microphone contradictorily will leverage your audio quality to a new level with greater clarity and noise-refining capacity. There is a vast array of microphones available together with a wide price range on the market. You may want to take a look around.
1.5. Select a Suitable Audio Recorder
Then, you need a tool to record your voice. It can be an audio recorder or any app that has this feature. This blog recommends you ActivePresenter – a powerful authoring tool and free screen recorder as well. This app allows you to record narration straightforwardly. Besides, you can do more than just record your voice:
- Record system audio
- Edit the audio: cut, copy, paste, delete
- Reduce noise
- Normalize the audio
- Add the fade in/fade out effects
- Speed up/Slow down the audio
- Adjust volume
In addition, this app allows you to take screencasts and edit videos. It means that you can create a screencast video from A to Z with only this app. So, download the app now to experience all the above features for free. You can use the app on either your Windows or macOS.


2. While Recording
After everything is ready, let’s get started. However, take note of the below tips to ensure the audio quality.
2.1. Pay Attention to the Narrator’s Posture
The narrator’s posture also affects the voice’s quality. Stand-up posture allows for stronger and smoother airflow back and forth from your belly which contributes to longer breaths and a more sonorous voice. Or otherwise, you should sit up straight and keep your upper body as comfortable as possible.
2.2. Keep the Audio Track in Big Chunks
Multiple screen recorders like ActivePresenter allow for re-recording or partly recording small fractions of the voice-over. However, don’t split your session into too many iotas. Try to record the whole video in one take or separate it into a few long sessions to keep it natural and harmonious.
2.3. Finish Recording Your Voice in One Day
Even professional narrators can incur the problem of realizing their voice tone differs between days. Regaining your previous pitch can be unexpectedly painstaking. So it is advisable that you complete your recording within a day if you want to make your voice sound better, especially when you are not a voice expert.
3. After Recording
You followed all steps and tips above, but the recorded audio may not satisfy you. Let’s see what you can do next to improve your recorded voice.
As mentioned above, ActivePresenter also supports audio editing tools to enhance the recorded audio quality. They are noise reduction and audio normalization.
3.1. Reduce Noise
In some ways, the recorded audio still contains some background noise. So, you need to remove or reduce them to make your voice sound better. After inserting the recorded voice into the app, it will appear on the Timeline pane with visible waveforms. The audio has some silence ranges where you don’t speak. But, if you listen carefully, you will hear some noise. Besides, when you zoom in, you may see very tiny waves. It is the background noise you have to remove.
To remove them, do as follow:
Step 1: Get a noise profile:
- Select a range that contains noise only or the entire audio track.
- Click the down arrow next to the Audio Noise Reduction button > Get Noise Profile.
Step 2: Reduce noise:
- Select the audio track.
- Click the Audio Noise Reduction button.
After that, the Noise Reduction dialog will appear like the image below. In this dialog, you can customize the values if needed.
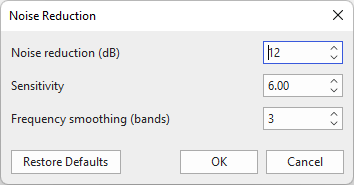
- Noise reduction: Control the amount of volume reduction. Keep this value as low as possible. A higher value can make the noise quieter but distort the audio track.
- Sensitivity: Decide how much of the audio is considered as noise. Similarly, a higher value can remove more noise. But don’t abuse it. It can damage the audio.
- Frequence smoothing (bands): Spread the noise reduction into adjacent bands. However, notice that smoothing can make the audio less clear.
Step 3: Click OK to apply the effect.
Note:
- Noise reduction is a trial-and-error process. If it does not satisfy you, click the Restore Defaults and try again. Adjust the value a little bit each time to find the best suit.
- Applying the noise reduction effect too many times can ruin your audio quality. Also, make your voice sound tiny and robotic.
3.2. Normalize Voice Recording
Voice normalization comes in handy if you want to:
- Get the maximum volume for a quiet audio file without clipping.
- Match volumes of multiple audio tracks recorded at different volumes.
To normalize your recorded voice, do as follow:
Step 1: Select a range or the entire track.
Step 2: Click the Audio Normalization button on the Timeline pane.
After that, the Audio Normalization dialog appears and allows you to customize some properties to make your voice sound better.
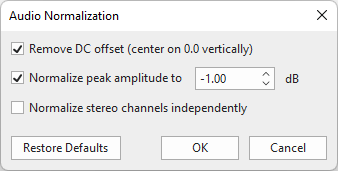
- Remove DC offset (center on 0.0 vertically): The DC offset can distort the audio, so make sure that the waveform is on the 0.0 line. Select this option to remove the DC offset.
- Normalize peak amplitude to a specific value: This helps bring the highest peak to the norm. -1.00 dB is considered an optimal value. Exceeding this value can make the audio distorted and hard to listen to.
- Normalize stereo channels independently: If you have two audio tracks with different volume and want to mix them properly with a uniform volume, select this option. It helps normalize the channels independently, and adjust the amplitude separately for each channel.
Step 3: Click OK to apply.
4. Export Your Voice Recording
If you create screencasts by other applications, you may want to export your recorded voice. To do that, right-click the audio > Export To File. ActivePresenter allows you to export it to popular formats, namely WAV, M4A, MP3, and OGG.
That’s how to make your voice sound better. Hope it helps. Don’t forget to follow our Blog and YouTube channel for more helpful articles and videos.
See more: