When it comes to recording, ActivePresenter allows you record screen and voice easily. That is, you can record both simultaneously during the capture phase. Alternatively, add closed caption, and then insert narration (also voice-over) during the edit phase. You can even record voice-over and attach it to an object. This is useful when you want to guide users with voice prompts.
In this tutorial, we’ll show you how to record narration in the edit phase. For other techniques, see tutorials below:
How to Record Narration
The Record Narration button lets you record voice-over directly from the Timeline pane. It allows you to record your voice even when you play the slide simultaneously. Hence, you can watch the slide playback and time your voice perfectly with the action on the screen. Besides, this button is helpful when you wish to dub your slide in another language. Now it’s time to learn these techniques in detail.
Note: Make sure you plug a microphone into your device before recording. If not, when you click Record Narration, the app shows a notification dialog to remind you of this.
Do as follows:
Step 1: Select a slide you want to insert voice-over.
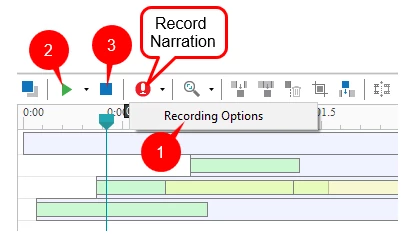
Step 2: Get the recording ready. Click the arrow button next to the Record Narration button > Recording Options (1).
Then, you see this dialog:
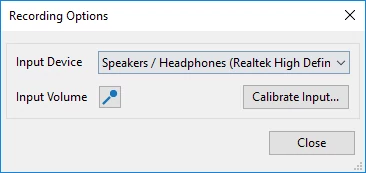
- Select a device from the Input Device drop-down list.
- Click Input Volume to adjust the volume of voice-over.
- Click Calibrate Input… to calibrate the volume level of microphone.
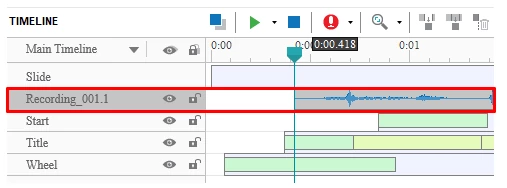
Step 3: In the Timeline pane, place the Playhead at the timestamp that you want to add voice-over.
Step 4: Click Record Narration. Then, this button appears dimmed, and the slide starts playing immediately. Just speak into the microphone as you do normally. In doing so, if you want to pause/resume the recording, click Pause/Resume (2).
Step 5: Click Stop (3) to stop the recording. Then, your narration is recorded as an audio object.
Tip:
- To improve the audio quality, use Audio Noise Reduction to remove noise.
- You can edit and remove the narration the same you as you do with a normal audio object. For example, cut/copy/delete/crop, insert freeze frames, split/join, speed up/slow down audio, change audio volume and fade in/fade out. All commands to perform these tasks are available in the Timeline pane.
That’s about how to record narration in ActivePresenter 7. Stay tuned to get more useful tutorials.